|
October 16th is World Bread Day, and our colleague Hannah Kaminsky of Bittersweet Blog has created something new: the Everything Bagel Babka.
First, a bit of history:
A Queens bagel maker lays claim to having “invented” the Everything Bagel around 1980. There was nothing like it among New York Bagels.
Seth Godin came forward to say that he worked in a bagel factory in 1977, and Everything Bagels were on the menu. Here’s the story. At least we have a general timeline of “around 1980.”
Now for the babka:
Babka is an Eastern European Jewish sweet yeast bread. The word means “little grandmother” in Polish, Russian, Ukranian and Yiddish.
Babka is made from a doubled and twisted length of yeast dough, originally with swirls of cinnamon and sometimes almond paste. It was baked in a loaf pan unless the household owned a fancy Kugelhopf (turban) pan, and topped with streusel.
THE HISTORY OF BABKA
Babka was created in the early 1800s, when housewives, baking challah for the sabbath, had extra dough at hand. They spread the dough with jam or cinnamon, perhaps with some raisins; then twisted it and baked it alongside the challah, as a treat for children.
When Eastern European Jews came to America, they discovered that chocolate affordable, and chopped up chocolate bars found their way into the babka. Until the late 20th century, babka was not well-known outside of Jewish homes and bakeries.
Here’s a longer history of babka.
These original babkas were parve—no dairy products—so used oil instead of butter. Modern bakers switched the oil for butter, and a better babka was born. And it evolved:
Today, “nouvelle babka” is made with Nutella as well as flavors such Chocolate Raspberry, Cinnamon Pecan Sticky Bun, Gingerbread, Matcha Black Sesame, Pumpkin Walnut, Salted Chocolate & Marzipan White Chocolate Cranberry (find these and other babka recipes here—there’s also a gluten-free recipe).
Leftovers (who has leftovers???) can be made into bread pudding.
SAVORY BABKA
You can make the same sweet twists of babka in a savory dough, which is what Hannah Kaminsky did. Instead of cinnamon or chocolate, she used cream cheese and an “everything bagel” topping to create a “bagel, lox and cream cheese” without an actual bagel.
You don’t need the lox and cream cheese. You can use jam or enjoy it plain.
RECIPE: “EVERYTHING BAGEL” BABKA
Ingredients For 1 Loaf
For The Dough
1 cup whole milk
1 tablespoon granulated sugar
1 packet active dry yeast (1/4 ounce / 2-1/4 teaspoons)
2 large eggs, beaten
1/4 cup melted butter or olive oil plus more for greasing
3-1/2 to 4-1/2 cups all-purpose flour
1 teaspoon salt
For The Cream Cheese Filling
1 package (8-ounces) cream cheese
1/4 cup Everything Bagel seasoning, store-bought or homemade (recipe follows)
For The Egg Wash
1 egg, beaten
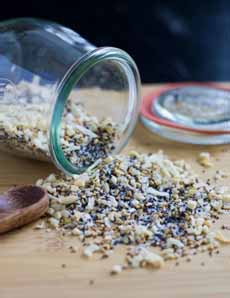
RECIPE: EVERYTHING BAGEL TOPPING
You can use this on avocado toast, eggs, grains, hummus, popcorn and salads.
Add the following ingredients to a small jar or airtight container, then shake to blend.
Ingredients
2 tablespoons poppy seeds
2 tablespoons white or black sesame seeds
1-1/2 tablespoons dehydrated chopped onion
1 tablespoon dehydrated minced garlic
1-2 teaspoons coarse/flaked sea salt
|
|

[1] “Everything Bagel” Babka created by Hannah Kaminsky | Bittersweet Blog.

[2] Sliced and turned into an “everything bagel” sandwich with cream cheese and smoked salmon (photo Bittersweet Blog).
You can make your own “everything bagel” topping, or buy it from Pereg or King Arthur Flour (photo courtesy Take Two Tapas).
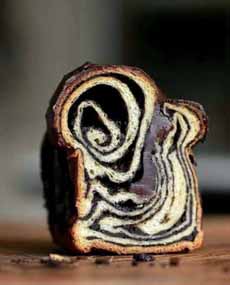
[4] Chocolate babka (photo courtesy @DraganaBakes | Twitter>/font>
|
Preparation
1. GENTLY WARM the milk and the sugar to just above room temperature (no hotter than 100°F). Sprinkle in the yeast and let sit for about 5 minutes, until the yeast re-activates into a foamy froth.
2. MIX in the eggs and melted butter, stirring well to combine. Next add the first 3-1/2 cups of flour and the salt. Incorporate all of the dry mixture into the milk blend: Using a stand mixer, knead on low speed for about 5 minutes with the dough hook attachment. To knead by hand, plan on spending closer to 10 minutes. Add more flour as needed to achieve a smooth, tacky but not sticky dough.
3. ROUND the dough into a ball and place it in a lightly greased bowl. Cover with a clean kitchen towel, rest in a warm spot, and let rise until doubled in volume; about 1 to 1-1/2 hours.
4. PRESS down the dough and divide it into two equal pieces. On a lightly floured surface, roll out one piece into a rectangle of about 14 x 10 inches and smear half of the cream cheese all over the surface. Sprinkle evenly with half of the everything bagel seasoning, and then roll it tightly, lengthwise, like you would for cinnamon buns. Repeat with the remaining dough and fillings. Once you have two filled logs…
5. SLICE both logs cleanly down the middle with a very sharp knife, leaving the bottom intact. Twist the two split rolls together and tuck the messy ends underneath. Place the full loaf in a lightly greased 8 x 4-inch loaf pan and lightly cover with a clean dish towel. Let rise for another hour. As you near the end of the second rise…
6. PREHEAT the oven to 350°F. Gently brush the loaf with the egg wash, and bake for 60 to 75 minutes, until golden brown all over. Let cool completely before slicing.
|