|
September is National Whole Grains Month, an occasion to revisit some oldies but goodies.
Thanks to King Arthur Baking (formerly King Arthur Flour) for this primer on eight* ancient grains.
“Ancient grains” is a marketing term used to describe a category of grains and pseudocereals, that are purported to have been minimally changed by selective breeding over recent millennia.
They are distinguished from more widespread cereals such as corn, rice and modern varieties of wheat, which are the products of thousands of years of selective breeding [source].
King Arthur sells the flour versions ground from ancient grains. They’ve provided the following information, including details on how the flours “bake up.”
Here are their recipes for using the different flours to bake banana bread, cinnamon bread, muffins, pancakes and scones.
The whole grains from which these flours are ground make delicious grain bowls, sides, salads, or substitutes for rice in any of your recipes (check out Bob’s Red Mill or Whole Foods to buy the whole grains).
To start you thinking in the “ancient” direction for the whole grains, there’s a recipe below for Kamut & Kale Salad. Bob’s Red Mill has more recipes.
More than half of them are gluten free: amaranth, buckwheat, millet, quinoa and teff.
1. AMARANTH
Amaranth is versatile, full of whole-grain nutrition, and enhances the flavor of many recipes. It’s naturally gluten-free. Like quinoa, it contains all nine essential amino acids plus lysine, a protein missing in most grains. Amaranth is a good source of iron, magnesium, and phosphorus.
> Flavor: Earthy and peppery.
> Flour Texture: Tender in small amounts; dense in larger quantities.
> Works Best In: Pancakes and quick breads.
> Gluten Free: Yes.
2. BARLEY
Barley is exceptionally high in fiber and low in starch, making it one of the lowest glycemic index (GI) grains you can use. With three times the soluble fiber of oats, it’s a delicious, nutty-tasting way to add nutrition to baked goods.
> Flavor: Subtly sweet and nutty.
> Flour Texture: Often moist in small amounts; crumbly in larger quantities.
> Works Best In: Pancakes and quick breads.
> Gluten Free: No.
3. BUCKWHEAT
Buckwheat is hearty, gluten-free, and a good source of magnesium, copper, and dietary fiber. Enjoy its health benefits, but also turn to it for its bold, nutty flavor.
> Flavor: Bold, toasty, and rich.
> Flour Texture: Moist and tender in small amounts; chalky in larger quantities.
> Works Best In: Pancakes and quick breads.
> Gluten Free: Yes.
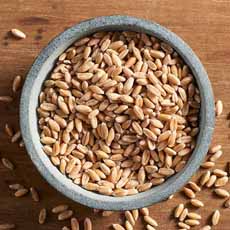
4. KAMUT
Kamut is an ancient variety of durum, with a grain twice the size of modern-day wheat. It contains some gluten; but the gluten format is different from modern wheat, so it may be digestible by people with slight gluten sensitivities. It’s a good source of protein and dietary fiber. In the U.S., the commercial name for kamut is Khorasan wheat (here’s why).
> Flavor: Rich and buttery.
> Flour Texture: Light and tender in small amounts; verging on crumbly in larger quantities.
> Works Best In: Scones, quick breads, and muffins.
> Gluten Free: No.
5. MILLET
Millet is packed with nutrition for flavorful, healthier baked goods. Naturally gluten-free, it adds mild flavor to both sweet and savory recipes. You might recognize whole millet: The small yellow seeds are often used in bird seed mixtures.
> Flavor: Sweet and corn-like.
> Flour Texture: Cornbread-like in small amounts; sandy in larger quantities.
> Works Best In: Muffins and quick breads.
> Gluten Free: Yes.
6. QUINOA
Quinoa adds whole-grain nutrition and essential amino acids to baked goods. Naturally gluten-free, quinoa is one of the only plant foods that’s a complete protein, offering all the essential amino acids including lysine. Quinoa is also one of the grain world’s best sources of potassium.
> Flavor: Bold and nutty.
> Flour Texture: Moist in small amounts; dry in larger quantities.
> Works Best In: Muffins and quick breads.
> Gluten Free: Yes.
7. SPELT
Spelt is an ancient strain of wheat. It’s high in protein and has a nutty, complex flavor that’s sweeter and lighter than that of whole wheat. Gluten-containing spelt is a good source of fiber, iron, and manganese.
> Flavor: Sweet with a taste of whole wheat.
> Flour Texture: Soft and moist in small amounts; dry in larger quantities.
> Works Best In: Pancakes, quick breads, and muffins.
> Gluten Free: No.
8. TEFF
Teff is a whole grain, and also a versatile, gluten-free flour that adds whole-grain nutrition to baked goods. This ancient East African grain is used to make the Ethiopian flatbread, injera. It’s a good source of iron and fiber.
> Flavor: Toasted and earthy.
> Flour Texture: Tender in small amounts; gritty in larger quantities.
> Works Best In: Quick breads and muffins.
> Gluten Free: Yes.
RECIPE: KAMUT & KALE SALAD
Recommendation: It’s a chore to cook and peel fresh beets. Instead, we buy them cooked and peeled from Beetology.
Ingredients For 4-6 Servings
2 cups cooked kamut
6 ounces kale, shredded
1/4 red onion, thinly sliced
1/4 cup fresh mint Leaves, minced
1-1/2 cups seedless red grapes, halved
1 pound red beets, cooked, peeled, and sliced
Optional: feta or goat cheese
For The Vinaigrette
2 tablespoons olive oil
1 tablespoon red wine vinegar
1 teaspoon lemon juice
1 teaspoon Dijon mustard
1/4-1/2 teaspoon salt
Preparation
This recipe was created by Hannah Kaminsky of Bittersweet Blog. If you’d like to serve it warm or hot, begin the assembly as soon as the kamut is fully cooked. Otherwise, chill the cooked grains for at least two hours before proceeding.
|
|
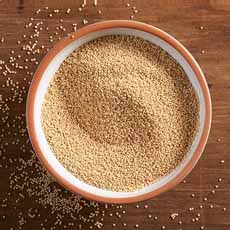
[1] Amaranth, naturally gluten-free. Like quinoa, it contains all nine essential amino acids and lysine, a protein missing in most grains (all grain photos © King Arthur Baking).
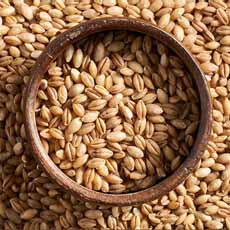
[2] Barley is one of the lowest glycemic index (GI) grains.
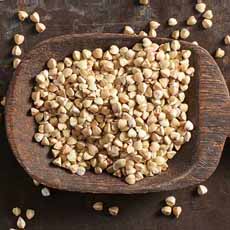
[3] Buckwheat flour is hearty and gluten-free.
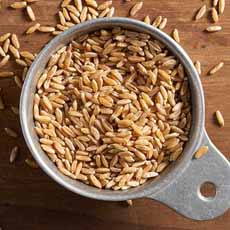
[4] Kamut contains some gluten. In the U.S., the commercial name for kamut is Khorasan wheat. Here’s why.
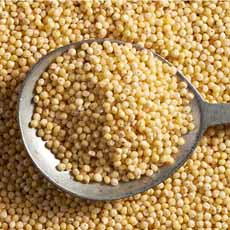
[5] Naturally gluten-free, millet adds mild flavor to both sweet and savory recipes.
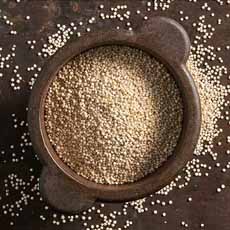
[6] Naturally gluten-free, quinoa is one of the only plant foods that’s a complete protein.
[7] Spelt has a nutty, complex flavor that’s sweeter and lighter than whole wheat.
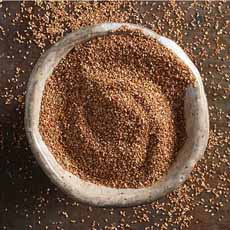
[8] Teff, a whole grain, is a good source of iron and fiber.
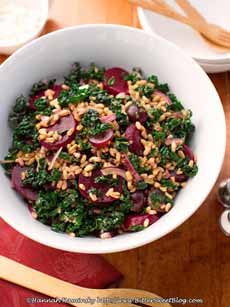
[9] Update your kale salad with kamut. Recipe and photo © Hannah Kaminsky | Bittersweet Blog).
|