|
September 27th is National Corned Beef Hash Day.
When life gives you corned beef, make corned beef hash.
Hash is a mixture of foods cut into small pieces. The term derives from the French hacher (ah-SHAY), which means “to chop.”
To make corned beef hash, the chopped beef is typically mixed with chopped onions, diced potatoes, and spices.
Corned beef hash is most often served with fried or poached eggs—it’s nice to mingle soft yolk with the hash—and toast. Some restaurants add hash browns or home fried potatoes, and even baked beans.
It can be served for breakfast, lunch, or dinner.
Below:
> The history of corned beef hash.
> Ways to serve corned beef hash.
Elsewhere on The Nibble:
> What Is Corned Beef
> The history of corned beef hash.
> The history of corned beef.
> One-pot corned beef hash recipe and 12 more corned beef/other hash recipes.
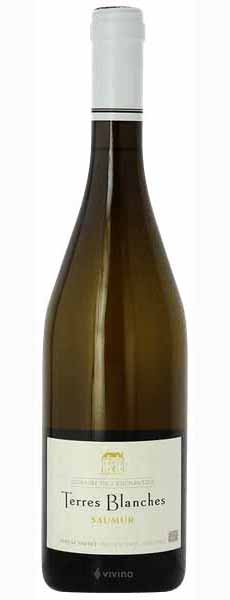
> Corned beef recipes and wine pairings.
> The year’s 25+ beef holidays.
> The different cuts of beef: a photo glossary.
CORNED BEEF HASH HISTORY
The concept of hash likely dates to the earliest times, as cooks diced up whatever ingredients they had and threw them into a pan to make a hot meal.
Tracking recipes through history, there is a 14th-century recipe in England for hache or hachy.
In the 17th century, English diarist Samuel Pepys wrote enthusiastically about a rabbit hash.
The term “hash” was given to dishes where leftover meats were simply sliced, not chopped.
An 18th-century recipe for “excellent hash” seasons a roux with cayenne, herbs, onion, and spices (cayenne, mace, and nutmeg), then thins it with broth or gravy and adds in mushroom catsup, simmering the cold sliced beef in it.
Can’t afford exotic spices and mushroom catsup? Simpler recipes made the dish hearty with boiled potatoes and root vegetables.
Or, simply make “Norman hash,” a dish of gravy and onions served over slices of leftover roast beef [source].
Pick your country and there’s a popular hash dish, although it may well have another name.
There’s everything from pickled beets in Denmark to Worcestershire sauce in England to tomato sauce and lots of garlic in Portugal and Brazil.
Check out these international hash variations.
But let’s get to hash in our own country.
Hash In America
Hash made with a variety of ingredients has been part of the American diet since at least colonial times, as 18th-century recipes attest [source].
As out-of-home eating expanded in the 1860s, beyond the lunch pail, street vendor or tavern, a cheap restaurant was referred to as a hash house or hashery.
(Alas, diners and other hash houses that actually had hash on the menu were replaced in the latter 20th century by national chains such as Denny’s and IHOP).
The Arrival Of Corned Beef
Corned beef arrived in the U.S. later on in the late 19th century. Although the exact origin of corned beef is unknown, it most likely came about when people began to preserve tp meat through salt-curing. This was a common method of preserving meat until the middle of the 20th century when the advent of refrigeration made it less popular.
While the tradition of salting beef as a means of preserving it has been around for thousands of years, the term “corned beef” dates to around the time of the Cattle Acts in the 17th century [source].
Corned beef was brought to the U.S. by Ashkenazi Jewish immigrants (Jews from northern Europe). Corned beef was a popular dish in their Old World lives, and they brought their corned beef recipes with them.
Historical note: Corned beef did not come from Ireland: Irish immigrants to New York City learned to corn beef from their Jewish immigrant neighbors. Corned beef recipes in Ireland migrated back across the pond, from the U.S. to the Emerald Isle.
Corned beef is salt-cured brisket of beef (photo #9). The term comes from the treatment of the meat with large-grained rock salt (photo #10), also called “corns” of salt (because they could be the size of small corn kernels).
The brisket comes from the front chest area of the cow, near the bottom. There are two briskets per animal. The brisket is one of the tougher cuts of meat because the animal works the muscle almost constantly in the course of the day.
This requires slow cooking over low heat, which breaks down the tough fibers, collagen, and connective tissues, thus tenderizing the meat.
Corned beef became popular enough to be canned as early as 1898, as you can see in photo #8—a can of Libby’s corned beef hash.
(This particular photo came from a guidebook published by the Alaska Commercial Company for people traveling to Alaska and the Yukon in the Klondike Gold Rush.)
Before hash became inextricably linked with corned beef, boiled beef hash was made in New England as a way to use up the leftovers from a traditional boiled dinner of beef, cabbage, potatoes, and onions. Also in New England:
Red flannel hash was made with beets instead of potatoes.
Fish hash, including salt cod hash, was another variation.
The 20th Century
During World War I, plenty of corned beef hash was dished out a garrisons and field kitchens. Toward the end of the war, canned corned beef hash appeared in field ration kits.
They continued in World War II, as did corned beef hash and other hash recipes on the home front. The meat had to be purchased with not only money but with ration stamps, limiting the amount of meat† any one person could have.
Because of meat rationing, the dish became popular during World War II. Although born of necessity, it was tasty, and it became an American comfort food.
Corned beef hash remained popular after the war. In 1950, Hormel Foods introduced canned corned beef hash and roast beef hash. Other brands proliferated.
Corned Beef Hash Today
It may not be fashionable, but corned beef hash has many fans. (Our enthusiasm for it comes from our mother and grandmother.)
It remains popular enough that a quick web search found canned corned beef hash:
From Armour, Broadcast, Castleberry’s, Chef-Mate, Hereford, Hormel, LeGoût, Libby’s, SB, and Vanee (a foodservice brand)
Private label brands such as American Pride, Best Choice, Brookdale, Food Club, Great Value, H-E-B, Hostess, IGA, Kroger, Meijer, Palm, Pure Foods, and Puritan.
WAYS TO SERVE CORNED BEEF HASH
In the U.S., corned beef is popular at breakfast and brunch. At restaurants, corned beef (or other) hash is typically served with eggs, toast, hollandaise sauce, and even baked beans.
Chefs at better restaurants have jumped upon the retro aspect of the dish, creating all types of variations.
A fancier recipe, for Corned Beef Hash “Benedict,” was created by William “Billy” Oliva, executive chef of Delmonico’s Steakhouse Restaurant in New York City (photo # 6).
It turned the corned beef hash into patties that replace the Canadian bacon in Eggs Benedict. A spicy hollandaise replaces the conventional hollandaise sauce. Here’s the recipe.
(This recipe is doubly Delmonico’s: Eggs Benedict were invented there in the 1860s.)
Lunch & Dinner
Corned beef hash is not just breakfast food. It also can be served for lunch or dinner with a salad.
Make it more special with any of these, and other, enhancements:
Bacon: crisp and chopped
Crumbled or shredded cheese
Fresh herbs (chives, parsley)
Garlic
Garnish: tortilla chip strips
Green peas
Heat: chiles, sriracha ketchup
Sour cream topping
Sauce: cheddar, béarnaise, hollandaise*, tomato
Spices: beyond European spices to Chinese five spice, curry, red chile flakes
You can throw in anything in the fridge, from scallions to hard-cooked eggs to cherry tomatoes and zucchini.
You can get as creative as you like, from corn kernels in the summer to diced squash in the fall.
You can also change the:
Egg: fried, poached, scrambled, soft boiled
Format: patties, stacks, Eggs Benedict (see photos #4, #5, and #6)
Fusion: cabbage rolls, lettuce cups, stuffed peppers, tacos
Meat: hash from duck or other poultry, fish and shellfish, lamb, pork, roast beef, steak, venison
Toast: biscuits, English muffins, rustic sourdough
Just enjoy being part of the tradition of corned beef hash.
|
|
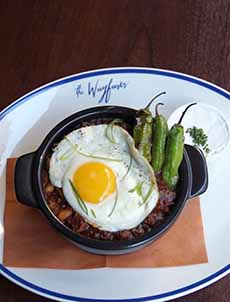
[1] Corned beef hash with a fried egg and a contemporary garnish of fried shishito peppers (photo © The Wayfarer | NYC [now closed]).

[2] Out of the pan and onto the plate. A poached egg can be substituted for a fried egg (photo © Allen Brothers).
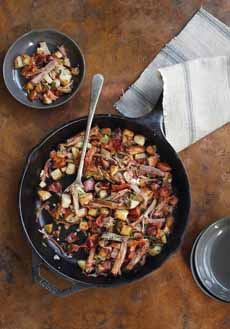
[3] Hash updated with bacon added to the beef. Here’s the recipe (photo © Lodge Cast Iron).

[4] Change the format, as with these corned beef hash patties. Here’s the recipe (photo © Idaho Potato Commission).
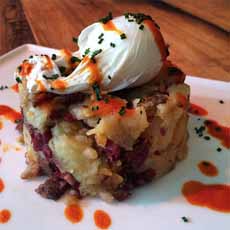
[5] Make it fancy like they do at Murray’s Cheese Bar. Pack the hash into a ring mold and top with a medium egg, poached (photo © Murray’s Cheese Bar | NYC).

[6] Switch out the Canadian bacon on Eggs Benedict for corned beef hash, as they do at Delmonico’s (photo © Delmonico’s Restaurant | NYC).
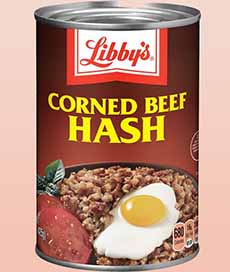
[7] Libby’s corned beef hash, still holding strong after more than 120 years (photo © Libby’s).
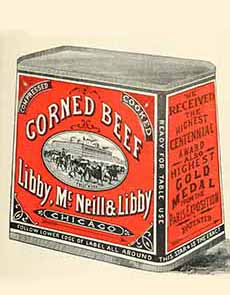
[8] A can of Libby’s corned beef from 1898 (photo Libby McNeill | Public Domain).
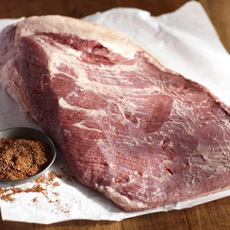
[9] A beef brisket (photo © Double R Ranch | Snake River Farms).

[10] Rock salt. You can buy it from Gourmet Food Store.
|