
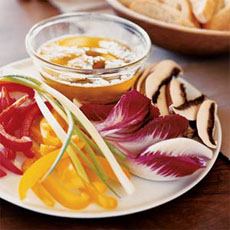
[1] You can buy dipping oil, or make your own for pennies! Nice bottles like this one from A&A Alta Cucina Italia are welcome foodie gifts (photo courtesy Local Market South). [2] Another American tradition: Add a splash of balsamic to the oil (here’s the recipe from Lemony Thyme). [3] Bagna cauda, a hot dipping oil for crudités, is a popular holiday dish in Italy (photo James Carrier | Sunset | All Recipes). |
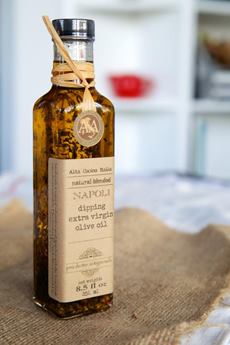
|
Around 1990, an Italian restaurant in San Francisco began to substitute extra virgin olive oil for the butter served with bread (source).
While not an authentic Italian practice, it was a revelation to non-Italian Americans, raised on butter.
Other restaurants followed, and the idea spread nationwide.
At the same time, news of the heart-healthy benefits of olive oil gained traction, and many Americans looked forward to EVOO with their bread basket.
Some continued the practice at home, especially for entertaining. A product known as “dipping oil” or “bread dippers” emerged, to be placed in a dish and served with crusty breads and crostini (small toasted slices) and crudités.
Bread dipping sets appeared, with seasonings plus shallow dishes for the olive oil. “Dipping dishes” could be shallow white saucer shapes, or elaborate designs with olive clusters.
The commercial dipping oils were typically seasoned with Italian herbs. Then, home cooks realized they could:
Season their own olive oil with their favorite herbs, for pennies.
Use a flavored oil for dipping: basil, chile, garlic, truffle, etc., ditto, served plain or with extra seasonings
In addition to dipping bread, the seasoned oil can be used:
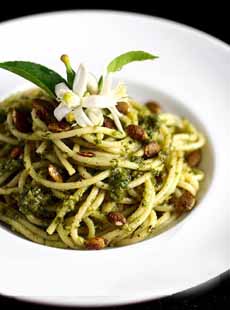
As a pasta sauce: Toss it with spaghetti to create the Roman staple Pasta Aglio, Olio e Peperoncino, spaghetti (or other pasta) with olive oil, minced garlic and red chile flakes.
Drizzle onto grilled fish/seafood and meats, vegetables and starches (potatoes, rice and other grains) on veggies, steaks, chicken, and other grilled meats.
MAKE YOUR OWN DIPPING OIL
Use fresh or dried herbs. NOTE: Make only what you’re going to use at a given time (within a few days). When manufacturers add seasonings to oil, the product is pasteurized, stopping any growth of any bacteria from the add-ins.
So don’t make a whole jar of infused oil to give as gifts, or keep on the shelf. Keep the oil in the fridge; and if you aren’t using it fast enough as a dipper, use it to sauté, dress salads, etc.
Citrus zest
Herbs: minced basil, dill, garlic, oregano, parsley, thyme, etc.
Spices: celery seeds, coriander, cumin, dill seed, fennel, red chile flakes, etc.
Optional: splash of balsamic vinegar
Optional: salt or flavored salt
Extra virgin olive oil or flavor-infused olive oil
Optional: balsamic vinegar
Plus
Sliced crusty bread, regular or lightly toasted
Crudités (raw vegetables)
Preparation
1. POUR the olive oil into a ramekin or shallow dish. Top with the desired amount of seasonings and stir lightly.
2. PLACE on a serving plate with the bread and/or crudités.
|
A RELATED IDEA: BAUGNA CAUDA, HOT DIPPING OIL
Bagna càuda, pronounced BON-ya COW-da, is a variation of the French concept of crudités with dip (photo #3). Bagna caôda is an alternative spelling.
The name means “hot bath”; the dip comprises olive oil and butter, seasoned with garlic and anchovies and served hot.
A specialty of Italy’s Piedmont region, bagna càuda is served during the autumn and winter months, often as part of the Christmas Eve Feast of The Seven Fishes or other Christmas Eve menu.
Want to make your own hot bath with garlic? Here’s a recipe.
|