THE NIBBLE BLOG: Products, Recipes & Trends In Specialty Foods


Also visit our main website, TheNibble.com.

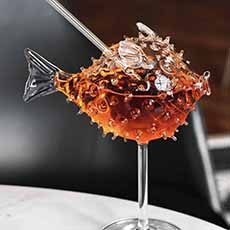
FOOD FUN: Finding Nemo — A Cocktail In A Fish Glass

Enjoy your Aperol Spritz—or other colorful cocktail—in this fish-shaped stemware.

The shape is actually not the Japanese clownfish, the species of orange-and-white-striped hero of Finding Nemo.

Instead, it’s the infamous Japanese blowfish, or fugu.

If blowfish isn’t prepared properly, lethal amounts of the poison tetrodotoxin, which exists in its inner organs, will leak into the flesh—and kill you.

Thus, you can call your drink the Killer Cocktail.

Or you can go for the gentler name of Finding Nemo.
 
 
ABOUT THE GLASSES

The glasses hold 8.5 ounces and are made of borosilicate glass, a newer and superior formulation.

Borosilicate does not crack under extreme temperature changes as regular glass can. Its durability has made it the glass of choice for high-end restaurants and wineries.

Here’s more about it.

This glass-as-art (or is that art-as-glass?) doesn’t come cheap. At $74.16, it is pricey, to say the least.

It was designed by 100% Chef, which designs creative serveware for the restaurant and catering industries.

But for the right person, it’s a special gift.
 
 
>>> GET YOURS AT KOERNER-CO.COM. <<<
 
 
WANT SOME AFFORDABLE FOOD FUN?

Check out these 15 DIY glassware-decorating tutorials, showing beautiful designs you can make yourself.

And although they look like elegant artisan glassware, the article claims that “really pretty simple to make.”


[1] An Aperol Spritz in a “Finding Nemo” glass (both photos © John E. Koerner Company).


[2] Or, more accurately call it Brutus The Blowfish. Get yours here.


Comments off

RECIPE: Red Hot Candy Apples For Halloween


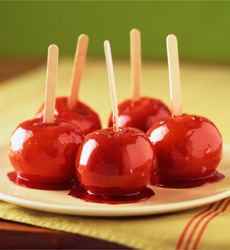
[1] Our favorite Halloween candy is candy apples (photo by Sevenmarie | CreativeCommons is licensed under CC-BY 2.0).


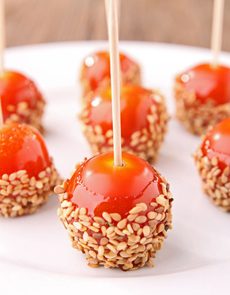
[2] Enjoy them plain, but we like to add a topping, as in the photo below (photo © Splenda).

Candy Apples With Chopped Nuts
[3] Add some toppings, from the sunflower seeds in this photo to candy corn, chopped nuts, Halloween sprinkles, etc. (photo © M. Studio | Fotolia).


Here’s a twist on candy apples: Red Hot Candy Apples, made with Red Hots cinnamon candies or cinnamon oil.

You can whip up a batch in just 20 minutes.

There are more candy apple, caramel apple and chocolate apple recipes below.

CANDY APPLES RECIPE

Ingredients

  • 8 wood craft sticks/popsicle sticks
  • 8 medium Granny Smith or Gala apples
  • 2 cups granulated sugar
  • 1 cup light corn syrup
  • 1/2 cup hot water
  • 1/2 cup red cinnamon candies, like Red Hots, or 1/8 teaspoon cinnamon oil (which we prefer)
  • Optional toppings: Halloween sprinkle mix, candy corn, chopped pistachio nuts
     
    Preparation

    1. Line a baking sheet with aluminum foil. Spray the foil with nonstick cooking spray.

    2. Wash the apples carefully and remove any stems. Stick the apples in boiling water* for 10 seconds, then remove and dry thoroughly—moisture will prohibit the coating from adhering properly. You can do this step first; towel dry the apples, then let them air-dry for an hour or more.

    3. Stick the skewers firmly in the stem ends.

    4. Combine the water, corn syrup and sugar in a medium saucepan over medium-high heat. Stir until the sugar dissolves; then continue to cook, without stirring, until mixture reaches 250° degrees on a candy thermometer. Occasionally wash down the sides of the pan with a wet pastry brush to prevent crystallization.

    5. Once the candy thermometer reaches 250°F, add the cinnamon candies or cinnamon oil and stir briefly to incorporate. Continue to cook, washing down the sides, until the thermometer reaches 285°F.

    6. Remove the pan from the heat and stir the candy coating until it is smooth. Hold an apple by the skewer and dip it into the candy, tilting the pan at an angle and rotating the apple to cover it completely with an even layer. Remove the apple and twirl over wax paper to remove the excess, then set it on the prepared baking sheet. Repeat with remaining apples.

    7. Allow the apples to cool. Candy apples are best enjoyed within 24 hours, when the candy coating will be the most crackly. Over time, ambient moisture and humidity cause the coating to soften.

    TIP: If you have leftover candy syrup, there’s no need to waste it. Spoon it into rounds on a wax paper- or parchment-covered cookie sheet until it hardens into red cinnamon hard candy.

    ______________
    *This removes any wax from the apples and helps the coating to adhere. Alternatively, you can soak them for a few minutes in hot tap water with a dash of cider vinegar, then remove and polish dry with a soft cloth. You can also purchase Veggie Wash, a spray solution that removes the wax from fruits and vegetables.

  •  
     
    CANDY APPLE HISTORY
     
     
    MORE CANDY APPLE, CHOCOLATE & CARAMEL APPLE RECIPES

  • Bourbon Caramel Apples
  • Caramel Apples With Lots Of Toppings
  • Classic Red Candy Apples
  • Easter Candy Apples
  • Matcha White Chocolate Granny Smith Apples
  • Modern Art Chocolate Apples
  • Sugar-Free Red Candy Apples
  • Sugar-Free Caramel Apples
  •   

    Comments off

    TIP OF THE DAY: Vegan Desserts In A Great New Book

    Our colleague Hannah Kaminsky, of Bittersweet Blog, is a regular contributor to THE NIBBLE. She has written six cookbooks!

    A long-time vegan, Hannah oriented her sweet tooth to creating vegan recipes for herself and others who want delicious cookies, cakes, pies and other sweets.

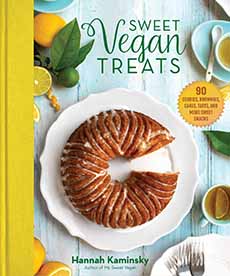
    Her sixth cookbook, Sweet Vegan Treats (photo #1) has just been released.

    It’s timely: November is World Vegan Month; November 1st is World Vegan Day.

    The recipes are so good, that omnivores won’t even suspect they’re vegan. Every recipe was taste-tested and approved by both vegans and non-vegans.

    Since the recipes are entirely plant-based—no eggs, dairy or other animal products—they may also be welcomed by kosher eaters and people with those specific allergies.

    Here’s a sample of the 90 recipes:

  • Almond Avalanche Bars
  • Baklava Tart
  • Bananas Foster Cake
  • Cheesecake Thumbprint Cookies
  • Chili Chocolate Tart
  • Chocolate Chip Cookie Pie
  • Chocolate-Peanut Butter Cookie Bombs
  • Five Minute Chocolate-Coconut Fudge
  • Icebox Cheesecake
  • Lychee Cupcakes With Raspberry Frosting
  • Mocha Revelation Cake
  • Root Beer Float Cupcakes
  • Whoopie Pies
  •  
    There are also breakfast sweets, like Carrot Cake Quinoa Cereal, Figgy Graham Scones, Fruited Focaccia and Strawberry Love Muffins,

    Equally as important, Hannah places vegan baking in its context: the ingredients, techniques, and troubleshooting.
     
     
    >>> GET YOUR COPY FROM AMAZON.<<<


    RECIPE: CRANBERRY RED VELVET CAKE

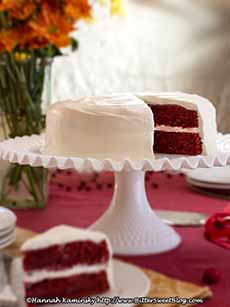
    Since we’re heading into cranberry season, here’s a recipe from the book (photo #2).

    You can turn it from a vegan recipe into a conventional one by substituting the vegan butter and cream cheese and the nondairy milk for conventional ingredients.
     
    Ingredients For 10 to 14 Servings

  • 2-1/2 cups cranberries, fresh or frozen
  • 1/4 cup light brown sugar, firmly packed
  • 2 tablespoons lemon juice
  • 1/4 cup finely diced, steamed beet (about 1 small beet)
  • 2/3 cup olive oil
  • 2/3 cup unsweetened nondairy milk
  • 1/4 cup beet juice
  • 1-1/2 teaspoons vanilla extract
  • 1 teaspoon apple cider vinegar
  • 2-1/4 cups all-purpose flour
  • 1-1/3 cup granulated sugar
  • 1/4 cup natural cocoa powder
  • 1-1/2 teaspoons baking powder
  • 1/2 teaspoon salt
  • 1/8 teaspoon ground cinnamon
  •  
    For The Cream Cheese Frosting

  • 2 (8-ounce) packages vegan cream cheese
  • 1 cup vegan butter, at room temperature
  • 5 cups confectioners sugar
  • 1 teaspoon vanilla extract
  • Pinch of salt
  •  


    [1] A terrific vegan desserts cookbook that also works for people who are kosher or have certain allergies (all photos © Hannah Kaminsky | Skyhorse Publishing).


    [2] It’s cranberry season, so make a Red Velvet Cake with cranberries. They deepen the color and the flavor. The recipe is below. You can substitute conventional butter, cream cheese and milk.


    [3] We can’t wait to bake this “Oreo” pound cake. The recipe, called Cookies & Creme Pound Cake, is made with the vegan version of the cream-filled sandwich cookie.*


    [4] Green Tea (Matcha) Tiramisu.

     
    Preparation

    1. PREHEAT the oven to 350°F and lightly grease and flour two 8-inch round cake pans.

    2. COMBINE the cranberries, brown sugar and lemon juice in a medium saucepan over moderate heat. Stir periodically and allow the mixture to stew for 10 to 15 minutes, roughly mashing the cranberries against the side of the pan to help thicken the mixture.

    Once it reaches a jammy consistency, thick enough to coat the back of a spoon, turn off the heat and let it cool for at least 15 minutes. In the meantime…

    3. TOSS the cooked beet, oil, nondairy milk, beet juice, vanilla and vinegar into the blender and purée on high speed. Blend until completely smooth, pausing to scrape down the sides of the canister if needed.

    4. WHISK together in a separate large bowl the flour, granulated sugar, cocoa powder, baking powder, salt and cinnamon. Make sure that all the dry goods are equally distributed within the bowl before adding in all of the blended wet ingredients along with the stewed cranberries.

    Stir with a large spatula to bring everything together into a smooth batter, being careful not to overmix. A few remaining lumps are just fine.

    5. DISTRIBUTE the batter equally between the two cake pans and tent the pans loosely with foil to prevent the tops from browning. Bake for 28 to 32 minutes, until a toothpick inserted into the centers pulls out cleanly. Let cool completely before frosting.

    6. PREPARE the frosting: Combine the cream cheese and butter in the stand mixer with the whisk attachment installed. Beat the two together thoroughly until smooth and homogenous, before adding in half of the confectioners sugar with the vanilla and salt.

    Start the mixer on a low speed to incorporate the sugar, pausing to scrape down the sides of the bowl with the spatula. Add in the remaining sugar in the same fashion, giving the mixer plenty of time to blend it in.

    7. TURN the speed to high and whip the frosting for a full 5 to 10 minutes, until light and fluffy. Apply to the cake as desired (see photo #2). Because this frosting is fairly soft, it’s advisable to store the finished cake in the fridge just prior to serving, if you make it in advance.

    ________________
    *While Oreos have no animal ingredients in the recipe, they are made on the same equipment as products that contain milk. Thus, people who are kosher or vegan choose a vegan alternative, to avoid the possibility of even tiny amounts of milk.


    Comments off


    © Copyright 2005-2026 Lifestyle Direct, Inc. All rights reserved. All images are copyrighted to their respective owners.