THE NIBBLE BLOG: Products, Recipes & Trends In Specialty Foods


Also visit our main website, TheNibble.com.

RECIPE: Pierogies Primavera & More From Mrs. T’s

Baked Pierogies
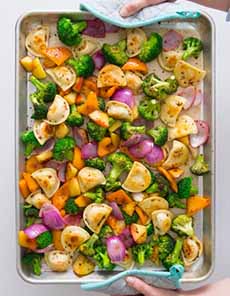
[1] One-sheet Pierogies Primavera. The recipe is below.

Mrs. T's Mini Classic Cheddar Pierogies
[2] Mini Classic Cheddar Pierogies.

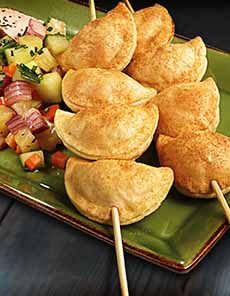
Pierogi Skewers
[3] Mini Pierogi Skewers. Here’s the recipe.


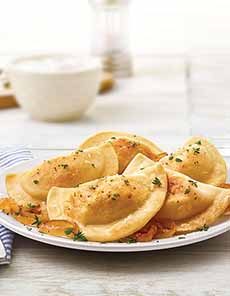
[4] Classic pierogies with butter and onions—and a bowl of sour cream. Here’s the recipe (photos 1-4 © Mrs. T’s).


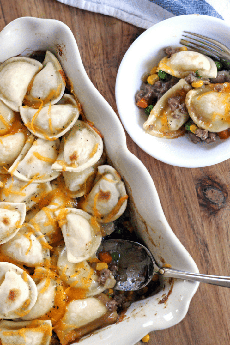
[5] Pierogi “Shepherd’s Pie.” Here’s the recipe from Cleverly Simple (photo © Cleverly Simple)..


October 8th is National Pierogi Day.

Today we have an easy comfort food idea: Pasta Primavera—but not the standard you expect.

It’s made with pierogi, the filled dumplings of Central and Eastern European origin.

There, the pierogi are made by filling made filling pieces of noodle [pasta] dough with a savory or sweet filling, and pinching the edges together like ravioli.

They are then boiling like ravioli, or pan-fried. Unlike Italian filled pasta, the toppings reflect Eastern European cuisine: butter and/or sour cream.

Pasta Primavera got its name from the colorful vegetables combined with the pasta.

In addition to the colorful additions, it gave us pasta lovers a guilt waiver because of the vegetables.
 
 
THE HISTORY OF PASTA PRIMAVERA

The origin of Pasta Primavera has a touch of glamour.

In 1975, New York chef Sirio Maccioni of Le Cirque was hired to cook for an Italian baron and his guests, on a 700-acre Shangri-La Ranch on Robert’s Island, Nova Scotia.

Along with two of his chefs, he began to prepare local game and fish, but eventually the baron and his guests asked for something different.

Maccioni then made pasta and added vegetables, with a sauce of butter, cream and parmesan cheese.

The dish was a success, and Maccioni began to serve it at Le Cirque in New York City where it was a “special” until publicity made it the next hot thing.

A 1977 article in the New York Times, by the power duo Craig Claiborne and Pierre Franey, included a recipe for the dish.

Other chefs subsequently put in their own claims for inventing the dish, but the end of the story is that Pasta Primavera became a staple in homes and restaurants, and remains so to this day.
 
 
RECIPE: PIEROGIES PRIMAVERA

What’s more fun than Pasta Primavera? Pierogies Primavera, an easy sheet pan dinner with veggies and mini pierogies.

This recipe, from Mrs. T’s, is a welcome pasta dish for veggie eaters and a temptation for those who resist their veggies.

Feel free to load up on even more vegetables for an greater balance of veggie to pierogy/pierogi.

Prep time is 10 minutes, cook time is 20 minutes.
 
 
MRS. T’S PIEROGIES

Try Mrs. T’s Pierogies can be baked, boiled, fried, sautéed or grilled

The minis (bite size) are made in Mini Classic Cheddar, Mini Cheddar Seasoned With Bacon, Mini Classic Onion and Mini Four Cheese Medley.

The full-size pierogies are available in 10 additional flavors (don’t hesitate to try the sauerkraut pierogies).
 
 
RECIPE: PIEROGIES PRIMAVERA

This recipe uses the cheddar variety: sharp cheddar cheese blended into seasoned whipped potatoes. You can switch flavors at your discretion

Ingredients For 4 Servings

  • 1 box of Mini Classic Cheddar or your favorite variety Mrs. T’s Pierogies
  • 3 cloves garlic, smashed
  • 1 medium red onion, cut into 1-1/2-inch pieces
  • 1 large apple (such as Honeycrisp), cored and cut into 1-1/2-inch pieces
  • 1 medium orange bell pepper, cut into 1-inch pieces
  • 8 ounces broccoli florets
  •  
    For The Dressing

  • 2 tablespoons olive oil
  • 1 tablespoons whole-grain Dijon mustard
  • 1 teaspoon white wine vinegar
  • 1 teaspoon kosher salt
  • ¼ teaspoon freshly ground black pepper, plus more for serving
  •  
    Preparation

    1. ARRANGE a rack in the middle of the oven and preheat to 400°F. Line a rimmed baking sheet with parchment paper.

     
    2. PLACE the pierogies, garlic and vegetables on the baking sheet.

    3. WHISK the dressing ingredients together in a small bowl and pour over the pierogies and vegetables. Toss gently to combine, then spread into an even layer.

    4. ROAST, stirring halfway through until the pierogies are golden-brown and the vegetables are tender, 16 to 18 minutes total. Serve with a peppermill for those who like more heat.
     
     
    MORE PASTA PRIMAVERA RECIPES

  • Classic Pasta Primavera
  • Pasta Primavera With Shaved Vegetables
  •  
     
    MORE WAYS TO SERVE PIEROGI

    These easy-to-prepare dumplings can be boiled, baked, fried, grilled or sautéd.

    You can serve them classic-style with sour cream (add fresh herbs garnish), with an optional side of sauerkraut.

    We like them as a snack, warm or room temperature, with beer.

    We like to top them with melted cheese, an homage to mac-and-cheese. But there’s so much more:

    But check it out: Our 50 different ways to serve pierogi!

    LOOK FOR MORE RECIPES AND PRODUCT NEWS AT MRSTSPIEROGIES.COM.


    Comments off

    TIP OF THE DAY: Apple Cider Sangria Recipe

    Fall means apple cider, a drink that’s refreshing served cold or hot (mulled cider).

    Here’s a festive drink that adds wine, to make it a sangria.

    Here’s how to set up an apple cider bar for a party.

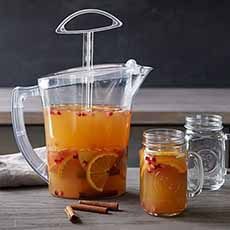
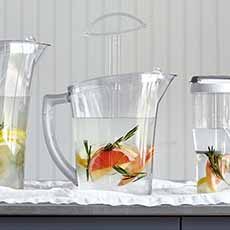
    If you need a pitcher, take a look at Pampered Chef’s Quick-Stir Pitcher. It has a plunger feature, to make it easy to mix powdered drinks, and can be used to serve hot or cold drinks. Bonus: The sleek design fits into your refrigerator door. Here’s more about it.

    You can also serve the sangria from a punch bowl.

    This drink is made with what Americans call apple cider, but in Europe, apple cider is an alcoholic drink.

  • Hard cider is a fermented alcoholic beverage made from the unfiltered juice of apples. The alcohol content varies from a low 1.2% ABV* to 8.5% or higher—some imported ciders can be up to 12% ABV, an average level for table wines.
  • Fresh apple cider is raw apple juice, typically unfiltered. Thus, it is cloudy from the remnants of apple pulp. It is also typically more flavorful than apple juice—although of course, the particular blend of apples used in either has a big impact on the taste. It is pasteurized in order to be sold off the shelf.
  • Apple juice has been filtered to remove pulp solids, then pasteurized for longer shelf life.
  •  
     
    RECIPE: APPLE CIDER SANGRIA

    Thanks to Pampered Chef for the recipe.

    For a non-alcoholic version, substitute 3 cups (750 mL) lemon or orange sparkling water for the wine.

    Ingredients For 8 Servings

  • 4 cinnamon sticks
  • 3 cups (750 mL) chilled fresh apple cider, divided
  • 1 tbsp (15 mL) honey
  • 1 medium green or red apple, cored
  • 1 large navel orange
  • 1/4 cup (50 mL) fresh pomegranate seeds
  • 1 bottle (750 mL) chilled white wine, such as Pinot Grigio
  •  
    Preparation

    1. PLACE the cinnamon sticks, 1 cup of the apple cider and the honey in 2-cup prep bowl. Microwave, uncovered, on HIGH 2 minutes. Carefully remove the bowl from the microwave.

    2. POUR the cinnamon sticks and cider into a pitcher. Place in the refrigerator until ready to combine.

    3. CUT the apple and orange in half lengthwise, and then into slices. Add all of the fruit, the remaining apple cider and and wine into the pitcher; stir.

    4. PLACE the lid on the pitcher, or cover with plastic wrap. Chill for several hours or overnight.

    5. TO SERVE: Pour the sangria into glasses with ice. Top with some of the fruit, if desired.

    Nutrients per 8-ounce serving: Calories 140, Total Fat 0 g, Saturated Fat 0 g, Cholesterol 0 mg, Sodium 0 mg, Carbohydrate 21 g, Fiber 1 g, Sugars 6 g, Protein 0 g.
     
     
    SANGRIA HISTORY
     
     
    APPLE HISTORY
     
     
    APPLE CIDER HISTORY


    [1] Apple cider sangria combines seasonal flavors with wine.


    [2] (both photos © Pampered Chef).


    [3] Apple cider, mixed with ginger beer and infused with vanilla bean and fresh mint. Here’s the recipe.

    Apple Juice Sangria Recipe
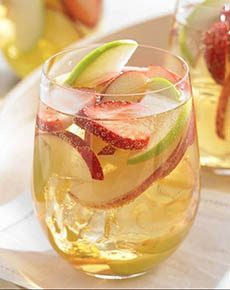
    [4] Apple juice sangria, made with clear apple juice instead of unfiltered apple cider (photos #3 and #4 © USA Apples).

     
    Wild apple trees originated in the mountains of Central Asia. The center of diversity of the genus became eastern [present-day] Turkey.

    The apple tree may have been the earliest tree that humans cultivated. Over the millennia, through selective breeding, farmers improved the fruits [source].

    When the Romans invaded England around 55 B.C.E., they found the locals cultivating apple orchards and drinking apple cider.

    The original apple varieties weren’t for eating. They were bitter, so were pressed for their juice and left to ferment into alcohol.

    The Romans immediately embraced the drink, and cider quickly spread through the Roman Empire and across Europe: from the Germanic tribes to the east, to the Normans in the south (northern France).

    When the Normans invaded England in the 9th century, they returned to Normandy with the rootstock to grow their own apple orchards and left behind the word “cider” for the English language [source].

    Everyone drank cider or beer: adults and children alike. Due to unhealthy water sources, it was the safer choice.

    Fast forward: Colonists brought apples to North America in the 17th century—the bitter cider apples. Apples were being grown in Massachusetts as early as 1630. At the end of the 18th century, Johnny Appleseed traveled west to spread apple trees for cider.

    As in Europe, cider or beer was drunk instead of water.

    Mutation was continually creating new breeds of apples. The McIntosh mutation was discovered in 1796, by a farmer named John McIntosh. It was sweeter, and was best for eating rather than fermenting.

    More sweet mutations followed, and today, we have as many varieties of sweet apples as cider apples.


    CHECK OUT WHAT’S HAPPENING ON OUR HOME PAGE, THENIBBLE.COM.


    Comments off

    TOP PICK OF THE WEEK: Summer Is Inside Canned Tomatoes


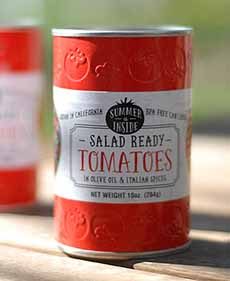
    [1] The inviting package design © Jamie Stark | Stark Designs).


    [2] Here’s the recipe from Here’s a most delicious French bread pizza recipe from Nicole of Cooking For Keeps (photo © Cooking For Keeps).


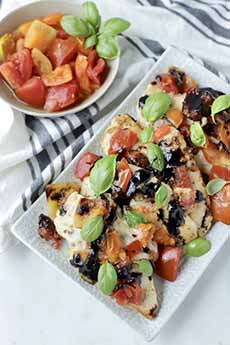
    [3] Caprese Chicken Skillet. Here’s the recipe from Rachel’s Healthy Plate (photo © Rachel’s Healthy Plate).


    [4] Gourmet grilled cheese sandwich on brown bread with cheddar, feta, arugula, red onion and tomatoes (photo © Wisconsin Cheese).
     
     
    >>>CHECK OUT<<<
    THE HISTORY OF TOMATOES


    Vine-ripened tomatoes are one of the treats of the summer table.

    That’s why this is a sorrowful time of year: The days are getting shorter, and there are no more summer tomatoes.

    But we have a solution for people who want to enjoy great tomato flavor during the off seasons: the Summer Is Inside brand of canned tomatoes (photo #1).

    Canned tomatoes, you say?

    Yes! Summer Is Inside tomatoes are standing by to brighten your meals all year long.

    Grown in California by family farmers, the tomatoes go from field to can in five hours. The process locks in all the flavor, freshness and nutrition.

    Unlike other canned tomato products, Summer On The Inside tomatoes have a firm texture that works well in many recipes.

    The Salad Ready Tomato Wedges are available in two varieties, classic red and tri-color. The tri-color variety features red, orange and yellow tomatoes.

    Each variety is marinated in olive oil and an Italian spices blend: garlic powder, onion powder, other spices, vinegar, sugar and salt.

    Even though the tomatoes are in oil and vinegar and Italian spices, the seasonings do not overpower the fresh, seasonal inherent tomato flavor. (They do, however, make them delicious to eat straight from the can.)

    Without doubt, Summer On The Inside is a superior solution to most canned tomato brands, and to the bland, mealy, produce department tomatoes that are picked green, turned red with ethylene gas, and sold hard.
     
     
    HOW WE USE SUMMER ON THE INSIDE CANNED TOMATOES

    The tomatoes are ready-to-eat. If you’re going to drain the liquid (e.g. for these uses), save it to use as a dressing, or a flavoring to other dishes (soups, stews, etc.)

    We’ve even added some vodka to the liquid for a Bloody Mary “Light.” But for more substantial cuisine, we use them in/on/as:

  • Caprese salad
  • Garnishes
  • Grilled cheese and other sandwiches (photo #2 and #4)
  • Green salad
  • Panzanella
  • Raw tomato substitute
  • Tomato tartlets
  •  
    There are more uses below.
     
     
    FINDING SUMMER ON THE INSIDE CANNED TOMATOES

    You can find Summer Is Inside with the label as shown in photo #1, in the canned tomato section of your grocery store. The brand name is inside the black tomato in the white band.

    But the manufacturer, Pacific Coast Producers, also private-labels its canned tomatoes to numerous retailers.

    For example, at Walmart, you’ll find the embossed can in red stripes with a white center, with the store’s Great Value brand replacing Summer On The Inside.

    The red and white color bands, with the embossed tomatoes in the red bands, will clue you in.
     
     
    USES FOR CANNED TOMATOES

    We typically use imported San Marzano or domestic San Marzano-style canned tomatoes. Summer On The Inside is just as good, and even better on green salads.

    For many of these recipes, you can simply open the can and put the tomatoes to work.

    But you can also drain them and roast them in the oven until they’re caramelized. Then, serve them with grilled cheese, on any cheese sandwich on toast, or as a vegetable side.

    More ways we used canned tomatoes:

  • Chili and Sloppy Joes
  • Braises
  • Mac and cheese (one of our favorite uses—just drain and mix in before cooking)
  • Pasta salad
  • Pasta sauce
  • Salsa
  • Shakshuka or a side with eggs
  • Simmer sauce (chicken, fish, grains, meatballs, etc.)
  • Skillet dishes (photo #3)
  • Tomato soup
  •  


    Comments off


    © Copyright 2005-2026 Lifestyle Direct, Inc. All rights reserved. All images are copyrighted to their respective owners.