|
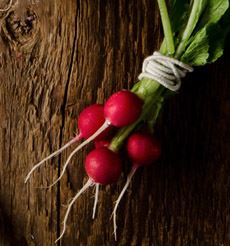
Low in calories, high in crunch, often with a hot pepper spiciness, radishes (Raphanus sativus) can be a fun food. They’re nutritious*, too.
If you’re old enough, you may remember the time when radish “roses” were almost as common a plate garnish a sprig of parsley. You sliced the rose in a certain way (or used a radish cutter), then dropped the radish into cold water, where the slices opened up into “petals.” As a child, we ate them petal by petal.
There are numerous varieties of radish beyond the red globe “supermarket radish,” known as the Cherry Belle.
Different varieties have varying levels of heat-spiciness, mostly depending on growing conditions. Even within a particular variety, it can vary based on soil, water, hot vs. cold weather, early versus late harvest and other factors.
Some people like them hot, others not so much. Unfortunately, you have to sample one to know what you’ve got.
RADISH HISTORY
The wild radish may have originated somewhere in southeast Asia, and developed by farmers in central Asia, China and India.
Radishes enter the written record in the third century B.C.E. and appear in Greek and Roman texts in the 1st century C.E., which describe small, large, round, long, mild and sharp varieties. The name comes from the Latin word “radix,” which means “root.”
The radish was one of the earliest vegetables to be brought over from Europe (source).
Burpee currently sells 30 varieties of differing shapes, sizes and colors.
Our favorite is the watermelon radish: When sliced, it resembles a slice of watermelon (photo #6).
Runner up: Mardi Gras radishes, a mix of seeds that yield black, purple, white and yellow radishes. (Easter radishes are a similar mix—photo #5).
See six different types of radish below.
WAYS TO SERVE RADISHES
Breakfast
French breakfast radishes. Serve with toast and butter, or with avocado toast.
Egg garnish. Slice or grate to add heat to any style of egg.
Appetizer & Snack
Crostini or tea sandwiches. For crostini, toast slices of baguette and top with sweet butter or pesto, thinly-sliced radish, a bit of cress or other green, and a pinch of sea salt. For tea sandwiches, trim the crusts from un-toasted white or whole wheat bread.
Raw, with butter and sea salt. It’s a popular dish in France. If you can find longer-shape radishes, cut a slice lengthwise, drop into cold water to open a channel, and pipe in softened butter. Otherwise, slice round radishes in half horizontally, butter the bottom half and serve like poppers.
Pickled. Any type of radish can be quickly and easily pickled, for snacking, sandwiches, garnish, etc. Here’s the recipe.
With ricotta. Put together a plate of fresh radishes and a dish of mild ricotta drizzled with olive oil. We enjoy this as a weekend breakfast with crusty rustic bread.
Crudités and dip! In decades past, the predecessor of the crudité plate was the relish tray, with celery, radishes and olives.
Lunch & Dinner
Julienned. Toss radish strips into salads, scrambled eggs, rice and grains and anything that needs some color and crunch. Duda Farm Fresh Foods sells radishes already trimmed, sliced into matchsticks and coins (see photo).
Boiled or steamed. Top with a cheese sauce, Eastern European-style.
Garnishes: Sandwiches (a must on Vietnamese bánh mì), burgers, tacos, soups, sides.
Salads: In addition to green salads, see the Radish Salad recipe below.
Roasted or braised: A great solution to deal with radishes that are too hot. The heat of the oven removes much of the heat from the radishes, making them sweet and buttery. If you don’t want to turn on the oven, braise on the stove top in butter until tender.
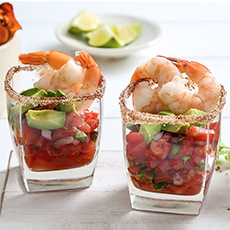
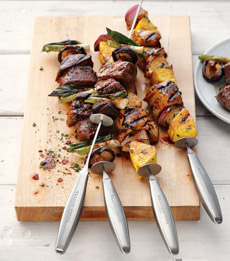
More: Kabobs, chilled radish soup and as many options as you can research or invent.
Cocktails
Cocktail garnish: notch a radish or a thick slice on the rim of a Bloody Mary or Martini.
RECIPE: RADISH & CUCUMBER SALAD
This recipe from Natasha’s Kitchen is a Ukranian influence.
The sour cream dressing helps to neutralizes the pungency of the radishes. Easy to make, prep time is just 10 minutes. It goes very nicely with grilled meats and anyplace you’d serve cole slaw.
Ingredients For 6 Side Servings
1 English cucumber, thinly sliced
2 bunches radishes, thinly sliced
1 large red bell pepper, diced
1 bunch scallions, chopped
3/4 cup sour cream
1 teaspoon Dijon or whole grain mustard (more to taste)
3/4 to 1 teaspoon salt, or to taste (substitute half garlic salt for a touch of garlic flavor)
Fresh-ground black pepper to taste
2 teaspoons fresh chopped dill (more to taste)
|
|
[1] The basic “supermarket radish” is called the Cherry Belle (photo courtesy The Chef’s Garden).

[2] Black Spanish radishes: the spiciest (photo courtesy Good Eggs).
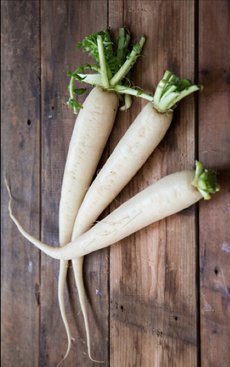
[3] Daikon, Japanese radish (photo courtesy Good Eggs).
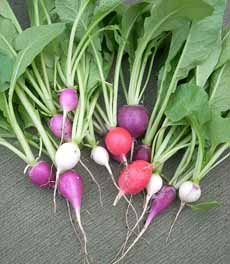
[4] Easter egg radishes, produced from a mix of seeds with different colors (photo courtesy Jengod | Wikipedia).

[5] French breakfast radishes. Serve them with toast and butter (photo courtesy Burpee).

[6] Watermelon radishes (photo courtesy Rodale Institute).
|
Preparation
1. COMBINE the cucumbers, radishes, bell pepper and green onion in a medium salad bowl.
2. COMBINE the sour cream, dill and salt in a small bowl.
3. STIR the sour cream dressing into the salad just before serving.
What About The Radish Tops?
If the radish leaves are fresh and sprightly, consider leaving them on. They’re edible and pretty (photo #3).
In fact, the leaves are the most nutritious part of the plant. They have a very mild flavor, like lettuce.
TYPES OF RADISHES
There are many varieties of radish, but here are the key ones to look for in markets:
Black Spanish Radish: The spiciest radish, and the one that looks least like a radish (photo #2). It can be pickled or grated like horseradish.
Cherry Belle Radish: The red, round supermarket radish (photo #1). Slice thin and toss into salads or onto tacos.
Daikon Radish: This long, white Japanese radish looks more like a parsnip than a radish (photo #3). A mild radish, it can be used any way. It’s shape enables it to be shredded garnish as a garnish or a base, as it’s used with sashimi.
Easter Egg Radish: So called because they come in a variety of colors, like easter eggs: pink, purple, red, and white (photo #4). They are similar in taste and texture to the basic Cherry Belle radish.
French Breakfast Radish: They’re small and mild in flavor, which is why you can eat them for breakfast (photo #5). French people enjoy them with sweet butter. You can also roast them.
Watermelon Radish: More mild in flavor but vivid in color—green and rose, similar to the colors of the watermelon for which it is named (photo #6). Slice it thin for salads or garnishes, cut them a bit thicker for crudités. You can pickle them, too.
_________________
*Radishes are rich in folic acid, potassium and vitamin C.
|