|
July 29th is National Lasagna Day. Lasagna is one of our favorite foods, but if we make a lasagna, we eat the whole thing. Not to mention, we spend the whole day making it. One of these days, we’ll try Crockpot Lasagna.
But one way to get a quick lasagna fix is ravioli lasagna, with layers of purchased ravioli replacing the lasagna noodles (and adding the flavor of their fillings, from cheese to pumpkin). Just add sauce, mozzarella and more cheese.
You can make something similar with angelotti, tortellini and other stuffed pasta; and also with rigatoni, penne or other tubular pasta: Anything to avoid wrangling those lasagna noodles (here are the different types of pasta).
You can make gluten-free lasagna with GF noodles, or with zucchini ribbons or potatoes (white or sweet).
And then, there’s this lasagna soup recipe from Eat Wisconsin Cheese. Prep time is just 10, minutes cook time is 30 minutes.
Are there other ways to enjoy lasagna? We’ll keep looking!
RECIPE: LASAGNA SOUP
Ingredients For 6 Servings
1 pound bulk sweet/mild Italian sausage
1 yellow onion, thinly sliced
4 garlic cloves, minced
Optional: 1/4 teaspoon red chile flakes
1 can (28 ounces) crushed tomatoes
4 cups (32 ounces) chicken stock
1-2 cups water
8 ounces lasagna noodles (not no-boil), broken into 1-2-inch pieces
1/4 cup fresh basil leaves, plus additional for serving
1/4 teaspoon black pepper
2 cups fresh spinach, packed and roughly chopped
Salt to taste
2 cups (8 ounces) mozzarella cheese, shredded
2 cups (16 ounces) ricotta cheese
1/2 cup (2 ounces) parmesan cheese, shredded
Preparation
1. HEAT a Dutch oven or large pot over high heat. Brown the sausage for 5 minutes, breaking it up as it cooks. Add the onions; cook 3-4 minutes, until the onions are softened and the sausage is cooked through.
2. ADD the garlic and red chile flakes; cook 1 minute. Add the crushed tomatoes, scraping the bottom of the pan with a wooden spoon. Add the stock, 1 cup water, lasagna noodles, basil and pepper. Bring to a boil.
3. REDUCE the heat to medium-high; cook at a gentle boil 10-12 minutes, until noodles are cooked through, stirring occasionally to prevent noodles from sticking to pot.
4. STIR in the spinach. Add salt to taste. If the soup is too thick, add the additional 1 cup of water or portion thereof. Remove from the heat.
5. SERVE: Divide the mozzarella among 6 serving bowls and ladle the soup over it. Top with spoonsful of ricotta, parmesan and additional basil.
THE HISTORY OF LASAGNA
When the military might of Rome overthrew Greece in 146 B.C.E., they recognized Greece’s superior culture, and took much from it, including fine food.
The classic Italian pasta dish, lasagna, did not originate in Italy but in ancient Greece!
Lasagne, the modern plural form of the individual lasagna noodles, is derived from the Greek laganon, the first known form of pasta. The dish it was baked in was a lasagnum.
Laganon was not the modern-age lasagna we know, made with traditional Italian ingredients. It was composed of layers of noodles and sauce and baked. The noodles were flattened dough, sliced into strips and baked without boiling.
Today, laganon remains the Greek word for a thin flatbread. And “Greek lasagna” is pastitsio, with very similar ingredients to Italy’s lasagna bolognese, tomato sauce with ground meat).
It survives today as the Greek dish, pastitsio, with ground beef and béchamel sauce.
THE ROMANS IMPROVE GREEK LAGANON
The Romans served pasta-like layers with other fillings between these layers, and this is how modern lasagna came to be. The first known lasagna recipe of the modern age (or at least, the Middle Ages, a.k.a. the medieval period) is in a cookbook published in Naples in 1390.
Also a layered dish, it was laboriously crafted by the cooks of the wealthy, with many more ingredients between the layers than sauce and cheese, including meats, offal (such as chicken livers), vegetables and hard-boiled eggs. It was a special-occasion dish.
Regional variations ensued: besciamella (the white sauce béchamel—here’s a recipe) and seafood on the coast. Where meat was plentiful, it was ground into a sauce; when meat was scarce, there were layers of vegetables.
|
|
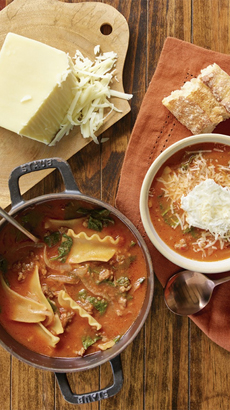
[1] Ways to enjoy lasagna. First up, Lasagna Soup, today’s recipe (photo © Eat Wisconsin Cheese.

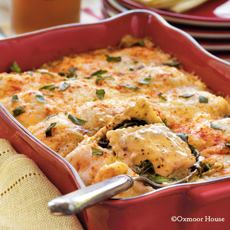
[2] Classic lasagna (photo © Carrabas Italian Grill).
[3] Ravioli lasagna. Here’s the recipe from Gooseberry Patch (photo © Gooseberry Patch).
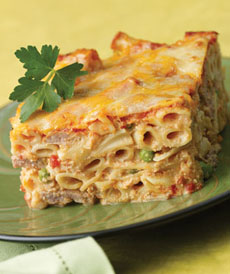
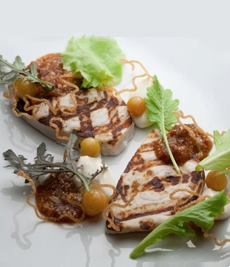
[4] It looks like rigatoni lasanga, but it’s Greek pastitsio (photo © Westside Market | NYC).

[5] Zucchini and radicchio lasagna. Here’s the recipe from Pasta Fits (photo © Pasta Fits).
|
At some point, the Italians changed the name from lasagnum, the name of the baking dish, to lasagna (spelled lasagne in the U.K.), the name that denoted a layered pasta dish with wide ribbon noodles.
The first version that came to the U.S. in the 1880s with the wave of southern Italian immigration was with marinara, a simple tomato sauce (in northern Italy, spinach pasta and besciamella (béchamel) were the preferred ingredients. Finding affordable meat in the U.S., ground beef or pork, and/or sausage, was added to the sauce; and large meatballs, not found in Italy due to the price of meat, became popular with the dish of spaghetti.
Since then, chefs and home cooks alike have been preparing their signature recipes. Our mom’s included, between the layers of lasagna noodles, meat sauce and ricotta, a layer of mini meatballs (an authentic Italian ingredient), a layer of sliced sweet Italian sausage (with fennel!), and a layer of pesto (just basil, parmesan and oil, no nuts). All layers got a topping of fresh-shredded parmesan, and the whole was crowned with a thick topping of mozzarella.
We’ve never had a better lasagna.
|