Preparation
1. MAKE the crust. Preheat the oven to 350°F and generously butter the bottom and side of a 9- or 8-inch springform pan (preferably nonstick). Wrap the outside with aluminum foil, covering the bottom and extending it all the way up the side (this prevents leakage).
2. SIFT together the flour, baking powder and salt in a small bowl. In a large bowl, beat the egg yolks on high for 3 minutes with an electric mixer. With the mixer running, slowly add 2 tablespoons of the sugar and continue beating until thick, light yellow ribbons form in the bowl, about 5 minutes more. Beat in the extracts.
3. SIFT the flour mixture over the batter and mix it with a spoon, until there are no remaining white flecks (do not over-mix). Blend in the melted butter. In a clean bowl using clean, dry beaters…
4. BEAT the egg whites and cream of tartar together on high, until frothy. Gradually add the remaining sugar and continue beating until stiff peaks form (the whites will stand up and look glossy, not dry).
5. FOLD about one-third of the whites into the batter, then fold in the remaining whites. If there are still a few white specks, they’ll disappear during baking.
6. GENTLY SPREAD the batter over the bottom of the pan and bake just until set and golden (not wet or sticky), about 10 minutes. Watch carefully and don’t let the top brown. Touch the cake gently in the center. If it springs back, it’s done. Remove the pan to a wire rack to cool.
7. INCREASE the oven heat to 375°F and prepare the filling. With the mixer on low, using the paddle attachment, beat the cream cheese until smooth. Then beat in the sweetened condensed milk, vanilla and almond extract. Finally, beat in the eggs.
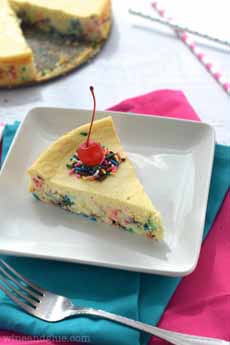
8. CONTINUE mixing until you can no longer see any yolk (it’s O.K. if the batter has a few lumps). Slowly mix in the sprinkles with a spoon.
9. POUR the batter into a 9-inch springform pan and bake for 40 minutes. Turn the oven off and let the cheesecake sit for an additional half hour. Remove the pan from the oven, let cool, and chill at least four hours or overnight in the fridge.
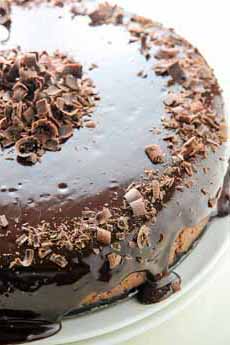
10. MAKE the optional ganache. Place the chocolate in a large, heatproof bowl and set aside. Heat the cream in a small saucepan over medium heat, until it begins to bubble around the edges, about 2 minutes. Remove from heat and pour it over the chopped chocolate. Let stand for 1 minute.
11. WHISK the mixture until the chocolate melts and a smooth ganache forms; about 2 minutes. Pour the ganache over the cheesecake. Leave plain or garnish as desired. If you don’t use sprinkles to garnish, the birthday cake underneath will be a surprise. Refrigerate until ready to serve.
MORE BIRTHDAY RECIPES FROM LISA
Cheesecake Batter Cookie Dip
Birthday Cake Bark
|


