|
If your Mother’s Day celebration includes nougat fans (torrone in Italy, where it originated), whip up a batch of this Strawberry Pistachio Nougat from chef and cookbook author Samir Nosrat. There’s also nougat history—the roots of the recipe go as far back as the 10th century in the Middle East.
Nougat (U.S. pronunciation: NOO-got, French pronunciation NOO-gah) is a family of chewy confections made with sugar or honey, roasted nuts, whipped egg whites, and sometimes, chopped candied fruit (photo #7, below).
It can be cut into rectangles or squares, broken into irregular pieces like toffee, or dipped in chocolate (nougat bars, or enrobed bonbons.
We saw one recipe where the nougat was cut and layered onto brownies between the cake and the frosting, and a recipe for Snickers Brownies that adds a layer of caramel as well.
Nougat is a regular ingredient in popular candy* bars and chocolates—including those you would never suspect because the nougat blends into a very different consistency and appearance (follow the asterisk).
March 26th is National Nougat Day. Enjoy some nougat:
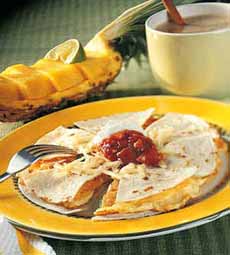
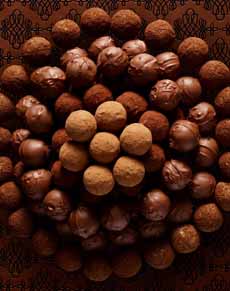
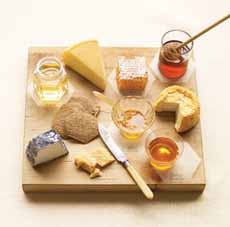
With Coffee: Enjoy it as a sophisticated piece of candy, alone or with a cup of coffee.
Nougat Glacé: Unlike ice cream, this famous French frozen dessert it doesn’t require a machine. Italian meringue, whipped cream, and bits of nougat are folded together. Because of the high sugar and air content, it stays soft and creamy, even when frozen solid.
Chocolate Pairing: In professional chocolate making, nougat is often used as a “textured layer” inside a bonbon. A thin layer of soft nougat might be placed on top of a dark chocolate ganache before the whole thing is dipped in chocolate. Or, make bark or serve a dessert plate of nougat and chocolate.
Dessert Garnish: Pastry chefs often use to create decorative, edible shards that provide height and architectural interest to a plate.
Beverage Flavoring: Nougat syrups (made by dissolving soft nougat into simple syrup) are used in high-end coffee shops and cocktail bars to provide a toasted nut and honey profile.
Below:
> The different types of nougat.
> The history of nougat.
> The recipe for delicious Strawberry Pistachio Nougat.
Elsewhere on The Nibble:
> The history of candy.
> The year’s 60+ candy holidays.
THE DIFFERENT TYPES OF NOUGAT
There are three basic kinds of nougat.
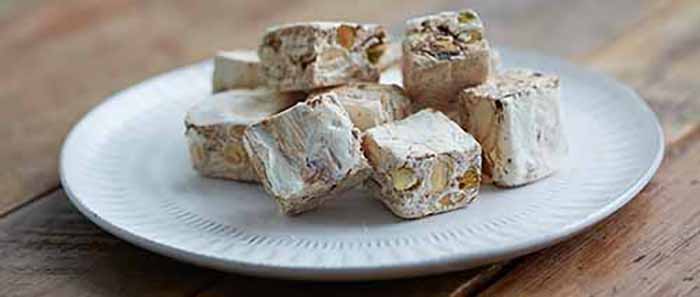
The most common is white nougat, photo #6 below, which is known in Italy as torrone and mandorlato, turrón in Spain, and nougat (the “t” is not pronounced) in France. It is a simple recipe: beaten egg whites, honey, and nuts. It first appeared in Cologna Veneta, Italy, in the early 15th century. The first published recipe in Spain appears in Alicante, in the 16th century. The first recipe found in France is from Montélimar, in the 18th century. White nougat is used as the base for modern flavored nougats.
Spanish turrón follows the traditional recipe, with toasted almonds (minimum 60% almond content!), sugar, honey, and egg whites.
Nougatine is a variation made with caramelized sugar and nuts).
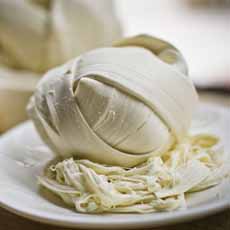
Italian torrone (photo #6) includes these same basic ingredients, using different nuts (no legal minimum) plus vanilla or citrus flavoring. It is often sandwiched between two very thin sheets of rice paper (photo #4, cocoa-flavored).
Venetian nougat, made in the town of Cologna Veneta is well known for its nougat production, especially the type called mandorlato. It is made from honey, sugar, egg whites, and almonds (mandorle in Italian). It has a different taste and a harder bite than torrone.
British nougat is traditionally made in the style of the Italian and Spanish varieties. The most common industrially-produced nougat, commonly found at fairgrounds and seaside resorts, is colored pink and white, with almonds and cherries. The pink nougat is often fruit-flavored. It is sometimes wrapped in edible rice paper, which keeps stickiness from the fingers.
U.S. candy artisans make conventional white nougat to modern flavors and colors: black cherry, café au lait, cranberry, matcha, pumpkin, and so forth. There’s even an all-American chocolate-peanut nougat (photo #5).
The Other Types Of Nougat
The second is type is brown nougat, called nougat noir (NOO-gah-NWAHR) in French (which literally means black nougat). It is made without egg whites and has a firmer, often crunchy texture. See photo #8 below, which (like most of the photos) links to the recipe.
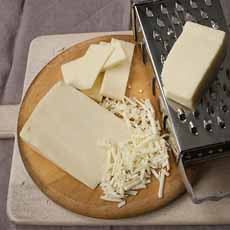
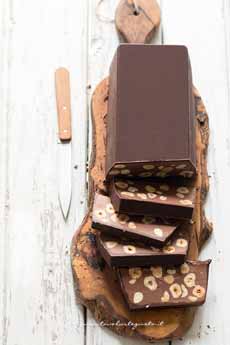
The third type of nougat is known as German or Viennese nougat. It contains only sugar, cocoa butter, nuts (usually hazelnuts), and cocoa mass, and has a soft consistency, similar to gianduja (chocolate and ground hazelnuts, also known as hazelnut praliné. It is often sliced from a loaf. This is the style called “nougat” in Germany and Austria, as well as in Denmark and Sweden. In the latter two countries, the original white nougat is referred to as “French nougat.” In Germany, is simply called nougat [source]. See photo #10, below.
And we must add:
Divinity, a close relative differing in a lighter texture and a simpler cooking technique (photos #6 and #7). See the ‡footnote and more in this recipe for classic divinity.
________________
*In the U.S. alone: Baby Ruth, Big Hunk, Charleston Chews, Mars Bar, Milky Way, Pay Day, Reese’s Fast Break, Snickers, Three Musketeers, Zero Bar. However, the nougat that appears in many modern candy bars in the U.S. and U.K. is different from traditional recipes, including in several cases, the original recipes of those candy bars.
Modern candy bar nougat is often a mixture of sucrose and corn syrup, aerated with a whipping agent such as egg white or hydrolyzed soy protein or gelatin. It may also include vegetable fats and milk powder. This type of nougat is often used as a filler by large candy companies since it’s inexpensive to make. Typically, it is used plain or chocolate-flavored, or combined with nuts, caramel, and/or chocolate to make the body of the candy bar. But some American confections feature such nougat as the primary component, rather than one of several.
________________
RECIPE: STRAWBERRY PISTACHIO NOUGAT
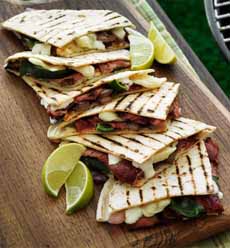
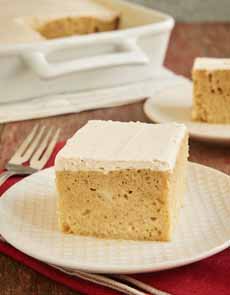
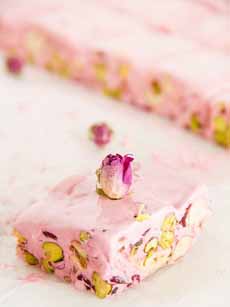
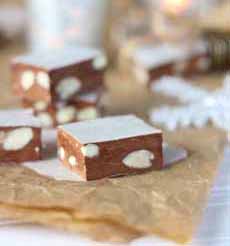
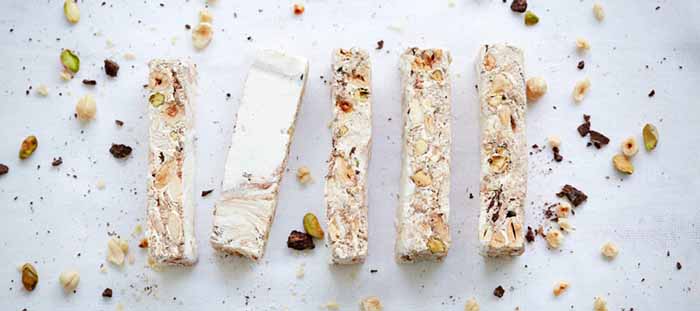
These are shown in photo #1 (rectangle cut) and photo #2 (square cut). Prep time is 15 minutes, and cook time is 10 minutes.
For step-by-step photo, visit A Cozy Kitchen. While you’re there, sign up for the inspiring blog feed.
Ingredients For 14 Pieces
1/2 cup freeze-dried strawberries
2 1/2 cups white granulated sugar
6 tablespoons light corn syrup
2 tablespoons honey
1/2 cup water
1/4 teaspoon salt
2 large egg whites
Optional: 2 drops red food coloring
2/3 cup chopped pistachios
Plus
Loaf pan
Parchment or wax paper
Spatula, pre-sprayed with cooking spray
Preparation
1. PLACE the freeze-dried strawberries in a food processor. Pulse until the strawberries turn into a powder (a clumpy texture is O.K.). Transfer to a small bowl and set aside.
2. LINE an 8 x 5-inch (a 9 x 5-inch will work too) loaf pan with wax paper or parchment, making sure there are a few inches of flaps on each side (this will make the removal of the nougat super easy). Spray a spatula with cooking spray.
3. COMBINE the sugar, corn syrup, honey, water, and salt in a medium saucepan. Give it a light stir until everything dissolves; then cook until a digital thermometer reads 260°F (the hardball stage).
|
|
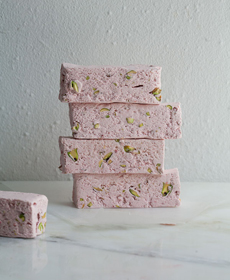
[1] White nougat (or its colored variations) can be cut into fingers (here) or squares (below— photos #1 and #2 © A Cozy Kitchen).

[2] Some people prefer their nougat in squares.
[3] Another pink nougat: East meets West in this rosewater, pistachio, and cranberry nougat. Here’s the recipe from The Healthy Cook (photo © The Healthy Cook).
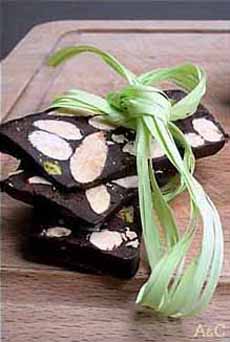
[4] A variation of Italian torrone with cocoa (chocolate) flavoring and almonds, with edible rice paper on the top and bottom. Here’s the recipe from Butter Baking (photo © Butter Baking).
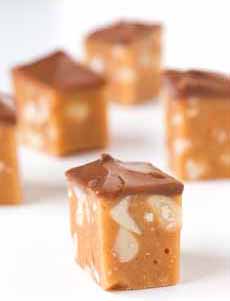
[5] The All-American: chocolate peanut nougat. recipe from Kitchen Sanctuary (Here’s the photo © Kitchen Sanctuary).
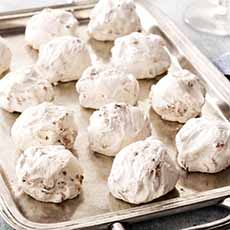
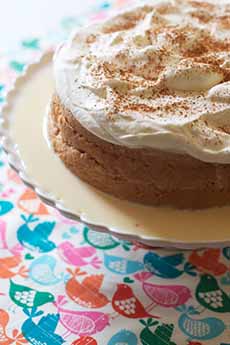
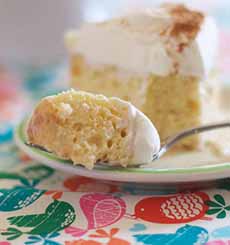
[6] Divinity is a lighter form of nougat. Check out the ‡footnote Here’s the recipe (photos #6 and #7 © Taste Of Home).

[7] Divinity can be made in flavors: almond, cherry (in photo), orange, peppermint, etc. Here’s more about divinity, and recipes.
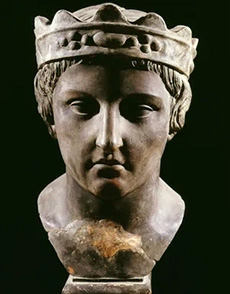
[8] Trivia: Torrone and Holy Roman Emperor Frederick II. It was rumored that torrone arrived in Cremona, Italy in the 1200s when Frederick II visited with “gourmet chefs,” and that he helped cement its Christmas association because he had a tradition of eating “exotic candy” on his birthday, December 26th. Here’s more about him (photo courtesy Museo Provinciale Campano | Capua, Italy).
|
4. ADD the egg whites to the bowl of a stand-up mixer (or use a hand mixer) and beat on low until they begin to get frothy and eventually turn into stiff peaks. While beating the stiff egg whites at low, slowly pour in the sugar syrup (step 3). Immediately add the powdered strawberries.
5. TURN the speed of the mixer to high and beat until the candy starts to thicken and hold a bit of shape, 4 to 5 minutes. Pour in the pistachios and transfer the nougat to the loaf pan, using the pre-sprayed spatula—the nougat will be sticky.
6. TOP with a sheet of wax paper. Press the top of the wax paper down to the surface so the top of the nougat will be smooth and even. Allow it to set at room temperature for about 2 hours. When the nougat has set…
7. LIFT up the sides of the wax paper, remove the top sheet, and spray a sharp knife with cooking spray. Cut up the nougat with a sharp knife into slices or 1 x 1-inch cubes.
Nougat will stay fresh for a week when kept in an airtight container.
[9] This torrone is made with three nuts: almonds, hazelnuts, and pistachios. Here’s the recipe (photo © American Heritage Chocolate).
|
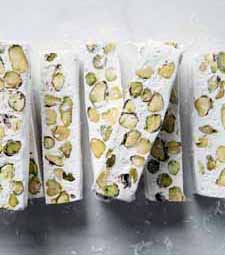
[10] Classic vanilla nougat with nuts (here, pistachios, although almonds are common and any nut can be used). Here’s the recipe from Aran Goyoaga of Canelle et Vanille (photo © Canelle et Vanille).
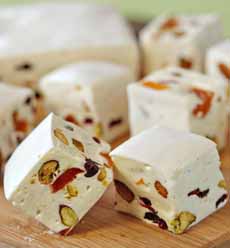
[11] White chocolate nougat with nuts and fruits. Here’s the recipe from The Spruce (photo © Elizabeth LaBau).
[12] Brown nougat, a.k.a. nougat noir, with hazelnuts. Here’s the recipe from Les Foodies. It’s in French, but use Google Translate (photo © Les Foodies).
[13] Here’s a loaf recipe recipe from Tavolarte Gusto). It’s in Italian, but use Google Translate (photo © Tavolarte Gusto).

[14] German or Viennese nougat: hazelnut praline (photo © Juergen Jeibmann | German Wikipedia).
|
|
THE HISTORY OF NOUGAT
The French word nougat, adopted by English speakers, comes from Occitan (a dialect of Provence, France) pan nogat, likely derived from the Latin panis nucatus, nut bread. In late colloquial Latin, the adjective nucatum means nutted or nutty.
The earliest known recipes for white nougat, which probably came from Central Asia, have been found in the Middle East.
A 10th-century book from Baghdad (in modern Iraq) calls the recipe natifs. One of the recipes indicates that it comes from Harran, a city located between Urfa, now in southeast Turkey. Another comes from Aleppo, in Syria.
Mention of natif is found in works from the triangle between Urfa, Aleppo, and Baghdad.
At the end of the 10th century, the traveler and geographer Ibn Hawqal wrote that he ate some natif in Manbij (in modern Syria) and Bukhara (in modern Uzbekistan) [source].
When it reached southern Europe, notably Italy, and Spain, nougat (called, respectively, torrone and turrón) was a specialty associated with the Christmas season.
Next Stop: Renaissance Italy
Thanks to Flamingi, makers of fine Italian nougat, for helping us to continue the story.
We start with a tale, likely apocryphal. It takes place in the city of Cremona, in the northern Italian region of Lombardy. On October 25, 1441: Bianca Maria Visconti was married to Francesco Sforza. The union allowed the Sforza family to dominate the Duchy of Milan for the next half-century.
According to the story, nougat (torrone) was first created for the wedding feast.
It was made in it the shape of the Torrazzo, the bell tower of the Cremona Cathedral. The claim is that torrone derives from “Torrazzo” (but wait….)
Is the story too good to be true? Yes: It seems to have been cited for the first time in a monograph published by the Chamber of Commerce of Cremona in 1914.
Earlier Claims From The Other End Of Italy
Let’s head south, to Benevento, the main town of the ancient Sannio region (in Latin, Samnium) in the southern part of Italy in what is now Campania. The people there lay claim to having invented torrone.
As proof, they refer to the Roman historian Livy (Titus Livius, 59 B.C.E. to 17 C.E.) and the Roman poet Martial (Marcus Valerius Martialis, 40 C.E. to 104 C.E.), claiming that these ancients documented in their writings the existence of nougat in that area, called cupedia.
However, in this digitized world, research cannot find a mention of cupedia. There is a similar Latin word, cuppedia, that does not appear in the writings of Livy and Martial.
Cuppedia can be translated as the deadly sin of gluttony, or as a delicacy. But what type of delicacy?
Italy As The Origin Gets Very Confusing
In various Italian dialects there are similar words: cupeta, copeta, copata and coppetta, which identify sweets similar to nougat or croccante, a product made with almonds or hazelnuts bound with caramelized sugar.
Cupeta and torrone are traditional products not only in Sannio, but also in Abruzzo, Calabria, Emilia Romagna, Lazio, Lombardy, Marche, Molise, Piedmont, Puglia, Sardinia, Tuscany, Valtellina, Veneto and finally, in Sicily, where croccante is called cubbaita.
That’s a lot of territory, for one to claim to be “the first” to invent torrone, absent any documentation.
By the 16th century, however, torrone is documented for sale in some apothecaries. Earlier, by the 15th century, turrón is documented in Spain.
The Spanish word, turrón, is quite similar to the Italian word torrone, and its most reliable source can be found in the Latin verb torrere, which means to toast (the nuts).
So take that, Torrazo bell tower of the Cremona cathedral! Take that, Benevento. We’re sticking with the Middle East, around the 10th century.
Back To The Middle East
References there to “roasted seeds kept together by a sweet paste” can equally refer to other products produced in many countries, starting with the Middle Eastern halva, made from ground sesame seeds and honey.
Some scholars suggest it originated before the 12th century, in Byzantium, and is documented at least by the 13th century—so nougat/natif is older.
Similar roasted seeds or nuts bound with a sweet paste can be found in other Middle Eastern Countries, as well as in the Slavic countries, and as far away as India.
While the earliest residents of the Middle East ate dates and figs and honey† as their “candy,” their descendants combined ingredients into more complex sweets.
Now, we just need someone to dig up documented information in Central Asia (from the Caspian Sea in the west to China in the east, from Afghanistan in the south to Russia in the north) to discover the first mention of nougat—whatever it was called there.
|
Honey: The Oldest Candy
Archaeologists have found beehive colonies in Israel, dating from the 10th to early 9th centuries B.C.E. [source].
But honey is far older than mankind—very far.
Honeybees first appeared during the Cretaceous Period, about 130 million years ago, in the area around what is now India.
But it was during a Pleistocene warming about 2-3 million years ago, that the honeybee spread west into Europe and then Africa (still no mankind†), stopping in the Middle East en route [source].
DO YOU LIKE FOOD HISTORY?
THE NIBBLE has written more than 1,100 histories of foods, beverages, and cooking techniques.
Some are just a couple of paragraphs, some are as long as the history above, and most are in-between.
You can find all the links on our food histories page.
[15] Put on a pot of coffee and invite the neighbors (photo © American Heritage Chocolate).
_______________
†Species of early Hominids appeared in Africa about 2 million years ago and went extinct, as did all the other hominid lines before Homo sapiens. The modern species of Homo appeared about 600,000 years ago in Africa and migrated from there to Europe and Asia. The Neanderthals appeared in Europe about 130,000 years ago, distinguished by their manufacture of diverse tools and evidence of symbolic thinking. [source].
Thus far, the earliest discovery of modern Homo sapiens skeletons come from Africa and date to nearly 200,000 years ago. They appear in Southwest Asia around 100,000 years ago and elsewhere in the Old World by 60,000-40,000 years ago [source].
‡Divinity is a lighter type of nougat. They are cousins that share the same DNA:They are both aerated confections made by folding a hot sugar syrup into whipped egg whites. The primary differences are their regional origins, the specific sugars used, and their final texture. Nougat is the original from Europe (Italian torrone, French nougat de Montélimar), sweetened with honey and sugar, denser and chewier. It often contains cocoa butter and almonds or pistachios. Divinity is a Southern U.S. creation, sweetened with corn syrup and sugar, yielding a crumbly, melt-in-your-mouth texture. It contains no fat but often contains pecans.often features almonds or pistachios.
The name “divinity” comes from its “divinely”” light, airy, and cloud-like texture.
CHECK OUT WHAT’S HAPPENING ON OUR HOME PAGE, THENIBBLE.COM.
|
|