THE NIBBLE BLOG: Products, Recipes & Trends In Specialty Foods


Also visit our main website, TheNibble.com.

Grilled Pineapple Recipes: Add Even More Flavor To Sweet Pineapple

Grilled Pineapple Ice Cream Sundae
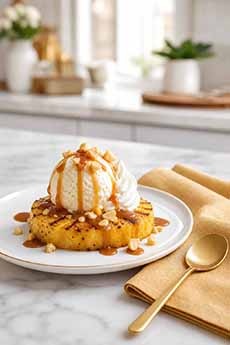
[1] Grilled pineapple in an ice cream sundae, with caramel sauce and macadamia nuts for another touch of the tropics (photo: The Nibble).

Grilled Pineapple
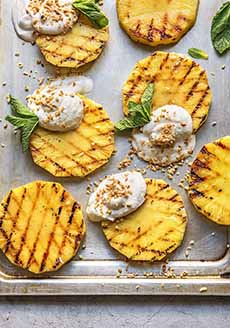
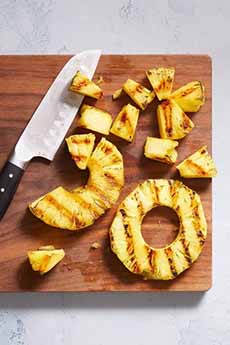
[2] Pineapple slices on the grill (photos #2, #3, #4 © Hello Fresh).


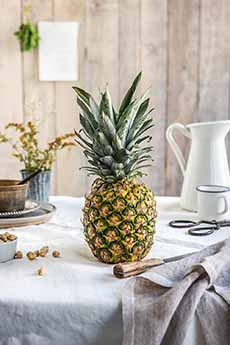
[3] Start with a ripe pineapple. (Note: Pineapples are typically picked when ripe and don’t ripen further, but smell the pineapple for an aroma).

Ham & Cheese With Grilled Pineapple
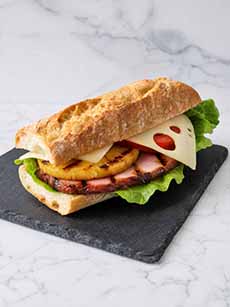
[4] Why wait for Easter to put pineapple rings on the ham, when you can have them on your ham sandwich anytime (photo: The Nibble).

Grilled Pineapple
[5] Add pieces to a chicken salad or green salad, or a grilled or roasted chicken or ham dish like this one (photo © Taste Of Home).

Burger With Grilled Pineapple
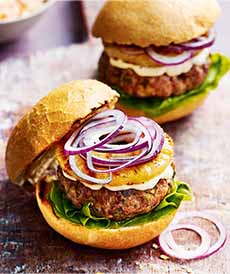
[6] Add a slice of grilled pineapple to a burger, BLT, or other sandwich. Here’s the recipe for the burger (photo © Tesco).


Updated June 2026

Grilled pineapple has so many uses, from salsa, to salads (chicken, crab, green, shrimp) to skewers and the recipes below.

It’s a delicious with breakfast sausages or bacon, at lunch on a burger or sandwich, and as dessert at dinner.

One of our favorites: a pineapple ice cream sundae with a scoop of vanilla atop a grilled pineapple ring, caramel sauce, a bit of whipped cream or mascarpone, and some macadamia or pistachio nuts.

> National Pineapple Day is June 27th.

Below:

> Recipe: grilled pineapple.

> More grilled pineapple recipes.

Elsewhere on The Nibble:

> The history of pineapple.

> The year’s 10+ pineapple holidays.

> The year’s 80+ fruit holidays.


RECIPE: GRILLED PINEAPPLE

Thanks to Hello Fresh for the inspiration for this recipe, which we adapted and expanded.

Ingredients

  • 1 large pineapple
  • Optional marinade
  • Optional garnishes
  •  
    Marinade For Grilled Pineapple

    While this is optional, it really elevates the recipe. The lime juice does real work, helping the flavors penetrate the rings. The rum transforms the flavor into something truly special, deepening the flavor.

  • 3 tablespoons honey or brown sugar (which caramelizes beautifully)
  • 2 tablespoons coconut oil
  • 2 tablespoons dark rum (optional but excellent)
  • 1 tablespoon lime juice
  • ¼ teaspoon cinnamon
  • Pinch of cayenne or a dash of hot sauce
  • Pinch of salt
  •  
    Garnishes

    You can use more than one of these. In fact, we encourage it!

  • Ice cream or frozen yogurt: especially vanilla, topped with toasted coconut.
  • Dairy: mascarpone, whipped cream.
  • Coconut whipped cream: thoroughly mix a 14-ounce can of coconut cream and 1/2-cup powdered sugar. Add chopped almonds for an unexpected crunch.
  • Nuts: almonds, macadamias, pecans, pistachios.
  • Herbs: basil or mint leaf.
  • Fresh fruit: Berries or diced tropical fruits like banana, mango and papaya.
  • Cinnamon brown sugar: Add cinnamon to the sugar to taste, and sprinkle on the grilled pineapple.
  • More: chile flakes, dried coconut, crystallized ginger, pink Hawaiian sea salt.
  •  
    Preparation

    1. MAKE the marinade. Whisk the ingredients together. Set aide as you slice the pineapple.

    2. SLICE the pineapple horizontally on a cutting board, and use a sharp cook’s knife to remove the top by slicing about a quarter-inch below the base of the leaves.

    3. STAND it upright and peel skin side by side, slicing down from the open top of the fruit. The sweetest parts are closest to the skin just behind the brown “eyes” you’ll find along the perimeter, so try to keep your slices clean to preserve all that flavor. Once peeled…

    4. LAY the pineapple horizontally to chop off the base and cut fruit into rings by slicing straight down width-wise, thickness to taste. The fiber-rich core is edible, but lots of people remove it because it isn’t as flavorful or sweet. Use a small paring knife to cut it out of your rings, if you’d prefer.

    5. PLACE the marinade in a large Ziploc-type bag with the pineapple rings. Shake the bag to coat the rings evenly, and pop it in the fridge until ready to grill. Marinate for at least 30 minutes, ideally up to 2 hours, shaking the bag intermittently. Brush any leftover marinade over the slices as they grill.

    6. TURN the grill to medium heat. Use tongs to remove the rings from the bag and lay them on the grill, spreading so they don’t slip through the grate. Grill until char marks appear, about 2-3 minutes per side. Garnish and serve.
     
     
    13 MORE GRILLED PINEAPPLE RECIPES

    Start with a ham, turkey or other sandwich with a slice of grilled pineapple and honey mustard. A slice of grilled pineapple is also great on a burger. Then, move on to these:

  • Cheddar Ice Cream With Grilled Pineapple
  • Grilled Pineapple & Peaches
  • Grilled Pineapple Cocktail Garnish
  • Grilled Mushroom, Pineapple & Arugula Salad
  • Grilled Pineapple On A BLT
  • Grilled Pineapple & Strawberry Skewers
  • Grilled Pineapple Slices For A Bunless Burger
  • Hawaiian Nachos With Pulled Pork & Grilled Pineapple
  • Island Veggie Burger With Grilled Pineapple
  • Pineapple Iced Tea & 50 More Pineapple Recipes
  • Roasted Pineapple Pound Cake
  • Salmon Skewers With Grilled Pineapple
  • Spicy Tequila Cocktail With Grilled Pineapple Garnish
  • Swiss Cheese & Bacon Cheeseburger With Grilled Pineapple
  • Teriyaki Chicken Sandwich With Grilled Pineapple
  •  
    Pina Colada At A Beach Resort
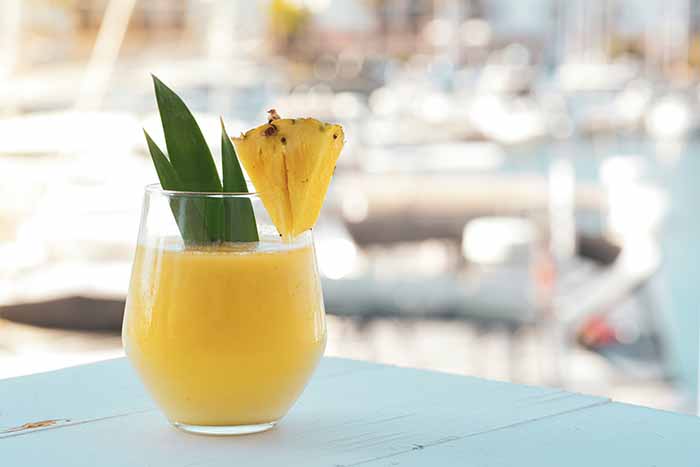
    [7] Don’t forget the Pina Colada! Here’s the original recipe (photo © Yes More Content | Unsplash).
     

    CHECK OUT WHAT’S HAPPENING ON OUR HOME PAGE, THENIBBLE.COM.


    Comments off

    Frozen Salmon Burgers, Ready To Defrost & Grill

    Our friend’s daughter is largely vegetarian, but she’ll eat an occasional piece of fish (which makes her a flexitarian—here’s the difference of these terms plus pescatarian, vegan and others).

    So for July 4th weekend, we picked up a box of SeaPak Alaskan Salmon Burgers, which are available frozen at stores nationwide.

    It takes time to make salmon burgers from scratch, but these frozen patties are just the thing for a busy occasion like grilling with guests.

    Cook them for 2 minutes on each side on a pre-heated and oiled pan or grill. The goal is a crispy outside and juicy interior.

    We like salmon bugers “rare.” Remember that the burger will continue to cook for a minute or two once removed from the heat source—and there’s nothing worse than overcooked fish.
     
     
    MORE USES FOR SEAPAK ALASKA SALMON BURGERS

    In addition to salmon burgers, decked out with lettuce, tomato, onion, pickles, cole slaw, and condiments of choice (that’s yogurt-dill sauce in photo #1), you can use the burgers:

  • At breakfast, with eggs on the side, broken up in a scramble or omelet, on an egg sandwich, or broken up and added to an egg burrito.
  • At lunch or dinner, atop a green salad, Greek salad, spinach salad or other favorite.
  • Broken up for fish tacos.
  • Crumbled into a rice bowl (or other grain bowl).
  • On a pizza: broken up and added atop the mozzarella or ricotta (salmon works for red or white pizzas).
  • Mixed into Fettuccine Alfredo or Pasta Primavera Alfredo.
  • As sliders with goat cheese, chopped sundried tomatoes in olive oil, and fresh basil.
  •  


    [1] Dress a salmon burger like a beef burger. Ketchup works, but a yogurt-dill sauce is better. Here’s a recipe (photo © McCormick).


    [2] Keep a package of salmon burgers burgers in the freezer, for family and guests (photo © SeaPak).

     
    SeaPak’s Alaskan Salmon Burgers are gluten-free, low carb and high in protein. They’re made with all natural ingredients and contain no additives or preservatives.

    In addition to great salmon flavor, salmon burgers bring the numerous health benefits of salmon.


    Comments off

    Curly Vegetable Salad Recipe: Enjoy Raw Veggies Curled


    [1] (photo © Better Homes & Gardens).


    [2] You can make curled vegetables look like a bouquet (photo © Canard Inc.).


    [3] Here, a beet and goat cheese salad is graced with curled beets (photo © Triomphe | NYC [now closed]).


    [4] If fiddlehead ferns are in season, definitely add some (photo Katharine Pollak | © The Nibble).


    An easy way to turn a raw vegetable salad into edible art is to thinly shave/cut the vegetables with a vegetable peeler or mandoline, and soak them in ice water for about 20 minutes.

    This will not only make the ribbons curl, but they’ll be crunchier, too.

    And, some might say, they have more eye appeal—much more than a spiralized raw vegetable salad.

    Are you game to try?
     
     
    CHOOSE VEGETABLES THAT ARE EASY TO SHAVE

    Choose vegetables that shave well.

    We’ve used asparagus, beets, broccoli stalks (a great use for them!), burdock root, carrots, celery, celery root (celeriac), daikon and other large radishes, Jerusalem artichoke, jicama, kohlrabi, parsnip, scallions* and sweet potato†.

    Shave them lengthwise, then place the pieces into a bowl of ice water. Keep the shaved vegetables in ice water until ready to serve.

    You can serve the curled vegetables on a bed of greens, or by themselves.
     
     
    RECIPE: CURLED VEGETABLE SALAD

    We adapted this salad from one in Better Homes and Gardens.

    Their recipe used cucumbers and radishes (photo #1). However, pick as many veggies to curl as you like, balancing beige-white vegetables with colored ones.

    You can also add the jalapeno or not; and optionally, add

  • Crumbled cheese: asiago, blue, cotija, feta, goat, etc.
  • Small cheese cubes: cheddar, colby, edam, jack, swiss, etc.)
  •  
    We’ve created a salad of greens and herbs. Use your favorite. We chose a baby lettuces mix and added baby arugula, basil, chives and mint. You can use crunchy romaine or any salad blend.

    Ingredients

  • 5-10 large radishes (e.g. daikon, watermelon radish)
  • 2 medium seedless cucumbers
  • Optional garnish: 1 jalapeño chile pepper, seeded and sliced into rings
  • Salad greens of choice
  • 3 tablespoons herbs of choice, chopped or julienned (basil, chives, dill, mint, sorrel)
  •  
    For The Dressing

  • Pinch sugar
  • 2-3 pinches salt
  • 3 tablespoons olive oil
  • 1 tablespoon white wine vinegar, lemon juice or lime juice
  • Optional garnish: crumbled or cubed cheese
  •  
    Preparation

    1. PEEL the vegetables as appropriate (e.g., carrots and cucumbers yes, asparagus and radishes no). Using a mandoline or a sturdy vegetable peeler, and cut them lengthwise into thin, ribbon-like strips. Aim for 3-inch lengths. You can elect to make them longer: The longer the strip, the less tight the curl. Try some test batches, e.g. two or three strips of each vegetable, to see what you prefer.

    2. PLACE the strips in ice-water bath, and let stand until curly, about 20 minutes. You can keep them in the ice water until ready to serve. Then, drain and transfer to a paper towel and blot dry.

    3. PREPARE the greens and herbs salad. Toss with the dressing (use as little dressing as needed to moisten) and add the cheese. Place in a bowl or on a plate.

    4. TOP with the curled vegetables. Serve with a pitcher of extra dressing to pass.

     
    ________________

    *Rather than shave the scallions, we trimmed the ends, removed the bulb for other use, and pulled off layer by layer.

    *Sweet potatoes can safely be eaten raw, although certain types of yams—and all white potatoes—are only safe to eat when cooked. That’s because raw potatoes contain a toxic compound called solanine.


    Comments off


    © Copyright 2005-2026 Lifestyle Direct, Inc. All rights reserved. All images are copyrighted to their respective owners.