THE NIBBLE BLOG: Products, Recipes & Trends In Specialty Foods


Also visit our main website, TheNibble.com.

TIP OF THE DAY: Spring Panzanella Salad

Spring Panzanella Salad
[1] Spring Panzanella Salad, an Italian classic (photos #1 and #2 © Tending The Table | California Olive Ranch).

Spring Panzanella Salad
[2] Close-up on the salad.


[3] Radicchio (this variety is Trevisol; photo © Good Eggs).


[3] Arbequina EVOO (photo © California Olive Ranch).


We love all kinds of bread, and that includes biscuits, pizza crusts, and the crunchy category: croutons, crackers, matzo, roti—you get the picture.

Today’s tip includes homemade croutons, which can be made from many types of bread.

We typically use artisan loaves, like sourdough or rustic country bread. But you can use any loaf that can be cubed; French or Italian bread, for example.

Whenever we have too much bread left over from an event, we’ll most certainly make panzanella the next day.

Panzanella (pahn-za-NEL-ah) is a Tuscan-style “bread salad” made with a loaf of day-old (or older*) Italian bread.

It was originally cubed into large croutons that were soaked in vinaigrette to soften them.

It started out as peasant food, when every scrap of food counted, including hardened, leftover bread.

Here’s the history of panzanella.

Today, in an era where most of us can toss the stale bread, the process is slightly different: People toast cubes of day-old bread, to make croutons.

The following recipe came to us from California Olive Ranch, producers of wonderful EVOOs. They adapted the recipe from one by Sasha Swerdloff of Tending The Table.

Panzanella can be a first course or a main, vegetarian or topped with proteins. There are more recipes below.
 
 
RECIPE: SPRING PANZANELLA SALAD

California Olive Ranch recommends Arbequina olive oil in the dressing.

They like the Arbequina varietal because of its subtle fruitiness and herbal notes. Those flavors pair nicely with fresh produce.

When you buy a blended olive oil that tastes fruity, that flavor is most likely contributed by Arbequina olives.

Ingredients For 2 Mains or 4 Side

For The Croutons

  • 6 tablespoons extra virgin olive oil
  • 3 cups rustic bread of choice, sliced or torn into 1-inch cubes
  • 3 cloves garlic, minced
  • 1 tablespoon fresh herbs of choice, or 2 teaspoons dried herbs (e.g. parsley, thyme, oregano)
  • Kosher salt and freshly ground pepper
  •  
    For The Dressing

  • 3 tablespoons Arbequina extra virgin olive oil (or substitute), plus more for serving
  • 2 tablespoons fresh lemon juice
  • 1 teaspoon Dijon mustard
  • 1/4 teaspoon each, kosher salt & fresh ground pepper
  •  
    For The Salad

  • A few handfuls salads greens, sliced radicchio, baby kale and/or pea shoots
  • 1 cup snap peas, sliced in half
  • 1/4 cup sunflower seeds, toasted
  • 1/4 cup shaved parmesan cheese
  •  
     
    Preparation

    1. PREHEAT the oven to 375°F.

    2. PREPARE the bread: Toss the bread, herbs, garlic, salt and pepper in the extra virgin olive oil, adding more as needed. Spread into a single layer on a baking sheet and toast until crisp, 10-12 minutes. Remove from the oven and let cool slightly.

    3. MAKE the dressing: Combine all ingredients in a small bowl and whisk together until emulsified. Season to taste and set aside.

    4. ASSEMBLE the salad base: Combine the greens, snap peas, sunflower seeds, and parmesan cheese in a large salad bowl. Add the dressing and toss to coat, then top with the croutons.

    5. FINISH with an extra drizzle of olive oil, as desired. Serve and enjoy!
     

    MORE PANZANELLA RECIPES

  • Autumn Panzanella Salad
  • Autumn Panzanella Salad #2, With Squash & Lentils
  • Basic Summer Bread Salad
  • Grilled Chicken Panzanella
  • Mix & Match Panzanella Ingredients
  • Naan Panzanella With Curried Croutons
  • Summer Panzanella With Heirloom Tomatoes
  • Summer Panzanella With Peaches & Prosciutto (photo #3)
  • Winter Panzanella With Citrus & Cheese
  • ________________

    *When the bread has no preservatives, we’ve found that one day or two days after purchase is fine for croutons. By the third day, the bread tends to be rock-hard and we can’t slice it. When this happens, though, stick it in the food processor and make high-quality breadcrumbs.


    Comments off

    PRODUCT OF THE WEEK: Diestel Turkey Meatloaf

    We are big fans of the turkey products from Diestel Family Ranch, a premier breeder of whole turkeys and other turkey treats. There are:

  • Conventional whole turkeys plus Non-GMO and organic options.
  • Boneless turkey breast that’s 100% breast, no patched-up pieces.
  • Turkey burgers, chorizo, franks, ground turkey and sandwich slices including turkey pastrami, sausage.
  •  
    Why are Diestel products better?

    The company is committed to raising the leanest, cleanest, most delicious birds that money can buy. The meat is succulent and tender.

    There are no artificial ingredients or preservatives, no hormones, antibiotics, or growth stimulants.

    Everything is produced according to strict animal welfare and environmental standards. The birds are raised in generous spaces where they can roam (photo #5).

    And for 70 years, this has been a family business—now in the fourth generation. Great people, great products.
     
     
    WHAT’S NEW: TURKEY MEATLOAF

    One of America’s favorite comfort foods is now on the menu: one-pound turkey meatloaf, ready to heat and eat.

    They let you put dinner on the table in 20 minutes or less.

    There are two varieties:

  • Traditional Sous Vide Turkey Meatloaf: Moist and tender, and great for meatloaf sandwiches (more information).
  • Florentine Sous Vide Turkey Meatloaf: Even more flavorful, this loaf contains spinach, feta, garlic and black pepper (more information).
  •  
    Both fully cooked loaves are made from premium coarse-ground turkey, and have a sweet tomato glaze.

    The SRP for a 16-ounce meatloaf is is $8.99 in stores, $13.95 online.
     
     
    WHAT IS SOUS VIDE?

    Sous vide (soo VEED, meaning “under vacuum”) is a French cooking technique, used in professional kitchens for some time but now becoming more popular in American kitchens.

    It is used by the greatest chefs to assure consistency in turning out fine meals. Portions are prepared in individual, sealed plastic bags that are cooked in a water bath.

    This ensures perfectly cooked meat, tender and moist. Here’s more about it.
     
     
    ANOTHER FAVORITE: TURKEY BREAST

    We like roast turkey more often than Thanksgiving or or Christmas dinners.

    While we don’t need a whole turkey, Diestel’s Holiday Turkey is always a treat.

    It’s available year-round: a cook-in-bag boneless turkey breast that comes brined, seasoned and ready to roast.

    And it’s soooo good.

    So don’t wait until the holidays: Cook one now!
     
     
    MORE INFORMATION ABOUT DIESTEL PRODUCTS

    Visit the company website, DiestelTurkey.com.

    See the family and the turkeys for yourself.

    The products are available at retailers nationwide, but you can also order them on the website.


    [1] Diestel Traditional Turkey Meatloaf (all photos © Diestel).


    [2] The package to look for.


    [3] Diestel Florentine Meatloaf.


    [4] The package to look for.


    [5] Diestel turkeys, enjoying their day.


    Comments off

    FOOD FUN: Upside Down Beer Glasses

    This upside-down beer glass caught our eye. We wanted a set, but couldn’t justify the expenditure (not to mention, no room in our cabinet).

    The double-walled glass keeps your beer colder, for longer.

    There’s no condensation on the outside, either.

    Plan ahead for Mother’s Day or Father’s Day and take a further look at the glasses.
     
     
    SOME BEER TRIVIA

  • The oldest known written recipe in the world is for beer.
  • The first brewery in North America opened in 1642, in Hoboken, New Jersey. The oldest brewery still in business is Yuengling. It began in 1829 in Pottsville, Pennsylvania.
  • The first beer brewed on the continent was by members of the Roanoke Colony in Virginia, in 1587.
  • Beer was first available in bottles in 1850. Cans arrived in 1935. Cans that opened with pull tabs weren’t launched until 1962.
  • Before then, you needed a punch can opener to open the can (photo #2).
  • The first beer six-packs came onto the market in the 1940s.
  • In 1969, beer in cans outsold beer in bottles for the first time.
  • A barrel of beer in the U.S. holds 31 gallons, enough to fill about 330 twelve-ounce bottles or cans.
  • Aside from water, beer is the second most popular beverage in the world. Tea is the most popular.
  •  
    [Source]
     
     
    THE HISTORY OF BEER
     
    THE DIFFERENT TYPES OF BEER


    [1] No, you’re not tipsy. This beer glass truly is upside-down (photo © Lily’s Home).


    [2] Before tab tops were available in 1962, you needed a punch can opener to get to your beer. The other side is a bottle opener. You can still get them at Walmart and elsewhere (photo @ Walmart).


    Comments off

    RECIPE: Chicken Thighs with Polenta

    Chicken & Polenta
    [1] Braised chicken thighs atop creamy polenta (photo © Good Eggs).


    [2] Large chicken thighs (photo © Good Eggs)


    [3] Use a braising dish or a casserole dish. A Dutch oven also works (photo of casserole dish © Lodge Cast Iron).


    [4] A wedge of Parmigiano-Reggiano, ready to grate (photo © YinYang iStock Photo).


    As a follow up to our polenta discussion and recipe earlier today, here’s another great way to serve it.

    Serve your mains with creamy polenta instead of grain, noodles or potatoes.
     
     
    RECIPE: CHICKEN THIGHS WITH POLENTA

    Thanks to Good Eggs for the recipe. Note that although this recipe says it provides three servings, we could eat all three chicken thighs ourselves (we’re not known for a modest appetite).

    Ingredients For 3 Servings

  • 1 cup polenta
  • 1 tablespoons butter
  • Parmigiano Reggiano cheese, freshly grated
  • A handful of parsley, roughly chopped
  • 3 large chicken thighs
  • 2 yellow onions, cut in half and sliced into ¼” pieces
  • 6 cloves of garlic, sliced
  • 2 carrots, peeled cut into ¼ inch pieces
  • ½ can whole tomatoes (ideally San Marzano), roughly chopped and 1 cup of the liquid reserved
  • 2-3 cups of chicken stock (substitute water)
  • 2-3 bay leaves
  • 4 or 5 black peppercorns
  • 2 tablespoons canola oil
  •  
    Preparation

    1. PAT the chicken dry with a paper towel and season with salt and pepper on both sides.

    2. ADD the canola oil to a braising dish, casserole dish or Dutch oven (photo #2): wide and deep, with a fitted lid. Place it over high heat. When the oil is hot, add the chicken, skin side down.

    3. BROWN the chicken for 2-3 minutes on each side, until it’s nice and golden brown. Remove the chicken from the pan, leaving the drippings, and add the garlic, onions and carrots. Brown until they have some color, about 2 minutes. Remove them from the pan.

    Once you’re through browning the chicken and vegetables…

    4. POUR off the fat into an empty jar or other receptacle, but not down the sink! Turn the heat to medium and add the tomatoes, along with their liquid, to the pan. With a wooden spoon, scrape the fond (brown bits) off the bottom of the pan and stir into the tomato sauce (this is called deglazing).

    5. ADD the vegetables and the chicken, skin side up, back to the pan and arrange in a single layer. Pour in enough stock or water to bring the level of liquid to just about the level of the chicken skin, and add the bay leaves. Cover the pan with its lid and simmer for about an hour.

    While the chicken cooks…

    6. MAKE the polenta. Bring 3 cups of water to boil in a pot. In a small bowl, whisk together a cup of water, a teaspoon of salt and a cup of polenta. When the water is at a rolling boil, add the water-polenta mixture and turn the heat down to medium.

    7. COOK the polenta for 10-15 minutes, stirring occasionally to make sure it doesn’t stick to the bottom of the pot. When the water is absorbed and the polenta is the texture of a thick porridge, add a tablespoon or so of butter to taste. Season with parmigiano or salt to finish.

    When the chicken is done…

    8. SERVE the chicken and vegetables alongside the polenta, with some of the sauce spooned over it. Garnish with parsley and dig in!
     
     
    MORE POLENTA RECIPES FOR YOU


    Comments off

    TIP OF THE DAY: Polenta For Breakfast, Lunch & Dinner

    Polenta, made from ground cornmeal, is a porridge that dates to ancient times. It is gluten free, although not a whole grain*.

    This traditional Italian cornmeal style originated in Umbria in northern Italy, where it was a simple, hearty peasant food. In the U.S. and U.K., cooked polenta is known as as cornmeal mush.

    Polenta has risen from its humble roots, and is now used by top chefs. Not only a versatile ingredient in Italian cuisine, it has crossed over to the world of fusion food.

    Polenta is sold in two ways:

  • 1. Ground corn grits, the basic form of polenta. This is the corn version of Cream Of Wheat and Cream Of Rice. It cooks up like any porridge.
  • You can cooked conventional polenta for 45 minutes. Or, make instant polenta in 3 minutes.
  • 2. Precooked, ready-to-heat-and eat solid polenta. It’s sold in fat sausage-like tubes, plain and in flavors such as basil, garlic and sundried tomato.
  • When left to cool, polenta sets and becomes sliceable for grilling, frying or topping with sauces.
  • The slices are a firm base for just about anything: hors d’oeuvres, first courses and sides. Just pan fry or heat them in the microwave.
  • No refrigeration is needed until after the tube is opened.
  •  
     
    WAYS TO SERVE POLENTA

    Polenta can be served at breakfast, lunch and dinner:

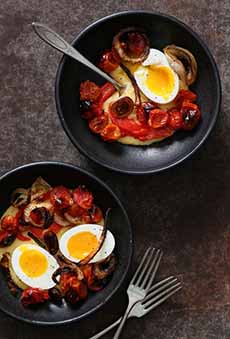
  • A base for poached or fried eggs.
  • An hors d’oeuvre, topped with a grilled shrimp, scallop, smoked salmon or salmon caviar.
  • A first course, topped with sautéed mushrooms and fresh herbs.
  • A side dish topped with tomato sauce and grated cheese.
  • Topped with melt cheese, for a snack or an appetizer.
  •  
     
    POLENTA BOWLS

    Think of polenta bowls as you would any grain bowl or vegetable bowl: food that can be served at any time of the day.

    The following recipe tops creamy polenta with Parmigiano-Reggiano cheese, roasted vegetables and “jammy” soft boiled eggs.

    Use this template to create your own, custom, polenta bowl.
     

    RECIPE: CHEESY POLENTA BOWL WITH JAMMY EGGS, ROASTED TOMATOES & RED PEPPERS

    Jammy eggs have become popular with chefs in recent years. They’re an oxymoron: a well-cooked soft boiled egg.

    You can think of them as halfway between soft boiled and hard boiled. Here’s a recipe.

    The recipe for this yummy bowl of comfort food is courtesy of DeLallo, online purveyor of fine Italian products.

    Ingredients For 2 Servings

  • 1 cup water
  • 2 cups chicken broth
  • 2 tablespoons butter
  • 1 (9.2-ounce) box DeLallo Instant Polenta (or substitute)
  • 1 teaspoon salt
  • 1/2 cup grated Parmigiano-Reggiano, plus more for serving
  • 2 tablespoons extra virgin olive oil
  • 1 teaspoon salt
  • 1 teaspoon pepper
  • 1 pint cherry tomatoes
  • 1 large onion, sliced
  • 1 jar (12-ounces) roasted red peppers, drained and sliced
  • 4 eggs, room temperature
  •  
    Preparation

    1. PREHEAT the oven to 400°F. Line a baking sheet with parchment paper.

    2. COMBINE the cherry tomatoes, onion, salt and pepper in a large bowl. Toss well to coat and spread evenly on the baking sheet. Roast the vegetables in the oven for 25 minutes, stirring twice. Meanwhile…

    3. BRING a large saucepan of water to a boil over medium-high heat. Using a slotted spoon, carefully lower the eggs into the water, one at a time. Cook the eggs for 6 minutes, adjusting the heat to maintain a gentle boil. Transfer the cooked eggs to a bowl of ice water and chill.

    4. BRING the water, broth and butter to a boil in a medium-sized saucepot. Slowly whisk in the polenta, stirring continuously until it begins to thicken, about 1 minute. Remove from the heat and stir in the cheese. Heat the roasted red peppers for 45 seconds in the microwave.

    5. DIVIDE the polenta into two bowls. Top with the roasted tomatoes and onions and roasted red peppers.

    6. GENTLY CRACK the eggs all over and peel. Slice them in half and place 2 halves in each bowl. Sprinkle with additional cheese if desired and serve.
     
     
    MORE POLENTA RECIPES

  • Ways To Serve Polenta
  • Things To Do With Polenta Slices
  • How To Make A Grain Bowl: A Template
  • What Is Polenta?
  •  


    [1] For breakfast, lunch or dinner: a cheesy polenta bowl, topped with Parmigiano-Reggiano, roasted tomatoes, onions and red peppers (photo © DeLallo).

    Polenta & Beets
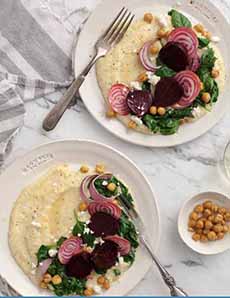
    [2] Creamy polenta with roasted beets as a first course. Here’s the recipe (photo © Blue Diamond).

    Chicken & Polenta
    [3] Pan-fried chicken breasts on a bed of creamy polenta (photo © Good Eggs).


    [4] Shrimp and sofrito with slices of solid herb polenta from a tube (photo © eMeals meal delivery service).

    Box Of DeLallo Instant Polenta
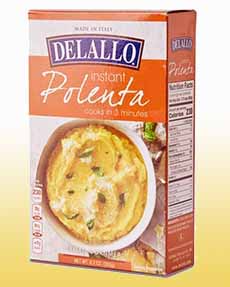
    [5] Instant polenta cooks up in three minutes (photo © DeLallo)

     
    ________________

    *The difference between cornmeal corn grits/polenta is that cornmeal is whole grain, with nothing removed. Corn grits/polenta is partially de-germed, so it is not considered whole grain. Here’s more about what makes a whole grain.


    Comments off

    The Nibble Webzine Of Food Adventures
    RSS
    Follow by Email


    © Copyright 2005-2026 Lifestyle Direct, Inc. All rights reserved. All images are copyrighted to their respective owners.