|
National Mustard Day is the first Saturday in August—which happens to be today. The holiday was initiated in 1988 by a mustard lover named Jill Sengstock, and was taken under the wing of the National Mustard Museum in 1991. If you’re anywhere near Middleton, Wisconsin, you can join in the day of mustard-centric family activities (or is that family-centric mustard activities?).
Mustard has been cultivated for more than 5,000 years, beginning in India in 3000 B.C.E. It grew wild in the foothills of the Himalayas.
The ancient Greeks and Romans used mustard as a condiment; some actually chewed the mustard seeds with their meat. Egyptian pharoahs were buried with seeds to use in the afterlife.
Fast forward: By the 1400s, mustard had spread through Europe, with each region making its own style.
Mustard came to the U.S. in the 1700s, with European immigrants who established mustard businesses.
The style of the day was strong, spicy and brown, but later, the yellow “ballpark” mustard style was born in the U.S.A. Here’s more history of mustard.
|
|
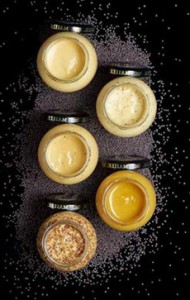
Five of the 20+ types of mustard made
by Maille Mustard. |
Today, there are dozens of different types of mustard—far beyond the all-American yellow mustard (like French’s), brown mustard (Chinese mustard, like Colman’s), Dijon (like Grey Poupon) and whole grain (like moutarde à l’ancienne—one variety, moutarde de Meaux, is called the “king of mustards” by connoisseurs).
For National Mustard Day, commit to trying any of these you aren’t familiar with, plus a flavored mustard. Beyond honey mustard, look for Roquefort mustard, tarragon mustard and walnut mustard—three of our favorites.
20+ WAYS TO USE MUSTARD
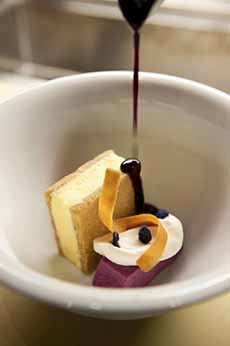
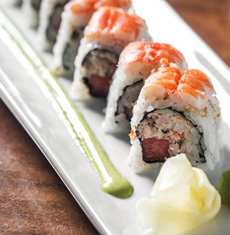
Beyond hot dogs, burgers and sandwiches, mustard is a natural complement to many foods. Before we start the conventional list, take a look at this first course: gravlax with mustard ice cream. There’s no sugar in the ice cream, just novelty. Think of it as a cold mustard cream sauce!
|

Pâté with whole grain mustard (also called grainy mustard and in French, moutarde a l’ancienne). Photo courtesy Dusek’s |
Chicago. |
|
Barbecue: The essential in South Carolina mustard barbecue sauce, and a help to tomato-based barbecue sauces, to cut the sweetness.
Butter: Blend mustard with butter and lemon for a compound butter topping for toast, grilled meat or sauteed meat and seafood.
Canapés: Spread a base of bread or cucumber with a flavored mustard, then top with cheese, pâté, meat or other ingredients.
Charcuterie: As a condiment with bacon, ballotines, confits, galantines, ham, pâtés, sausages and terrines.
Cheese: Serve mustard as a condiment with strong cheeses (more about cheese condiments).
Chicken: Mustard brightens chicken stews and makes a delicious glaze for chicken breasts and wings.
Dip: Serve it straight or mixed with mayonnaise, sour cream or plain yogurt, with crudités, chips, fries and pretzels. Mustard is also an ingredient in beer and Cheddar dips. You can also add it to a Mexican queso dip.
Eggs: Mustard adds complexity to deviled eggs. It also makes a delicious sauce for poached eggs.
|
|
Fish: Sturdy fish like salmon and tuna are wonderful with a mustard crust. As a glaze, brush it on salmon fillets before broiling or on tuna before searing. Here’s a recipe for a mustard glaze for fish.
Glaze: In addition to fish, glaze chicken, ham, pork and lamb.
Grilled meats: Use mustard as your condiment for meats (including sausages) and poultry.
Ground Meat & Seafood: Add a spoonful along with other seasonings, to burgers, crab cake, meat loaf, etc.
Mussels: Swirl mustard into lager-steamed mussels and garnish with dill. Here’s a mussels and mustard recipe from Pierre Franey, chef of the legendary (and belated) Le Pavillon restaurant in New York City.
Mustard Sauce: Here’s a recipe for mustard sauce.
Pan Sauces: After sautéing chicken breasts or searing steaks, whisk the fond (the browned bits at the bottom of the pan) with a splash of wine and a dollop of mustard, into a tasty sauce.
Pasta: Add acidity to a cream sauce for pasta with a spoonful of mustard. Make a butter-mustard sauce for noodles with grainy mustard.
Potatoes: Add a spoonful of mustard to mashed potatoes. Then top it with crumbled bacon and minced chives or scallions! Add Dijon mustard to a gratin; add a bit to a sour cream or yogurt sauce for potatoes and vegetables.
Roasts: To create a beautiful crust for a leg of lamb, pork loin or turkey breast, rub it with an herb mustard before roasting.
Salads: Add a spoonful to the “protein” salads—chicken, egg, ham, tuna—and the side salads—cole slaw, potato salad and macaroni salad.
Sandwich Spread: Mix mayonnaise with mustard, half and half or to taste. It adds flavor and cuts the calories and fat of the mayo in half.
Soup: Add a spoonful to a pot of dull soup.
Tartar Sauce: Here’s a zingy recipe from Colman’s.
Vinaigrette: A mustard dressing is a classic with salad greens, but it’s also delicious with roasted vegetables (try it with parsnips and turnips!).
Thanks to Colman’s Mustard for some of these yummy ideas. Click the link for recipes.
> MUSTARD HISTORY
> THE DIFFERENT TYPES OF MUSTARD
|
|