|
We were recently searching for something in the back of a friend’s pantry—at her request—and came across a jar of apple butter that looked past its prime. We checked the date. Yep, way gone.
“Do you know you have expired apple butter?” we queried. “Oh that,” she replied. “Someone gave it to me years ago and I didn’t know what to do with it.”
Apple butter is not butter, we explained. It’s a fruit spread so creamy, it spreads like butter. There’s no dairy in it. Think of it as creamy apple jam.
Today’s tip is for anyone who needs suggestions for using apple butter, and for those who want to make their own from the fall crop of just-picked apples. There’s a slow cooker recipe below.
WHAT IS APPLE BUTTER?
Apple butter is a highly concentrated form of apple sauce, as dense as a spread. While the skins are used, since the apples are cooked to a point where the sugar in the flesh caramelizes and the flesh turns brown, the color of the apple doesn’t make a difference.
|
|
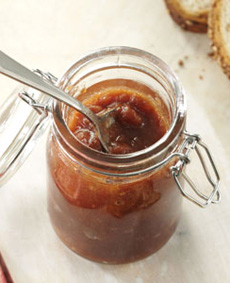
Ready, set spread your delicious homemade apple butter. Photo courtesy TasteOfHome.com. |
THE HISTORY OF APPLE BUTTER
In the Middle Ages, the first monasteries with large fruit orchards began to appear in Europe. Apple butter, developed at that time, turned out to have a long shelf life (due to the concentration of sugars). It was an ideal way to conserve part of the apple crop.
Villagers made their own apple butter, and a popular bread spread was born. As imported spices became more affordable, apple butter was enhanced with allspice, cinnamon, clove and nutmeg.
Fast forward some centuries to the colonization of North America: Housewives brought the technique for making apple butter with them. In the 1700s, the German Rhinelanders and Moravians who settled into the Blue Ridge Mountains, especially in Kentucky, North Carolina, Tennessee and West Virginia, “really honed apple butter-making to a deliciously fine art.” (Source: FoodTimeline.org.)
In the 1800s, another German immigrant group, the Pennsylvania Dutch (a misspelling of Deutsch), established the tradition in southeastern Pennsylvania. In the latter half of the century, with the invention of the Mason jar, apple butter was “put up” by even more households. These days, you can freeze it.
Apple butter’s popularity declined in the 20th century, with the proliferation of store-bought brands of jam and jelly providing a wide variety of fruit options year-round.
WHAT KIND OF APPLES SHOULD YOU USE?
You can use any apples, but soft apples work best because they cook down the fastest. Choose one (or more) of these varieties, and you’ll have apple butter in no time:
Braeburn
Cortland
Fuji
Gravenstein
Jonamac
Jonagold
Ida Red
WAYS TO USE APPLE BUTTER
Breakfast
On oatmeal
On toast or biscuits
On pancakes and waffles
As a topping for yogurt or cottage cheese
Muffin surprise (cut a channel, scoop out and fill, replace the top)
Lunch
Panini: ham or turkey, brie or cheddar (or other cheese), apple butter
Sandwich spread, including with cheese: grilled cheese, cream cheese, semihard cheese
PB&AB, or instead of the PB, apple butter with almond butter and sliced bananas
Turkey burger
|
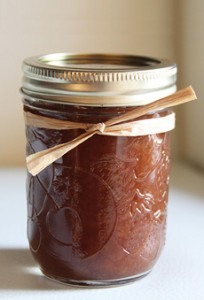
All you need to turn apple butter into a homemade gift is a ribbon! Photo courtesy EspressoandCream.com. |
|
Dinner
As a condiment for pork chops or roast
In barbecue sauce (recipe)
In a baked potato with sour cream or yogurt
Instead of applesauce
Ham glaze
Sauce for chicken
On baked sweet potatoes, or as a dip with sweet potato fries
Dessert
A cup of apple butter as dessert, with heavy cream or whipped cream.
Crepe filling, topped with cinnamon sugar (substitute tortillas for crepes)
Warmed or melted over vanilla ice cream and garnished with pecans
Cookie sandwiches
Baking†
Loaf cake sandwiches
|
|
Snack
On crackers
On a spoon, right from the jar
In a smoothie*
RECIPE: SLOW COOKER APPLE BUTTER
Because the apples cook for a long period, this is a recipe best made in a slow cooker. Plan to start cooking early in the morning. For gifting, use 8-ounce Mason or Ball jars, or other attractive jars. Note that the apple butter won’t have any preservatives, so should be refrigerated or frozen. This recipe is courtesy Taste Of Home.
Ingredients For 4 Pints
5-1/2 pounds apples, peeled and finely chopped (we kept the peel on)
4 cups sugar‡
2 to 3 teaspoons ground cinnamon
1/4 teaspoon ground cloves
1/4 teaspoon salt
Optional: 1 teaspoon cider vinegar
Preparation
1. PLACE the apples in a 3-quart slow cooker. Combine the other ingredients, pour over the apples and mix well. Cover and cook on high for 1 hour.
2. REDUCE the heat to low; cover and cook for 9-11 hours or until thickened and dark brown, stirring occasionally. Stir more frequently as the spread thickens, to prevent sticking.
3. UNCOVER and cook on low 1 hour longer. If desired, stir with a wire whisk until smooth.
4. SPOON into jars or freezer containers, leaving a half inch of space at the top. Cover and refrigerate or freeze.
_________________________________
*Freeze apple butter in an ice cube tray; blend frozen cubes with almond milk and banana, with spices to taste.
†You can use apple butter like applesauce, as a replacement for oil, eggs and butter, in most baked good recipes. Like applesauce, it provides sweetness and moistness in breads, cakes, cookies, muffins, pancakes and waffles. Look for tested recipes.
‡You can cut back on the sweetness, or try one batch and then adjust it.
|
|


 Hummus & Chermoula[/caption]