|
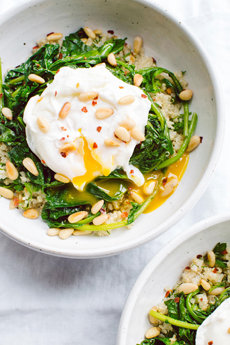
[1] A new approach to breakfast: egg with grain and veggie (photo and recipe © Good Eggs | San Francisco).

[2] Quinoa fried rice topped with an egg (photo © P.F. Chang’s).
|
|
The quinoa bowl recipe is below, but first:
A BRIEF BACKGROUND ON BREAKFAST TRADITIONS
There’s a yummy recipe for a quinoa breakfast bowl below. But first, a word about breakfast.
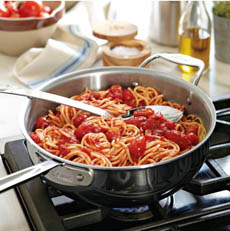
Traditional American breakfasts are echoes of the elaborate breakfasts of the English gentry, which fortified them for a day of sport. They’re much less elaborate today, but regular Brits can still enjoy a heaping plate of eggs, bacon, black and white sausage, beans, kidneys, kippers, mushrooms, potatoes, and tomatoes, with a side of fried bread.
In the late 19th century, the morning fare for wealthy Americans was similar: eggs with cutlets, ham, fried fish, deviled kidneys, black pudding (sausage), cold grouse or pheasant, fruit, and pie. The less affluent made do with eggs or porridge.
No wonder thousands of the well-to-do headed to spa-like sanitariums for rejuvenation. At one sanitarium, a physician named Caleb Jackson changed the way his clients breakfasted.
In 1863, he developed a healthful, spartan, fiber-filled breakfast—the first cold breakfast cereal. Granula, as he called it, was an early version of Grape-Nuts, whose inventor, C.W. Post, first had it when a patient at another sanitarium.
To make granula, baked sheets of graham flour dough were dried, broken into nuggets, baked again, and broken into smaller pieces. The resulting dense, chewy grain clusters had to be soaked overnight in milk before serving.
Other spas followed suit; and as prepared, packaged foods became more common, granula paved the way for Bran Flakes (1915), All Bran (1916), Rice Krispies (1927) and Raisin Bran* (1942), eaten with milk and sugar. In 1951 the onslaught of heavily sugared cereals targeted to kids began, producing Corn Pops, Frosted Flakes, Honey Smacks and Cocoa Krispies. Here’s a detailed history of breakfast cereal.
Around the world, there’s less of a distinction in foods served for breakfast versus other meals.
China: In China, there is a savory rice porridge called congee, but breakfast also can include dumplings, soup with rice and sweet items like fried sponge cake and steamed custard bun.
Japan: The traditional Japanese breakfast has rice, fish, miso soup, sticky soy beans and nori dried seaweed.
India: A common South Indian breakfast has vegetable stew served with steamed lentil and rice bread, and dosa, a thin crunchy crepe with spicy potato filling. [Source]
|
A DIFFERENT APPROACH TO BREAKFAST
Today’s tip is for a hybrid breakfast, combining breakfast eggs with dinner items: cooked grains and vegetables.
The recipe below was devised by Good Eggs in San Franciso, as a light dinner entrée: a poached egg with quinoa and broccoli rabe. They call it a grain bowl.
But we make it for breakfast, to replace butter-fried or -scrambled eggs and hash browns (or bagels and cream cheese) with better-for-you chow. You can also serve it for brunch or lunch,
You can replace the poached egg with another style, the quinoa with other grains or legumes, and the broccoli rabe with your vegetable of choice.
Prep time is 15 minutes, total time is 20 minutes.
> Check out the difference between broccoli, broccoli rabe and broccolini, below.
RECIPE: POACHED EGG WITH QUINOA AND BROCCOLI RABE
Ingredients For 2 Servings
2 tablespoons pine nuts*
2 tablespoons olive oil
6 cloves garlic, peeled and sliced
2 bunches broccoli rabe, stems cut off (substitute spinach)
2 pinches chile flakes
Salt and pepper to taste†
2 eggs
2 cups cooked quinoa or other whole grain
2 tablespoons ghee (clarified butter), melted‡
3 tablespoons parsley, roughly chopped
3 tablespoons dill or other fresh herbs (basil, chervil, mnt, roughly chopped
Garnish: flake salt, a pinch of chile flakes
_______________________________________
*We substituted chopped pistachio nuts, untoasted. You can substitute other nuts or seeds.
†If you plan to garnish with flake salt, under-salt the rabe and quinoa.
‡We didn’t have time to clarify, so used melted butter.
_______________________________________
|
|
Preparation
1. TOAST the pine nuts: Heat a pan over medium heat and add the pine nuts. Toast for 3-5 minutes, tossing them in the pan occasionally to ensure an even color. Remove when they’re golden brown and transfer to a bowl.
2. RETURN the pan to the stove, add 2 tablespoons of olive oil and turn the heat to high. When the oil is hot, add the garlic and sauté for about 3 minutes. As soon as the garlic starts to turn golden brown, turn the heat down to medium and add the broccoli rabe and a pinch or two of chile flakes.
3. TOSS the rabe in the oil and garlic using tongs, and sauté together for 5-7 minutes. Add a pinch or two of salt and taste. You want the leaves to be tender and the flavor to be a bit bitter, but delicious. If the rabe still has too much kick for your taste, cook for a few minutes longer. When the rabe is done, remove from heat and set aside. While the broccoli cooks…
4. SEASON the quinoa. Add the ghee and herbs to the quinoa and stir thoroughly. Finish with a few pinches of salt and a few grinds of pepper to taste.
5. COOK the eggs. You may have your own way of poaching eggs (we use an egg poacher; the result is less pretty but it’s a lot easier). Otherwise, here’s a technique from Good Eggs.
Fill a wide and deep pan about ¾ of the way with water. Put it over high heat and bring to a boil. As soon as the water is boiling, turn the heat down to a simmer. Crack the first egg into a metal ladle and submerge it in the water while holding the handle of the ladle upright. Poach the egg in the ladle for about 5 minutes (more or less depending on your yolk consistency preference.
To check on progress, lift the ladle to just above the water level and tip it gently to pour out excess water. Gently touch the yolk with the tip of your finger to get a sense of how runny it will be. When the egg is poached, gently transfer it to a slotted spoon and slide the egg onto a paper towel. Repeat with the second egg.
6. ASSEMBLE: Spoon the quinoa into the bottom of a bowl, then the broccoli rabe, then the egg. Finish with some flake salt, a pinch of chile, fresh herbs, and nuts.
BROCCOLI, BROCCOLINI & BROCCOLI RABE:
THE DIFFERENCE
Broccoli is a member of the Brassica family of cruciferous vegetables, which includes bok choy, broccoli, Brussels sprouts, cauliflower, cabbage, kale, kohlrabi, mustard greens and turnips, among other veggies. It has thick stalks and large, dense florets. It grows with large outer leaves, which are usually stripped away prior to hitting store shelves. However, they are edible and delicious.
Broccolini, which has long, slender stalks and small, less dense florettes, is hybrid developed in California by crossing conventional broccoli with Chinese kale. Unlike broccoli and broccoli rabe, it doesn not have leaves.
|
|
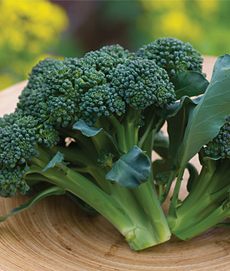
[3] Broccoli, with thick, shorter stalks and large florets (photo © Burpee).
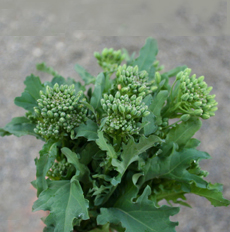
[4] Broccoli rabe, which has long stems, small florets and elegant leaves, can look like a bouquet (photo © Conscious Life Force).
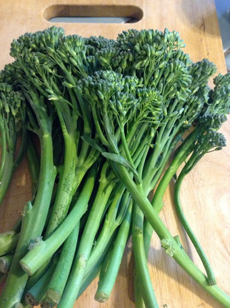 [5] Broccolini has long stems but no leaves (photo © Bodecology).
|
|
Broccoli rabe or rapini (pronounced robb and sometimes spelled raab) is popular in Southern Italy, where it is often served with pasta or polenta. It looks like a very leafy broccolini but is actually a member of the turnip genus. It is more bitter than broccoli and broccolini.
CHECK OUT WHAT’S HAPPENING ON OUR HOME PAGE, THENIBBLE.COM.
|
|