|
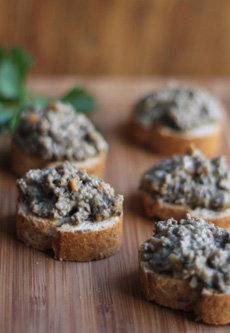
[1] This recipe from Emiko Davies at Honest Cooking is popular in Tuscany. It also contains mushrooms (photo © Honest Cooking).
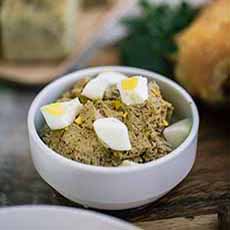
[2] Nana’s chopped liver. The recipe is (photo © Gelson’s Markets).
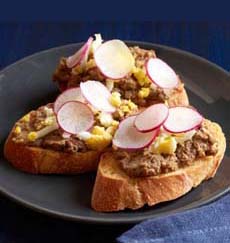
[3] Food Network adds a garnish of chopped hard-boiled egg and sliced radishes. (Here’s the recipe (photo © Food Network). Other colored vegetables also work, from asparagus and coronations to grape tomatoes.

[4] A torchon of foie gras with toasted baguette (photo courtesy Elle France).
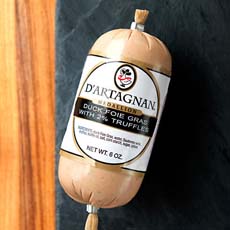
[5] You can purchase a ready-to-eat torchon from D’Artagnan. |
|
Crostini and bruschetta have entered the American mainstream over the past 20 years (here’s the difference).
At better restaurants, a bowl of soup is often served with a side or floating garnish of crostini, which can be simple toasted baguette slices (or other bread) and a side of butter or other spread; or topped with anything from cheese (blue, brie, feta, goat) to mashed avocado and bean purée.
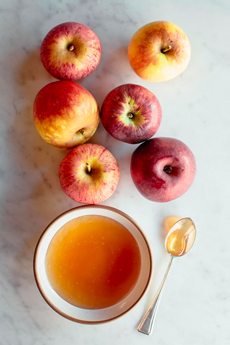
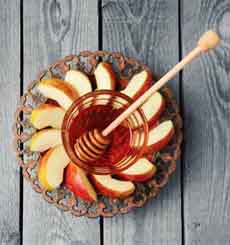
As millions of Americans get ready to enjoy the customary chopped liver Rosh Hashanah dinner, take a detour from the customary on saltines, rye or pumpernickel.
Serve chicken liver crostini (photo #1)!
You can make them with store-bought chopped chicken liver or mousse, but we always keep the tradition going with our Nana’s recipe (below).
Nana served her chopped liver with Nabisco saltines or Stoned Wheat Thins. When we were young, Mom had moved beyond those to party pumpernickel and [homemade] rye toasts.
Other families prefer triangles of white toast or rye bread. We like baguette crostini or (for a chopped liver sandwich) rye bread.
At Passover, chopped liver is served with matzoh.
> The recipe is below.
> Also below: customizing the recipe, optional garnishes, how to render chicken fat, and the difference between appetizers and hors d’oeuvre.
May 10th is National Liver & Onions Day, and these crostini are a more elegant expression of it.
WHAT ARE CROSTINI?
Crostini is the Italian name for croutons. These are not the small pieces served on American salad.
Rather, they are small-ish pieces of toast like a sliced, toasted baguette or a similar Italian loaf.
They’re splendid with chopped liver, and are commonplace in Italy as a base for chopped liver.
Many Americans confuse crostini with bruschetta. Bruschetta is the same slice of bread that is grilled rather than toasted.
A BRIEF HISTORY OF CHOPPED LIVER
European chopped chicken liver dates back perhaps 3,000 years. The chicken, which originated in [take your pick—the jury is still out] Africa, China or the Middle East, didn’t get to Western Europe until about 1000 B.C.E.
You can bet that every part of the bird was used, including the innards. We’ve seen some European recipes that of the chopped the liver liver together with the heart and gizzard, no doubt as their ancestors did.
CHOPPED LIVER FOR EVERYONE!
Many Americans think of chopped chicken liver as Jewish cooking, served at holidays and special events. But it’s also served by European Christians.
In Tuscany, Crostini di Fegatini (chicken liver crostini) is on every Christmas table—made by nonna (grandma), or with her recipe, and spread on crostini. As in Jewish households, its served for every birthday dinner or special occasion meal, and can be found on “the menu of literally every trattoria in Tuscany,” per Emiko Davies, a food writer and photographer specializing in Italian cuisine.
Here’s her recipe, adapted from one of those Tuscan trattorias.
On the opposite side of the country, in Venice, the recipes use butter and calve’s liver. In France, heavy cream and cognac (no surprise there!).
May 10th is National Liver & Onions Day. Chopped chicken liver, which includes onions, can be part of the celebration.
OUR VERY FAVORITE: FOIE GRAS CROSTINI
As much as we love Nana’s chicken liver, for us, the ultimate chicken liver crostini is not chicken liver at all, but a slice of a duck liver torchon or terrine (a.k.a. foie gras) on toasted brioche.
The liver comes fully prepared, with nothing to do except to slice it and make the crostini.
If you’re used to spending on good steaks, you can afford it. A 5-ounce torchon (good for 10 or more slices) is $39.99 and a 1-pound torch is $99.99, at Dartagnan.com.
It makes a lovely gift for a foie-gras (or chopped liver) lover.
FUN WITH CHICKEN LIVER CROSTINI
In addition to room temperature chopped liver on crostini, you can also serve crostini topped with warm sautéed chicken livers and onions. Just slice the livers into pieces after sautéing.
For some food fun, serve a duo of chicken liver crostini as an appetizer: one with chopped liver, one with sautéed liver.
What’s the difference between an appetizer and an hors d’oeuvre? See below.
|
RECIPE #1: NANA’S CHOPPED CHICKEN LIVER CROSTINI
This recipe calls for schmaltz, rendered chicken fat. Some European cultures use butter, cream or olive oil. Just keep to these fats and not to mayonnaise!
We once were served chopped chicken liver at a Passover seder, made with mayonnaise! The guest who brought it must not have been able to find or make schmaltz. We will never forget that taste (think of pastrami or corned beef with mayonnaise). Oy.
Prep time is 20 minutes, cook time is 10 minutes, plus optional chilling time. Nana insisted on making the liver at least a half-day in advance, to allow the flavors to meld in the fridge.
Chopped Liver Consistency
Depending on the preferences of the cook, the chopped liver can be coarse, medium, or blended into a mousse-type consistency with some extra fat.
Our preference is medium-to-mousse, but cooks with less time can go rustic. It’s just as tasty; we just prefer a finer texture on the palate.
Ingredients
2 pounds fresh chicken livers, rinsed and patted try
1 cup rendered chicken fat (schmaltz—recipe below)
2 cups yellow onions, medium to fine dice
4 extra-large eggs, hard-cooked and finely chopped
1/4 cup minced fresh Italian parsley leaves
Optional: 1/2 to 1 teaspoon fresh rosemary or thyme leaves (or more parsley
2 teaspoons kosher salt
1 teaspoon freshly ground black pepper
Preparation
1. CHECK the livers and remove any fat or membrane. Heat a large sauté or fry pan to medium heat. Add 3 tablespoons of rendered chicken fat and add the onions. Cook, stirring occasionally, until golden but not brown—about 10 to 12 minutes. Transfer the onions to a large plate and wipe out the pan.
2. COOK the livers 1 pound at a time. Place the livers in the same pan in a single layer, and season them with salt and pepper. Add three more tablespoons of fat and turn the heat to high. When the fat begins to shimmer, place the livers in the pan in a single layer. Cook the livers for 2 to 2-1/2 minutes per side until browned, turning once. You want to get the insides just pink. Never overcook liver!
3. TRANSFER the livers to the plate with the onions and repeat with the second pound of livers and 3 more tablespoons of fat. Let the cooked livers cool on a platter.
4. CHOP the livers and onions to your desired consistency. If you don’t have great knife skills, the time-honored Jewish technique is to use a mezzaluna and a wooden chopping bowl. You can buy them as a set, but it’s much easier—and less expensive—to use a double-blade mezzaluna and purchase a separate 12″ wood bowl. You can use the mezzaluna to chop vegetables or anything else; and the wood bowl doubles as a salad bowl, chip bowl, etc.
Don’t plus in a food processor without experimenting to see if you can get the consistency you want (it could end up like mousse). If you do use a processor, pulse in small batches so the bottom won’t liquefy before the top ingredients are well chopped.
5. ADD the chopped eggs, herbs, seasonings, and the remaining chicken fat to the bowl. Toss to combine. If you want a finer consistency, continue chopping. Refrigerate until ready to use.
________________
*You can substitute turkey livers. Here’s a party-size recipe from the New York Times.
|
|
MAKE THE RECIPE YOUR OWN
If you love chopped liver as much as we do, play around with the recipe and see which suits you. Some people like less hard-boiled egg mixed in; others leave it out of the liver and use it as a garnish on top. Some people like more herbs and onions, and some people prefer less.
Some people like the Italian custom of adding wine or fortified wine, the addition of fresh sage and garlic, and shallots instead of yellow onions.
Our favorite chopped liver appetizer preparation is our own Four-Onion Chopped Liver Crostini: chopped liver and onions (the basic recipe above), with a garnish of caramelized onions, some pickled onions on the side (red onions or cocktail onions), and a plate garnish of minced chives. Wowsa!
Optional Mix-Ins
Don’t use them all at once to find your ideal chopped liver recipe. Test small batches to see what you prefer.
After you cook one or two pounds of livers, divide the batch and add the additional flavors you want to try.
Some of the following are Italian touches; others were incorporated to Jewish-style chopped liver we’ve had along the way. If add adding wine or spirits, add them the last few minutes of cooking the livers.
1/4 cup reconstituted dried mushrooms or sautéed fresh mushrooms, both finely chopped
2 tablespoons pancetta, finely chopped
2 cloves minced sautéed garlic
Heat: a pinch cayenne or chipotle powder, splash of hot sauce, etc.
Wine or spirits: 2 tablespoons dry white wine, port, madeira, marsala, sherry, vin santo; or 1 tablespoon brandy or 80-proof spirit
2 tablespoons balsamic vinegar or lemon juice
Crunch: ½ stalk celery or 1/2 large carrot, finely chopped
Optional Garnishes
Apple or fig slicet
Baby arugula
Caramelilzed onions (delish!)
Chutney, fig or sour cherry jam, etc.
Coarse sea salt, plain or flavored
Cornichons, halved
Cress, microgreens or sprouts
Fresh herbs: parsley, sage, thyme
Hard-boiled eggs or yolks only (for more color), chopped
________________
†Aside from a garnish, you can create bottom layer of sliced apple or fig, with the chicken liver on top.
RECIPE #2: HOW TO RENDER CHICKEN FAT
Plan ahead: Save the uncooked chicken fat and skin you trim from chicken instead of throwing them away. Freeze them, and when you have enough, defrost and you’re ready to render.
You can also get chicken fat—often free—from butchers, who throw it away (except kosher butchers, who know their customers will buy it). Ask at your butcher shop or supermarket meat department.
You can also collect the fat from homemade chicken soup. Refrigerate it and skim the solid fat that rises to the top. It won’t be a whole lot, but every few tablespoons count.
You can see the entire process in photos from Tori Avey (who uses a slightly different recipe than we have here).
Get Ready To Enjoy Gribenes
The by-product of rendering the skin for fat is cracklings: crispy pieces of chicken skin. In Yiddish, they’re called gribenes (GRIH-beh-ness) or grieven (GREE-vin), which means “scraps” in Hebrew.
They’re a prized treat to eat on potatoes or anything else. When a whole chicken is being used for soup and the skin isn’t needed (it just adds fat that needs to be skimmed off later), it can be cut into strips for gribenes. Cooked with sliced onions, the result is memorable.
Ready to render?
Ingredients For 1/2 Cup Or More‡
8 ounces chicken fat and/or raw skin, cut into small pieces
1/4 teaspoon dried thyme (or 1/2 teaspoon fresh thyme leaves)
1 clove garlic, minced
2 tablespoons cold water
________________
‡Rendering fat only produces more schmaltz than rendering fat with skin.
Preparation
|
|
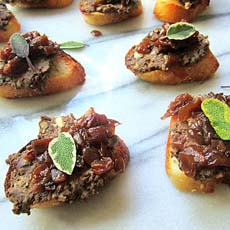
[6] This double garnish from StaceySnacksOnline.com is a dynamite combination of caramelized onions and fresh sage (photo © Stacey Snacks Online).
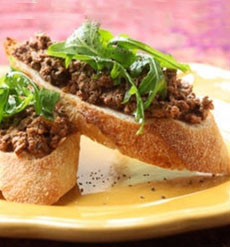
[7] A fusion garnish: arugula, originating in Italy, with chopped chicken liver (photo © DailyLife.com.au.

[8] Kings Food Markets uses a garnish of baby sage and cranberry sauce or chutney. Here’s the recipe (photo © Kings).

[9] Chef Craig Wallen whips the livers into a mousse consistency and garnishes the crostini with coarse sea salt. (Here’s the recipe (photo © Stephanie Bourgeois).
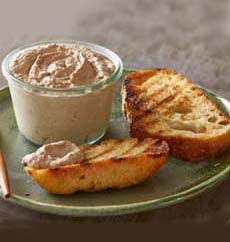
[10] Alton Brown serves DIY crostini, with individual ramekins of chicken liver mousse and a side of toasts. His recipe uses cream and cognac (photo © Food Network).
|
1. COMBINE the chicken fat and any skin in a small saucepan, along with the thyme, garlic and water. Bring the mixture to a simmer over medium-low heat.
2. COOK until the fat has rendered (liquefied) and the skin pieces are crispy, about 35 to 45 minutes. As liquid fat fills the pan, drain it into a measuring cup or another vessel
; the gribenes will take longer to get crisp.
3. EAT the gribenes as soon as possible after they come out of the pan. Don’t refrigerate; they’ll go limp. These delicious cracklings can be eaten with potatoes, garnish a salad or chicken/turkey sandwich, grits or polenta, etc. Both Nana and Mom ate them straight from the pan.
4. COOL the chicken fat slightly, then strain it into a lidded jar. It will keep for up to one week, maybe longer.
FOOD 101: THE DIFFERENCE BETWEEN APPETIZERS & HORS D’OEUVRE
The terms are often used interchangeably, but there is a difference:
Hors d’oeuvre (there’s no extra “s” in French: it’s the same spelling singular or plural), pronounced or-DERV, refers to finger food, such as canapés, served with drinks prior to the meal. The name means “outside the work,” i.e., not part of the main meal.
French hors d’oeuvre were traditionally one-bite items, artistically constructed. Today, the category has expanded to mini quiches, skewers, tarts; baby lamb chops; stuffed mushrooms, etc.
An appetizer is a first course, served at the table and in larger portions. You can plate multiple hors d’oeuvres as an appetizer. In France, that’s known as hors d’oeuvres variés, a variety of hors d’oeuvres.
What about crackers and cheese, crudités and dips, salsa and chips, and other popular American foods served with pre-dinner drinks? Since they are finger foods, you can call them hors d’oeuvre—although that could be a tad pretentious. Call them American hors d’oeuvre.
CHECK OUT WHAT’S HAPPENING ON OUR HOME PAGE, THENIBBLE.COM.
|
|