|
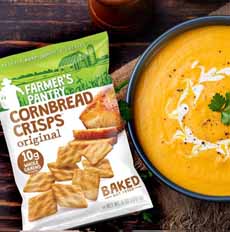
1. FARMER’S PANTRY CORNBREAD CRISPS
Farmer’s Pantry, a snack brand that launched last year, has generated feelings of snack-love in our home and office.
Farmer’s Pantry Cornbread Crisps are the first cornbread cracker snack to hit the market—and if that doesn’t sound exciting, let us restate:
The crisps are like cornbread in a crunchy chip.
Our bona fides: We love cornbread, we can’t get enough cornbread, when we have extra time, we bake cornbread. Ditto for corn muffins.
So after a few chips, when the cornmeal flavor and texture had titillated our taste buds, we:
Headed to Amazon to order more.
Prayed to the supermarket gods that Cornbread Crisps will get lots of distribution, so everyone can grab a bag (and thus keep this wonderful product in production).
There are three flavors, equally worthy of your attention:
Original
Honey Butter
Jalapeño
The chips are all-natural and certified kosher (OU).
They crisps are available in 6-ounce bags of regular size crisps and 2-ounce bags of bite-sized crisps—although the regular size are bite-size enough for us.
We enjoy them:
Snacking from the bag.
As croutons on salads.
With soups.
With dips.
Another fan turned them into cornbread stuffing, and inspired us to make a savory pie crust.
About the company:
Farmer’s Pantry gives back to American farmers, and is a proud sponsor of the National FFA Organization (formerly Future Farmers Of America), supporting students interested in a future in agriculture.
Look at your local food markets or do what we did: race to buy them online so you won’t be without for long.
See more at FarmersPantry.farm.
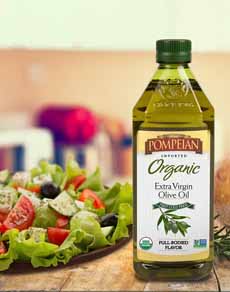
2. POMPEIAN OLIVE OIL
Recently we were treated to an olive oil tasting led by Dr. Luisito Cercaci, one of the most experienced olive oil scientists in the world. Our team was guided through the professional olive oil tasting technique used by official grading panels.
Luisito is Pompeian’s Vice President of Quality and Research & Development, following decades of work at the Department of the Food Quality Authority of the Italian Ministry of Agriculture, and other Italian food quality authorities.
Some of us were already users of Pompeian olive oils, but pretty soon into the tasting, all of us became converts.
How good is it? We drink two tablespoons of heart-healthy olive oil daily (the FDA’s suggestion). We’d been drinking pricey olive oil from a variety of California artisan producers.
|