|
Our products of the week are sweet ones: beverages from Almond Breeze, organic sugar from Dulcie and mochi from My/Mo.
As with all of our Products Of The Week, we consume them all, regularly.
1. ALMOND BREEZE ALMONDMILK MEXICAN HOT CHOCOLATE
Recently we reviewed the line of Almond Breeze Almondmilk nondairy milk drinks, which have become a favorite of ours.
When we feel like a milkshake, we pour ourselves some smooth, creamy Almondmilk Horchata or Almondmilk Blended With Real Bananas.
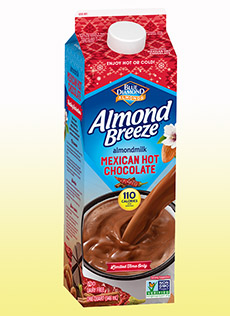
Now there’s something new in our fridge: limited-edition Almond Breeze Almondmilk Mexican Hot Chocolate.
It’s made with traditional Mexican hot chocolate ingredients like allspice, cayenne and cinnamon, and is delicious hot or cold.
Served hot or cold- This new beverage can be enjoyed multiple ways.
A dairy-free option for the holidays, the line is dairy- free, gluten- lactose- and soy-free. It is certified kosher-dairy by OU.
Another holiday-appropriate beverage, Almond Breeze Almondmilk Nog—egg nog without the eggs or dairy—is on the shelves now through January.
Discover more at BlueDiamond.com.
2. DULCIE ORGANIC CANE SUGAR
If you’re trying to eliminate refined foods from your diet, remember to include your sugar.
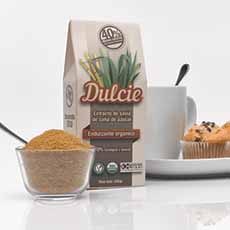
Dulcie is a new brand of organic, unrefined, whole cane sugar. It’s panela sugar, a type most people aren’t familiar with, which is extensively used in
An unbleached and unrefined sweetener made from sugar cane, it resembles brown sugar.
However, because it is unprocessed it contains more minerals than brown sugar, which is a refined product (unrefined sugar is called raw sugar).
Golden in color, it can be used in the same way as refined white sugar. In coffee or tea, it has a richer, rounder flavor (as opposed to a cloying flavor).
Panela is popular in Colombia. A variation called piloncillo is used in Mexico, and a variation called rapadura is made in Venezuela.
All of these are related to the jaggery of India and to the muscovado sugar of Barbados.
Dulcie retains all the natural vitamins and minerals found in the sugarcane plant, which are stripped during the refining process for white sugar.
Dulcie is handmade by artisans in Colombia, and goes plant-to-jar. Here’s how it’s made.
Dulcie is certified organic, kosher (by K M), non-GMO, gluten-free, plant based and vegan.
Try it in your favorite baked goods, on oatmeal, in coffee and tea, and anywhere you need some natural sweetness.
Dulcie is available at natural food stores, and online at Amazon.
Discover more at Dulcie.com.
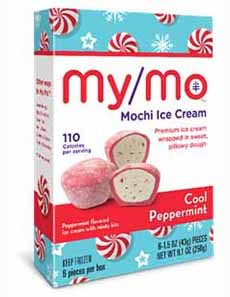
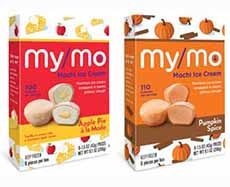
3. MY/MO MOCHI ICE CREAM
“Chew Your Ice Cream” says My/Mo Mochi. If you’ve had mochi, you know what that means.
It not, it’s time to try them, especially with the limited edition seasonal flavors:
Apple Pie á la Mode
Cool Peppermint
Pumpkin Spice
My/Mo Mochi Ice Cream is a two- or three-bite ball of ice cream that’s wrapped in chewy, pillowy mochi dough.
The dough is gluten-free, made from rice.
While it sounds like a dessert from Japan, it was actually invented in in 1993 in Los Angeles. Here’s the story.
Available in 12 year-round plus seasonal flavors, My/Mo Mochi gives snackers a fun way to enjoy ice cream in a handheld form—no dishes or spoons required.
The line is gluten free and rBST free, and certified kosher by OK.
Take a look at all the flavors.
Discover more at MyMoMochi.
|