|

[1] Beef and mushroom broth with sliced portabella mushrooms, garnished with nasturtium leaves (tangy and peppery), sliced radishes and nori (seaweed) (photo © South Fork Kitchen & Bar).

[2] Vietnamese-style broth with scallions, tofu, noodles, onions and a cilantro garnish (photo © Nguyen Phuong Nguyen | Pexels).
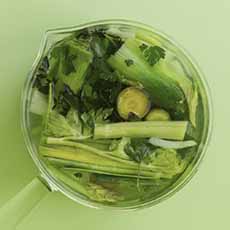
[3] Familiar veggies: celery, leeks, onion, zucchini, parsley (photo © Foodism 360 | Unsplash).
|
|
Pesce en brodo (PESH-ay en BRO-doe) is a classic Italian seafood soup, serving the fillet in a light broth with vegetables.
See our article on how to make pesce en brodo, a light and luscious—and
easy to make—summer main.
Tortellini en brodo is a pasta version.
But how about verdure en brodo (vehr-DOO-ray), vegetables in broth?
It’s a light soup dish for summer, perfect as a first course in beef, chicken, fish or vegetable broth, or as a main course with added protein like tofu—or a tweak with a few shrimp or scallops.
You can also add noodles: spaghetti or linguine, glass noodles (a.k.a. cellophane noodles) or rice noodles*.
WHERE TO BEGIN
If you’re not the type of cook who relishes making broth from start, it’s easy to make with purchased broth.
Then, simply stroll the produce aisle for the vegetables.
Go beyond the obvious contenders—button mushrooms, carrots, celery, green beans, peas. They’re fine but there’s much more. How about:
The Familiar: How about broccoli/broccolini/rabe, cabbage, fennel, parsnips, portabella mushrooms, spinach, squash, turnips, zucchini and summer squash? Don’t forget leeks or onions.
Asian-Style: Bean sprouts, bok choy, Chinese cabbage, mushrooms, seaweed? Toss in a can of bean sprouts.
Cruciferous: High-antioxidant ingredients include bok choy, broccoli, cabbage, cauliflower, collards, kale and mustard greens, garnished with sliced radishes and watercress.
Springtime: Our favorite spring veggies are delicious en brodo: asparagus, fava beans, morels and ramps.
The variations are endless, and your produce aisle will inspire you.
Don’t skimp on the veggies: Make your soup chock-full of them.
RECIPE: VEGETABLES EN BRODO
Ingredients
Broth of choice
Vegetables of choice
Herbs of choice
Seasonings of choice (salt, pepper, chili flakes, fresh ginger root)
Optional: noodles of choice
Garnish of choice (chopped scallions, cilantro, enoki mushrooms, grated carrots, parsley, shredded daikon, sliced radishes, etc.)
Preparation
1. COOK the ingredients in the broth. Garnish as desired and serve.
________________
*Both glass noodles and rice noodles are Chinese-style noodles, but they differ in their main ingredient. Rice noodles are made from rice flour and water, while glass noodles are made from mung bean flour and water. Glass noodles are also known as bean thread noodles, cellophane noodles or transparent noodles.
|