|
Until now, we were not the target customer for an energy drink. While many of our generation gulped the newly-arrived-from-Austria Red Bull, the flavor was unbearable to our sophisticated palate. That was around 1990. Many energy drinks have come and gone since. Red Bull remains the best-selling energy drink in the world, with 7.9 billion cans sold in a year as of 2020 [source].
Energy drinks are packed with sugar, so the category is now introducing zero calorie (no added sugar) versions.
Red Bull was the first to introduce a sugar-free version (in 2003—and in our opinion, even worse tasting than the original).
Earlier this year, Monster Energy, a Coca-Cola brand, introduced Monster Ultra, with some ultra-sounding flavors: Gold, Fiesta Mango, Paradise, Rosà, Sunrise, Violet and Watermelon; and the less romantically-named Ultra, Black, Blue and Red. Zero sugar, zero calories.
They tasted a lot better than other no-sugar energy drinks, but still had those “energy drink” undertone flavors that stopped us from gulping the can. We only sipped as much as we thought we might need to keep us awake for a late dinner date.
Last week a box of True North Energy Seltzer appeared on our doorstep. It was a double surprise: Finally, we found our energy drink!
And True North Energy Seltzer is our Top Pick Of The Week.
1. TRUE NORTH PURE ENERGY SELTZER
Ah, another 12 ounce (375 ml) slim can, but this time, tasting great!
The True North Company has two lines. The original line is True North Pure Energy Seltzer. It’s made in six flavors: Black Cherry (photo #1), Cucumber Lime (photo #2), Grapefruit Lemonade, Mandarin Yuzu, Peach Pear and Watermelon.
This is our kind of energy drink because it tastes just like flavored seltzer, untouched by sweeteners of any kind. The flavors are all-natural.
These seltzers also have what the brand calls “the added benefit of an immunity blend,” antioxidants and immune boosters.
The seltzers are fortified with vitamin C, vitamins A and C; a B-complex of B3, B5, B6, and B 12; and Zinc. Zero calories!
We order it by the case from Amazon. Alas, there’s no mixed case; but maybe the brand will read this and offer one.
Here’s more about the line.
2. TRU: FUNCTIONAL SELTZERS
For people who want a functional drink, and a little sweetness in their seltzer, there’s the new Tru line.
Functional foods and beverages are everyday foods enhanced (fortified) with supplemental nutrition. The goal is to provide a health benefit beyond normal satiation and nutrition. Here’s more about them.
Five of the Tru flavors are enhanced with different formulations of natural caffeine, vitamins and antioxidants. They all do the same thing: give you energy.
The sixth does the opposite: It helps you have a better night’s sleep. Call it the anti-energy seltzer.
The line is:
All natural. The all-natural blend of ingredients is gluten-free, keto-friendly, low calories, low carbohydrates, low glycemic, natural flavors, no major allergens. non-GMO, no artificial preservatives and vegan.
Sweeteners. The drinks are naturally sweetened with monk fruit, stevia leaf and erythritol, for 5 calories a can.
Select the formula you need*:
Tru Energy Wake Up Blend in an Orange Mango flavor increases mental alertness and endurance with all 8 B-complex vitamins, antioxidant vitamin E, green tea and natural caffeine.
Tru Focus Brain Blend is in Apple Kiwi, with yerba mate, natural caffeine, choline bitartrate, CoQ10.
Tru Defend Immunity Blend is in Pineapple, with echinacea, ginger, vitamin C, turmeric.
Tru Rescue Detox Blend is in Blackberry, with prickly pear and DHM to help metabolize alcohol and help prevent hangover symptoms)
Tru Energy Glow Blend is in Raspberry, with skin, hair and nail helpers like collagen and hyaluronic acid, biotin and antioxidant vitamins A and D.
Tru Power Workout Blend is in Watermelon, with green coffee bean and other natural caffeine, beta-alanine to help build lead muscle and more.
Then, there’s a variety to help you go to sleep:
Tru Dream Sleep Blend is in Cherry Berry, enhanced with melatonin, chamomile, magnesium and the neurotransmitter GAB, to improve sleep quality; and the amino acid, 5 HTP (5-Hydroxytryptophan), to help promote the production of serotonin.
Here’s more about the line.
GET YOUR TRUE NORTH ENERGY SELTZER
Head to DrinkTru.com.
It’s also available on Amazon.
Whether Original or Tru, try True North. You’ll have energy that also counts as hydration.
And you don’t have to make coffee!
|
|
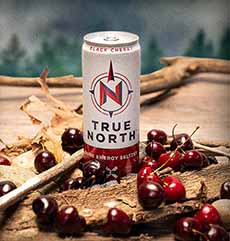
[1] True North Pure Energy Seltzer provides a bigger boost than coffee, in our experience (all photos © True North Energy Seltzer).
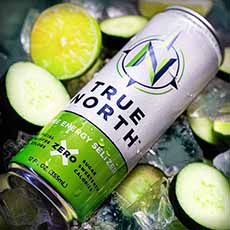
[2] It comes in 6 flavors: Black Cherry, Cucumber Lime, Grapefruit Lemonade, Mandarin Yuzu, Peach Pear and Watermelon.
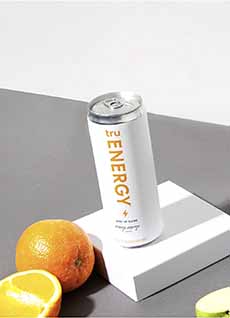
[3] True North’s functional line, Tru Energy Wake Up Blend provides the boost to start your day (all photos © True North Energy Seltzer).

[4] Defend (for immunity), Focus (for concentration) and Rescue (to detox after over-consumption of alcohol) energy seltzers.

[5] Power (workout blend) and Dream, the one seltzer that gives you sleep, not energy.

[6] The family of Tru flavors.
|