|
Bruschetta and crostini are popular hors d’oeuvres that are easy to make. They also can be served as a first course or a light meal, with salad and/or soup.
BRUSCHETTA VS. CROSTINI: WHAT’S THE DIFFERENCE?
The answer, in brief, is the size of the slice, plus grilling versus toasting. Bruschetta (three or four inches in diameter) are cut from an Italian loaf and grilled; crostini (about two inches in diameter) are cut from a thinner loaf such as a baguette and toasted.
Bruschetta (pronounced broo-SKEH-tuh) is grilled bread rubbed with garlic and topped with any variety of items. The toppings can be as simple as extra-virgin olive oil, salt, and pepper, to diced tomatoes and basil, to almost any spread, vegetable, cured meat or cheese—even fruit.
Bruschetta originated in the Tuscany region of Italy, where it is commonly served as a snack or appetizer. It may have been the original garlic bread.
The word comes from the verb bruscare in the Roman dialect, which means “to roast over coals.” If you have access to a grill, grill the bread for authenticity. If not, you can toast it.
Some American manufacturers and others in the food industry misuse the term, using it to refer to the topping only and selling jars of “bruschetta” (it should be bruschetta topping). Show your superior knowledge and don’t allow the term to be distorted: The word bruschetta refers to the grilled bread, not the topping.
Crostini (cruh-STEE-nee) are croutons: not in the American sense of small cubes tossed into soup or salad, but thin slices of toasted bread.
Smaller than bruschetta, the slices are typically cut from a ficelle, a thinner baguette one to two inches wide (the word is French for “string”). The slices are brushed with olive oil, toasted, and then topped with spreadable cheese, pâté, or other ingredients. Plain crostini are served with soups and salads, like melba toast, or set out with cheese.
While lovely grapefruits are still in season, make this colorful and flavorful Grapefruit Bruschetta recipe from Sunkist (photo above).
We especially like it with a Sauvignon Blanc, which often has complementary grassy/herbal or grapefruit notes. You can use any type of grapefruit, but rosy-fleshed varieties make the most beautiful presentation.
RED GRAPEFRUIT BRUSCHETTA
Ingredients For 8 Servings
1 baguette, sliced (how to pick the best baguette)
½ tablespoon olive oil
2 pink or red grapefruit, peeled and segmented
½ cup basil, torn
½ cup blue cheese (if you’re not a blue fan, substitute goat cheese)
Optional: 1 tablespoon red onion, tiny dice
Salt and pepper to taste, as desired (or add crushed red pepper for a touch of heat)
Optional garnish: honey
Preparation
1. PREHEAT oven to 450°F.
2. PLACE baguette slices on a baking sheet and brush both sides with olive oil. Place in oven and bake for 5-6 minutes, flipping halfway through. Remove from oven and set aside.
3. MIX together grapefruit and basil in a small bowl.
4. SPOON onto toasted baguette slices and top with crumbled blue cheese and an optional light honey drizzle.
Here’s another variation of grapefruit bruschetta that cooks the grapefruit topping.
MORE BRUSCHETTA & CROSTINI RECPIES
Any of these recipes can be prepared as bruschetta or crostini, depending on whether you prefer to grill or toast the bread.
American Bruschetta
Apple Raisin Topping
Black Bean Bruschetta
Brie & Beet Bruschetta
Bruschetta With Radicchio Tapenade
Bruschetta With Prosciutto & Goat Cheese
Cherry Tomato Bruschetta
Chicken Liver Crostini
DIY Bruschetta Party Bar
Fig & Brie Bruschetta
Grape Salsa For Bruschetta & Crostini
Low-Carb Brsuchetta
‘Nduja Topping
Onion-Tomato Jam Recipe
Spring Crostini Recipes
Summer Squash Crostini With Goat Cheese
Tapenade For Bruschetta & Crostini
Whipped Ricotta Crostini
White Bean Bruschetta
|
|

[1] With bruschetta, the bread is grilled (photo © California Olive Ranch).
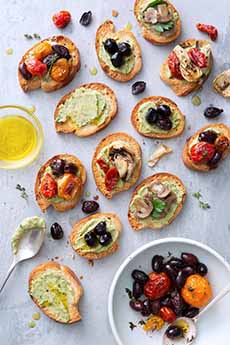
[2] With crostini, the bread is toasted. Here’s the recipe for crostini with white bean spread (photo © DeLallo).

[3] You can top bruschetta—grilled bread—with anything, including rosy grapefruit. The recipe is below (photo © Sunkist Growers).

[4] Crostini American-style: BevCooks.com used a regular loaf of whole grain bread for appetizer- or meal-size portions. Also consider rye bread. Here’s the recipe.
|