THE NIBBLE BLOG: Products, Recipes & Trends In Specialty Foods


Also visit our main website, TheNibble.com.

TIP OF THE DAY: Make Almond Milk

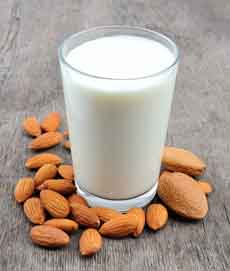
Homemade Almond Milk
Homemade almond milk. Photo courtesy
Juice Queen.

  Here’s a fun project for the weekend: homemade almond milk. All you need are almonds, water, cheesecloth and a jar.

Almond milk is a dairy-free milk alternative, favored by the lactose-intolerant, vegans, raw foodists and as a kosher (pareve) milk alternative. Others simply like the creaminess and hints of almond on the palate.

Almond milk is the number one nondairy milk in the U.S. It can be used anywhere cow’s milk is used, from morning cereal to afternoon smoothies to after-dinner coffee. (Here’s a nutrition comparison.)

In just five minutes (plus eight hours soaking time), you can make a batch, From there, you can make flavored almond milk, like vanilla or cocoa. You can add a sweetener of choice—agave, honey, maple syrup, noncaloric sweetener, sugar—or drink it as is (it has its own natural sweetness).

You can even give a cocoa almond milk kit to a child, useful for everything from Show and Tell to inspiring the joy of cooking.


But today’s project is making a batch of plain almond milk. Sure, you can buy it ready made. But making your own is not only fun; it tastes a lot better than the manufactured, shelf-stable product, which typically contains additives and preservatives.


RECIPE: HOMEMADE ALMOND MILK

Ingredients

  • 2 cups raw almonds
  • Jar
  • Water
  • Cheesecloth
  •  
    Preparation

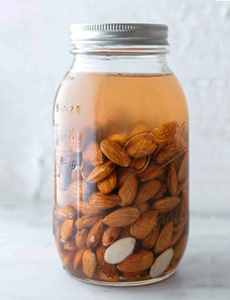
    1. PLACE the almonds in a large bowl or jar and cover with cold water by at least an inch. Cap the jar or cover the bowl with a dish towel, and let the almonds soak for at least 8 hours and up to 2 days. The almonds will plump as they absorb water. The longer you soak them, the creamier the milk will be. If you plan to soak them for more than 8 hours or overnight, put the bowl in the fridge.

    2. STRAIN the almonds in a colander, thoroughly rinse them with cold water and place them in a blender. Pulse them to break up the almonds. Add 4 cups of water and blend on high until the mixture is very smooth, 2 to 4 minutes. The almonds should break down into a very fine meal and the water should be white and opaque.

    3. PLACE the cheesecloth in a large strainer over a bowl. If you don’t have a strainer, gather the edges of the cheesecloth in one hand so as to create a well. Carefully pour the water and almond mixture into the cheesecloth, taking pains to not let any spill out of the sides. When all of the mixture has been poured…

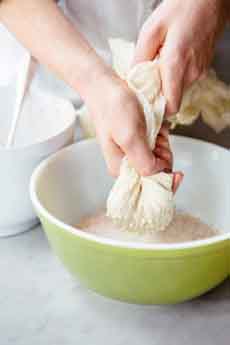
    4. SQUEEZE the remaining almond meal in the cheesecloth to extract any remaining liquid. You can wring the cheesecloth to get every last drop. See below for what to do with the leftover almond meal. At this point you can taste the almond milk and sweeten to taste. It has natural sweetness, so we don’t add anything more.

    5. STORE the almond milk in an airtight container in the fridge. Since it has no preservatives and isn’t pasteurized, it only keeps for two or three days. Because there are no emulsifiers, the milk can separate. Just shake the bottle.

    If you’ve had commercial almond milk, you’ll be wowed by the fresh flavor.

      Make Almond Milk

    Making Almond Milk
    Top: Soaking the almonds. Bottom: Wringing the last delicious drops from the cheesecloth. Photos and recipe courtesy Good Eggs | San Francisco.

     
    If you’d like a thinner milk, use more water next time; for thicker milk, use less water.

    If you plan to make almond milk regularly, buy a nut milk bag from a health food store or online. It’s easier to work with than cheesecloth.

    HOW TO USE THE LEFTOVER ALMOND MEAL

    You can toss or compost it, of course. But you can also:

  • Add it to oatmeal, muffin batter or smoothies for extra protein.
  • If you want to keep it for future baking, dry it by spreading it onto a baking sheet and baking it in a low oven (275°F to 300°F) until completely dry, 2 to 3 hours. You can then freeze it for up to 6 months.
  •  
    MAKING ALMOND MILK: BLENDER VS. FOOD PROCESSOR

    You can use either a blender or a food processor to make almond milk. The differences:

  • With a blender, the milk has a silkier texture and subtly sweet flavor notes.
  • With a food processor, the milk is a bit thicker with a nuttier flavor. It may contain some the bits of ground almonds.

     
    ALMOND MILK HISTORY

    In the Middle Ages, almond milk was made in Europe to East Asia. It was a staple because it kept longer than cow’s or goat’s milk; and it was appropriate for consumption during Lent and fast days.


  • Comments off

    TOP PICK OF THE WEEK: Biscotti Bites

    Biscotti Bites

    Almond Biscotti Bites
    Top: Each Biscotti Bite is a 12-calorie treat. Photo: Thomas Francois | FOT. Bottom: Almond, one of the three flavors of Biscotti Bites. Photo: The Bites Company.


    Every person who is mindful of calories searches for those magical foods that deliver the satisfaction without the calories. We discovered one such food in Biscotti Bites from The Bites Company.

    Before we wax poetic, note that other companies market products called Biscotti Bites. Some are miniature biscotti like Nonni’s Biscotti Bites, a product we enjoy very much.

    But The Bites Company makes little round cookies, just 1-3/8 inches in diameter.

    They’re less dense than biscotti yet still crunchy. And they deliver lovely biscotti flavor in in Almond, Cocoa and Lemon.

    Company founder Dina Upton had made traditional biscotti for 30 years. She reworked her recipe so that her cookies would still deliver a biscotti experience at 12 calories a bite.

    The recommended serving size is 10 cookies for 120 calories; 9 cookies have 3 Weight Watchers points.

    The cookies are all natural, made in small batches from scratch with top-quality ingredients. The Almond flavor evokes traditional biscotti. The Lemon flavor contains fresh lemon peel, for a lilting lemon flavor. The Cocoa flavor is more subtle; we prefer the first two.

    As for nutrition, Biscotti Bites are:

  • Are low in sodium, with no added salt.
  • Have less than 1 gram of sugar in each cookie.
  • Have the right “no” list: no canola oil, no GMOs, no high fructose corn syrup, no MSG, no soy, no trans fat.
  •  
    They are also kosher-certified, although the company is using up its supply of packaging without the hechsher.

    Biscotti Bites are sold in 4.5-ounce bags, and the Almond variety is available in 1-ounce single serve bags. You can buy them on the company website, TheBitesCompany.com, or head to Amazon for:

  • Almond Biscotti Bites
  • Cocoa Biscotti Bites
  • Lemon Biscotti Bites
  •  

     
    The MSRP for single packages is $5.99; a three-pack is $15.00. We promise, they’re worth every penny.

    They are so delicious that you can’t eat just one. Fortunately, you can have 10 at a time.
     
    BISCOTTI TRIVIA

    Biscotti date back to ancient Rome. They were originally made not for a leisurely snack with an espresso, but as a long-shelf-life food that could be carried by travelers, back in the day when you were not likely to find food on the road.

    Among the travelers who took biscotti with them were the Roman Legions. Here’s the history of biscotti.


    Comments off

    TIP OF THE DAY: Don’t Toss The Broccoli Stems

    Many people don’t like broccoli stems, as proven by the bags of florets-only in the produce section. But while the texture is different, the stems are just as tasty, with just as much nutrition and cruciferous antioxidants.

    If, for whatever reason, you don’t cook them along with the florets, put them to another use.

  • Cook and purée them.
  • Shave them raw into salads.
  • Steam and add them to omelets and cooked grains.
  • Add them to soup.
  • Toss them into a stir-fry.
  •  
    For the tenderest results, you can use a vegetable peeler to remove the outer layer of supermarket broccoli stems before cooking; they tend to be tougher than just-harvested greenmarket broccoli. Then, you can cook them as you like or keep shaving the raw stems for a salad ingredient.

    In the recipe that follows, the raw stems are sliced into thin circles and turned into their own salad: broccoli stem salad! Who needs lettuce?

    This recipe is by Kate Galassi for Quinciple, a delivery service that brings the week’s best fruits and vegetables to your door.
     
     
    RECIPE: BROCCOLI STEM SALAD

    Ingredients For 2 Servings

  • 2 broccoli stems (from 2 large heads of broccoli)
  • ½ garlic clove, crushed
  • ½ lemon, juiced
  • 4 tablespoons olive oil
  • Pinch of chili flakes (crushed red pepper)
  • Salt and pepper
  • ¼ cup mixed fresh herbs, such as basil, mint or parsley; or fresh or dried oregano* and thyme*
  • ___________________________________
     
    *A little bit of oregano and thyme go a long way, so don’t use too much in your blend.

      Broccoli Stem Salad
    [1] If you don’t cook the broccoli stems, make a broccoli stem salad (photo and recipe © Quinciple.

    Head Of Broccoli
    [2] The little green “trees” with robust stalks and branches got their name from the Latin word “bracchium,” which means strong arm or branch (photo © Burpee).

     
    Preparation

    1. SHAVE the stems into paper-thin slices with a mandoline. If you don’t have one, use a very sharp chef’s knife to slice the stems as thinly as you can.

    2. WHISK together the garlic, lemon juice, olive oil, and chili flakes, and toss with the sliced broccoli stems. Season with salt and pepper and let sit for fifteen minutes. Meanwhile…

    3. PICK the herb leaves off their stems. Small leaves, including parsley, can stay whole. Larger leaves of basil and mint should be torn into smaller pieces. Or, chop them all if you like, with a mezzaluna or other tool.

    4. DIVIDE the broccoli salad between two plates and garnish with the fresh herbs.
     
     
    THE CRUCIFEROUS VEGETABLES FAMILY

    Broccoli is a cruciferous vegetable, a member of the Brassicaceae family of cancer-fighting superfoods.

    “Cruciferous” derives from cruciferae, New Latin for “cross-bearing.” The flowers of these vegetables consist of four petals in the shape of a cross.

    The family includes arugula, bok choy, broccoli, Brussels sprouts, cabbage, cauliflower, collard greens, horseradish, kale, kohlrabi, mizuna, mustard greens, radish, rapeseed/canola, rapini (broccoli rabe), rutabaga, tatsoi and turnips.

    They’re low in calories and high in fiber, vitamins, and minerals. You can’t eat too many of them, but you can overcook them. You’ll know they’re overcooked when an unpleasant sulfur aroma appears. They’ll also fade in color.

    That’s because all cruciferous vegetables contain chemical compounds that, when exposed to heat for a sufficient amount of time, produce hydrogen sulfide.

    So, enjoy them on the al dente side.


    CHECK OUT WHAT’S HAPPENING ON OUR HOME PAGE, THENIBBLE.COM.


    Comments off


    © Copyright 2005-2026 Lifestyle Direct, Inc. All rights reserved. All images are copyrighted to their respective owners.