THE NIBBLE BLOG: Products, Recipes & Trends In Specialty Foods


Also visit our main website, TheNibble.com.

TIP OF THE DAY: Grain Bowls With Roasted Vegetables

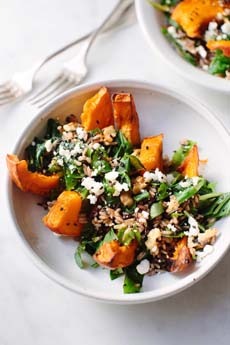
Grain Bowl With Squash
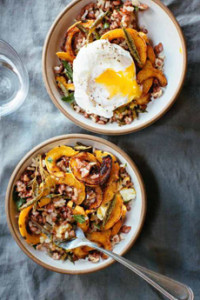
[1] Grain bowl with delicata squash (all photos © Good Eggs).

Grain Bowl With Squash
[2] Wild rice bowl with kabocha squash.

  Did grain bowls originate in healthy “salad” food chains? All we know is that in the last few years, grain bowls have become a go-to light and nutritious meal, whether you buy yours from a food shop or bring it from home.

Make one of your new year healthy food switches a weekly grain bowl. The options are endless, and you’ll get to try different grains and explore other ingredients, including different varieties of squash. (Squash and grains are a great marriage.)

Grain bowls can be served at lunch or dinner; hot, warm, or chilled. They can be:

  • Meatless for meatless Monday
  • Topped with small amounts of meat, poultry, fish, or seafood
  • Vegan
  •  
    You can top it with your favorite garnishes (olives, please!). You can use up leftovers.

    No time to cook grains? Look at precooked grains; add or substitute canned beans.

    Check out the recipe below.
     
     
    GRAIN BOWLS: HOW TO MIX & MATCH

    The formula is simple: cooked grain topped with vegetables and proteins, drizzled with dressing, and garnished.

  • Grains: Make them whole grains, and expand your experience. Barley? Couscous? Kamut? Quinoa? Peruse the choices at your regular food store, and seek out natural food stores for even more options.
  • Proteins: beans/other legumes*; crumbled/shaved/shredded cheese; fried, hard cooked or poached eggs; fish/seafood; meat or poultry; tofu.
  • Vegetables: marinated, pickled, raw (avocado, cucumber, radish), roasted, steamed, wilted.
  • Garnishes: baby arugula, capers, cherry/grape tomatoes, dried fruit (apricots, dates, cherries, cranberries, raisins), fresh herbs, green onions, green peas/edamame, hummus, kimchi, nuts/seeds, olives, plain yogurt, sprouts, sundried tomatoes, watercress.
  • Heat: chile flakes, chipotle, hot sauce, minced jalapeño.
  • Dressing: lemon/lime wedges, regular or flavored oil and vinegar, tahini.
  •  
     
    RECIPE: WILD RICE & ROASTED SQUASH SALAD

    This recipe, from Good Eggs, takes 15 minutes of prep time and 30 minutes of cook time. It specifies kabocha squash; but as mentioned above, you can take the opportunity to try any squash you like.

    Ingredients

  • 1 kabocha squash (or substitute)
  • 1 cup wild rice
  • 1/3 cup walnuts, toasted and roughly chopped
  • 1 tablespoon black sesame seeds
  • 3 tablespoons parsley, roughly chopped
  • 1 cup arugula, roughly chopped
  • ½ cup feta cheese
  • 2-3 tablespoons rice vinegar
  • 1 tablespoon sesame oil
  • Olive oil
  • Salt and pepper
  •  
    _________________

    *The difference between beans and legumes: All beans are legumes, plants with pod fruits. But the category also includes peas, pulses (like lentils), and even pod-based vine nuts like peanuts.
     
    Preparation

    1. PREHEAT the oven to 400°F. Using a sturdy knife and a steady hand, cut the squash in half and scoop out the seeds. (Save ‘em to roast if you like!) Slice kabocha halves into 1” thick wedges and arrange them in one layer on a baking sheet. Toss with a pinch of salt and a bit of olive oil—just enough to coat each piece—and place the sheet in the oven. They should take about 30 minutes to cook.

    2. PUT the rice in a pot with 2 cups of water and bring it to a boil. When the water boils, cover the pot and turn it down to a simmer until the rice is cooked (about 25-30 minutes). While the rice and the squash cook…
    3. WASH and dry the watercress and arugula. Chop them very roughly and set them aside. Toast the walnuts until they’re golden brown (about 4-5 minutes in the toaster oven or 3 minutes in the oven—they’re deceptively fast toasting nuts). Chop once they’ve cooled.

    4. CHECK the rice. If it’s fully cooked, turn off the flame and let it sit for a few minutes in the covered pot. If all of the water is absorbed but the grains are not yet cooked, add a bit more water and continue to cook it with the cover on for a few more minutes. When it’s done, scoop the rice into a bowl and place it in the fridge for a few minutes.
    Step 5

    5. CHECK the squash. When it is fully cooked (golden brown and tender) after about 30 minutes, remove it from the oven. Let it cool slightly if you don’t want to wilt the greens. In a bowl, combine the rice, squash, greens, sesame seeds, parsley, walnuts, and feta. Dress with a couple splashes of rice vinegar, a bit of olive oil, and a few drops of sesame oil. Mix gently with a large spoon.

    6. ADJUST seasonings (salt and pepper) to taste and serve.


    A SQUASH ODYSSEY

    What do these have in common: acorn, Australian blue, banana, buttercup, butternut, calabaza, carnival, chayote, delicata, gold nugget, hubbard, kabocha, orangetti, red kuri, spaghetti, stripetti, sweet dumpling, and turban?

    They’re all winter squash—but you probably guessed that from the headline. Do you know how delicious they all are, though? We went on a two-week squash odyssey and found a personal favorite (carnival squash, so good we ate the rind; sweet dumpling squash was our runner-up).

    Squash Is A Guilt-Free Food

  • It’s good for you, with tons of vitamin A (one serving has four times the RDA—and 52% of vitamin C) and a good source of vitamin E (alpha-tocopherol), thiamin, niacin, vitamin B6, folate, calcium, magnesium, potassium, and manganese.
  • The calories are just 80 to 100 per cup, depending on the variety.
  • Read more about these gorgeous vegetables in our Squash Glossary.
     
     
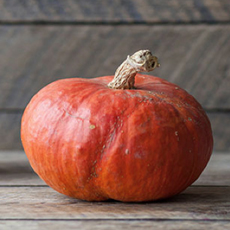
    WHAT ARE KABOCHA SQUASH?

    Kabocha is also called Japanese pumpkin, especially in Australia and New Zealand. It is the variety of squash used in tempura. You may find different varieties in farmer’s markets. We’ve included photos of three varieties.

    Many of the kabocha in the market are kuri kabocha, a variety bred from seiyo kabocha, buttercup squash. It has a strong yet sweet flavor; its texture and flavor have been described as a combination of pumpkin and sweet potato. The rind of a kabocha is edible.

    Kabocha is available year-round but peaks in the late summer and early fall.

    Squash History

    The ancestors of all squash originated, and were domesticated, in Mesoamerica, some 8000 to 10,000 years ago. That’s 4,000 years earlier than the domestication of maize and beans, other local staples.

    Christopher Columbus brought squash back to Europe, along with tobacco, potatoes, and tomatoes. From there, the vegetable was dispersed around the world.


    Gray Kabocha Squash
    [3] Gray kabocha squash.

    Red Kabocha Squash
    [4] Red kabocha squash.

    Sunshine Kabocha Squash
    [5] Sunshine kabocha squash.

     
    In 1541 squash was brought to Japan from Cambodia on Portuguese ships. The sailors then went to Japan, where they introduced the squash as Cambodia abóbora, (Cambodian pumpkin). The name was shortened by the Japanese to kabocha, and kabocha became the generic term for all squash. [Source]


    CHECK OUT WHAT’S HAPPENING ON OUR HOME PAGE, THENIBBLE.COM.


    Comments off

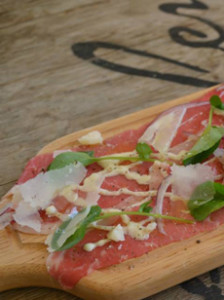
    FOOD FUN: “Stonehenge” Beef Carpaccio

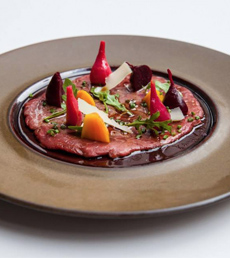
    Stonehenge Beef Carpaccio

    Garden Beef Carpaccio From All'Onda
    Turn beef carpaccio into an homage to
    Stonehenge. Photos courtesy All’Onda | NYC.

      We’re starting the new year of Food Fun with this eye-catching, low calorie treat.

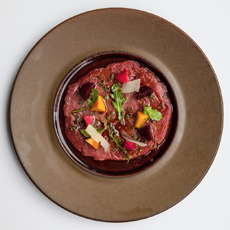
    We love the eye appeal of the food at All’Onda in New York City. Take this “Stonehenge” Beef Carpaccio. Cut beets are arranged in a circle in an homage to the giant standing stones of Stonehenge.

    Carpaccio (car-POTCH-yo) is a very popular first course in Italy. Paper-thin slices of beef tenderloin are topped with arugula and shaved cheese, traditionally Parmigiano-Reggiano, and a drizzle of olive oil. On top of those basics, the cook can add anything that he/she likes.

    So consider what else you’d like to include in your own carpaccio. How about baby spinach, pieces of blood orange, capers or caperberries, cherry or grape tomatoes, gourmet sprouts, onions/green onions/chives, and for those who are blessed financially, white truffles in season (the season is now). The chef at All’Onda chose baby beets and you can, too.
     
    For an outside-the-box surf-and-turf, top the beef with anchovies, caviar (salmon caviar is nice and affordable, wasabi tobiko has hot wasabi flavor and a great crunch) or thinly-sliced raw scallops.

    The dressing can be fine olive oil or herb-infused oil (basil or rosemary are best) with a slice of lemon or lime. It could be a vinaigrette; or it could be something fusion. We like ponzu sauce, which we used in our re-creation of this recipe.

    Serve the carpaccio with sliced baguette or crusty sourdough, plain or toasted, along with a peppermill.


    RECIPE: STONEHENGE CARPACCIO

    Total preparation time is 2 hours 35 minutes, of which two hours is chilling time in the freezer. The biggest challenge you’ll have is slicing the beef thinly and evenly. Sharpen that knife!

    Ingredients For 4 Servings

  • 10 ounces beef tenderloin*
  • 2-3 cups handfuls baby arugula (substitute baby spinach)
  • EVOO (we used basil-infused) or balsamic vinaigrette
  • Baby beets in red and yellow, sliced to stand up
  • Kosher salt
  • Minced chives and/or small capers
  • Shaved Parmesan or Pecorino Romano cheese†
  •  
    ___________________________________________
    *Get the the tip end of the loin, which is narrower and a better shape for carpaccio.

    †American “Romano” cheese is a mild cheese not related to Italian Peorino Romano, which is salty and flavorful like Parmigiano-Reggiano. See our Cheese Glossary for more information.


    Preparation

    1. FREEZE the beef briefly to make it easier to cut. Cloak it tightly with plastic wrap and place it in the freezer for 2 hours. Chill the plates in the refrigerator.

    2. REMOVE the beef from the freezer and thinly slice it into pieces approximately 1/8″ to 1/4″ thick. Lay out sheets of plastic wrap and place each slice onto the wrap as you slice it. Top the slices with another piece of plastic wrap and gently pound the meat with a mallet until the slices are paper thin.

    3. DIVIDE the beef onto the four plates, creating a neat circle or other artful layout. Toss the greens lightly in the balsamic vinaigrette. Arrange the beets into “Stonehenge.” pepper and/or

    4. TOP with the shaved cheese and serve, passing the peppermill and the bread.
     

    CARPACCIO VS. CRUDO

    Sometimes we see “Tuna Carpaccio” or other seafood carpaccio (octopus, salmon, scallops, etc.) on a menu. That’s incorrect; feel free to point it out to the chef. (Seriously: We once had to tell a two-star chef, via our waiter, that his menu featured bison, not buffalo).

      Carpaccio Recipe
    Don’t want to create Stonehenge? The same ingredients make a conventional beef carpaccio. This one, from Firenze Osteria, is slightly less conventional: It substitutes aïoli—garlic mayonnaise—for the olive oil.
     
    Just because they’re acclaimed doesn’t mean that they’re correct.)

    Carpaccio is raw beef filet, typically sirloin; crudo is the term for raw fish or seafood. Crudo is analogous to sashimi or tiradito, but the fish is cut differently.

    While crudo has been eaten for millennia*, carpaccio is a modern dish, created in Venice in 1963, at the time of an exhibition dedicated to Venetian painter Vittore Carpaccio (1465-1526).

    The carpaccio dish was based on the Piedmont speciality, carne cruda all’albese, created by Giuseppe Cipriani, founder of Harry’s Bar in Venice. Using fine Piedmontese beef (Piemontese in Italian), he originally prepared it for a countess whose doctors had recommended that she eat raw meat!
     
    _________________________________________
    ‡From the earliest times, fishermen have eaten their catch on board, with a bit of salt and/or citrus. Before man learned to make fire, some 350,000 years ago, the catch was de facto eaten raw. Here’s a list of raw fish dishes.


    Comments off

    TIP OF THE DAY: Quick Microwaved Mug-Scrambled Eggs

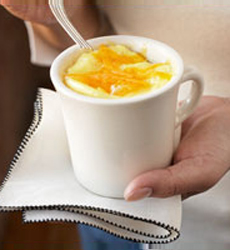
    Mug Scrambled Eggs
    Mug-scrambled eggs, ready in less than three minutes. Photo courtesy American
    Egg Board.
     

    You should start the day off with a protein-based breakfast. Many of us don’t, opting for toast, a bagel or a bowl of Corn Flakes. Yet, you can have a better-for-you breakfast of scrambled eggs, without turning on the stove.

    For a quick and easy breakfast in less than 3 minutes, try this microwave egg scramble from the American Egg Board, IncredibleEgg.org.

    Just toss the ingredients into a mug! Prep time is 1 minute, cook time is 2 minutes. You can even prepare the mixture the night before, cutting your morning time to

    To blend the ingredients, you’ll need a mini whisk or an Aerolatte or other milk frother. However, in a pinch, a fork will do.
     
     
    RECIPE: MICROWAVED MUG SCRAMBLED EGGS

    Ingredients Per Serving

  • 2 eggs
  • 2 tablespoons milk
  • Optional: minced fresh or dried herbs
  • Salt and pepper to taste
  • Optional garnishes: 2 tablespoons shredded Cheddar cheese
    or salsa
  • Preparation

    1. COAT a 12-ounce, microwave-safe coffee mug with cooking spray. Add the eggs, milk, herbs and salt and pepper to taste; beat or whisk until blended.

    2. MICROWAVE on HIGH 45 seconds; stir. MICROWAVE until eggs are almost set, 30 to 45 seconds longer. Note: Microwave ovens vary. Cooking times may need to be adjusted.

    3. TOP with cheese and/or salsa; season with salt and pepper.
      

    Comments off


    © Copyright 2005-2026 Lifestyle Direct, Inc. All rights reserved. All images are copyrighted to their respective owners.