[1] Chicken enchilada fixings in a hot dog roll (photo © KingsHawaiian.com).

[2] Pepperoni pizza ingredients in a hot dog roll (photo © SimplyStacie.net).
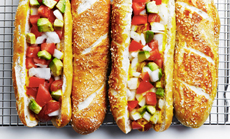
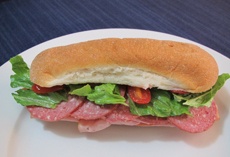
[3] Salad on a hot dog roll (photo © Bitemore.com).
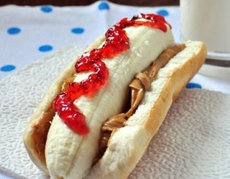
[4] Peanut butter, bacon and banana on a hot dog roll (photo © Huffington Post).
|
|
July is National Hot Dog Month, so be sure to get your fill.
When you have extra rolls without hot dogs, brats or other sausages to grace them, you can stick them in the freezer.
You can also turn them into bread pudding, panzanella (bread salad), croutons or bread crumbs, and any number of recipes requiring bread, from gazpacho to romesco sauce.
But today, we’ve thought outside the box in terms of fillings, and present 20 alternative fillings for your hot dog rolls.
TIP: If the preparation doesn’t already require toasting/grilling, most of these preparations will be better with toasted or grilled rolls.
TRY THESE SANDWICHES
Food 101: Anything served in a roll is considered a sandwich (thus, burgers and hot dogs are sandwiches).
Buffalo Roll: Chicken tenders, blue cheese dressing, diced celery.
Breakfast “Burrito”: Scrambled eggs, bacon/sausage, salsa or other garnish.
Breakfast Toast: Serve a toasted roll with your favorite breakfast spreads.
Bruschetta or Crostini (the difference): Add your favorite toppings and eat them sandwich-style. You can cut them in half for serving.
Carrot Dogs: vegan recipe.
Cheese Sticks: recipe.
Chili (without the dog, but with the cheese and onions).
Faux Enchiladas Or Tacos: replace the tortilla with the roll.
French Toast or breakfast pastries.
Fruit Rolls: toast, spread with honey and add fresh fruit.
Garlic bread: One roll creates a mini garlic bread “loaf.”
Green Salad Roll: put all the ingredients on a toasted roll (go light on the vinaigrette): Cobb Salad, Chef Salad, Greek Salad, Spinach Salad.
Grilled Cheese.
Grilled Fish Or Seafood: Top it with tartar sauce or seafood sauce (instead of a lobster roll, try more affordable seafood).
Other Foods Not Eaten On Bread: Try Bean salad, ratatouille—check the fridge.
Panini: Add sandwich fillings, butter the outsides and grill the roll on a panini press.
Pizza Roll: Fill with your favorite pizza topping, sauce and mozzarella; microwave for 30 seconds to melt the cheese.
Sandwiches Made With Other Types Of Rolls: Barbecue, chicken parm, cubano, meatball, po’boy, Sloppy Joe, etc.
Sandwiches Made With Sliced Bread: Ham and cheese, PB&J, tuna, etc. Try a PB and banana sandwich, using the entire banana like a hot dog.
Southern Bird Dogs (recipe).
We avoided ideas like these cheese fries in a hot dog roll, as well as spaghetti rolls and chicken chow mein on a hot dog roll. But you still can have fun with it: See the Frog Sandwich photo below.
|
GARNISH, GARNISH, GARNISH
Whatever you put into your hot dog roll, consider garnishes to top it:
Chopped fresh herbs
Diced tomatoes, onions, jalapeños, bell peppers
Leftover grains, vegetables
Pickles and/or sliced olives
Chutney or relish
Salsa
Shredded cheese
Shredded lettuce, slaw
|
|
BUNS, ROLLS AND BISCUITS: THE DIFFERENCE
You may have noticed that we use the word roll instead of bun to denote hot dog-specific bread.
There is no official difference: Both are single-serve breads, and the FDA only stipulates that buns and rolls weigh less than one-half pound (loaves of bread must weigh one pound or more).
Manufacturers and retailers use whichever term they want. However, the American Institute of Baking uses this distinction:
“Rolls” is generally applied to individual breads that hold a filling—either pre-filled like cinnamon rolls from sandwich bread like Kaiser rolls. The notable exception is hot cross buns, which are filled with currants or raisins. (Editor’s note: The first recorded use of the term “hot cross bun” appears in 1733, when there was no distinction. Because there is no official standard, there are many exceptions, from hot dog an hamburger buns (should be rolls) to hot cross buns (filled with currants).
“Buns” typically do not contain a filling, but can be eaten plain, with a spread (butter, jam), or used as a sop*.
Bunne was the word used in Middle English. The use of roll to describe a small bread came much later. The oldest reference we could find is to Parker House rolls, in 1873.
Biscuits use a different leavening. Biscuits use baking powder to rise; buns and rolls use yeast.
Texture: Rolls can be hard (crusty) or soft, buns are soft, and biscuits are pillowy soft (from the baking powder).
HOT DOG RECIPES (WITH ACTUAL HOT DOGS)
Bacon Cheese Dogs
Cubano Dog
Gourmet Hot Dogs 1
Gourmet Hot Dogs 2
Italian Hot Dogs
Mini Corn Dogs
Tater Tot Hot Dog Skewers
Top 10 Hot Dog Toppings
|
|

[5] The Southern Bird Dog is filled with chicken tenders and bacon (photo © JamHands.com).
[6] Use extra hot dog rolls for your sandwiches (photo © GlutenFreeDairyFreeNJ.Blogspot.com).

[7] Have fun: a cheese sandwich on a hot dog roll (photo © TheChaosAndTheClutter.com).
|
_____________________
*“Sop” indicates a piece of bread or other solid used to wipe up a liquid food: gravy, sauce, soup, stew, etc. It is the source of the words supper, soup and sopping (drenched). It evolved from the Old English soppian, “bread soaked in some liquid.”
|
|