THE NIBBLE BLOG: Products, Recipes & Trends In Specialty Foods


Also visit our main website, TheNibble.com.


Things To Do With Blueberries: Blueberry Recipes For Every Meal

Got blueberries? There at an excellent price right now. When October brings half-pints of blueberries for $5 and more, you’ll be sorry you didn’t enjoy more of these during peak blueberry season.

So enjoy all the blueberry and mixed fruit salads, cocktails, and pies. Here are some of our recipes to include blueberries in every meal.

> July is National Blueberry Month.

> The history of blueberries is below.
 
 
MORE BLUEBERRY RECIPES

BEVERAGES

  • Blueberry Lavender Water
  • Blueberry Lemonade
  • Blueberry Lemonade Cocktail
  • Blueberry Lime Smash
  • Blueberry Mango Chile Smoothie
  • Blueberry Mimosa Cocktail
  • Blueberry Pom Smoothie
  • Blueberry Smoothie With Almond Milk
  • Coffee Shake With Blueberries
  •  
    BREAKFAST

  • Baked Oatmeal With Blueberries & Almonds
  • Blueberry Breakfast Salad
  • Blueberry Popovers
  • Blueberry Yogurt Granola Parfait
  • Fresh Blueberry Muffins
  • On cottage cheese, French toast, oatmeal, waffles and on plain, blueberry, and vanilla yogurt
  • Overnight Lemon Blueberry Muffin Casserole
  • 7 Ways To Make Blueberry Pancakes
  • >
     
    MAINS, SAUCES & SIDES

  • Blueberry Gastrique For Grilled Meat, Poultry & Fish
  • Green Salad With Blueberries & Blue Cheese
  • Rack Of Lamb With Homemade Blueberry Jam
  • Scattered blueberries as a plate garnish
  •  
    DESSERTS

  • Blueberry Cheesecake Ice Cream Pops
  • Blueberry Cobbler
  • Blueberry Ice Cream
  • Blueberry Ice Pops
  • Blueberry Pound Cake
  • Blueberry Sorbet
  • Blueberry Topping for angel cake, cheesecake, pound cake
  • Lemon Blueberry Icebox Cake
  • Lemon Blueberry and White Chocolate Cream Cake
  • Mango Blueberry Cobbler
  • No Bake Blueberry Cheesecake
  •  
     
    THE HISTORY OF BLUEBERRIES

    Blueberries (Vaccinium corymbosum) are one of the few fruit species native* to North America and unknown in Europe: perennial flowering plants with indigo-colored berries. Also included in the Vaccinium genus are cranberries, bilberries, and grouseberries.

    Vaccinum is a member of the Ericaceae family, which also includes the huckleberry (the most common in the U.S. is the black huckleberry, Gaylussacia baccata) and popular non-edibles including azalea, rhododendron, and various common heaths and heathers.

    Blueberries are called by different names, including bilberry, cowberry, farkleberry, and sparkleberry.

    Wild blueberries were gathered by Native Americans to eat as fresh fruit during the season and used dried fruit thereafter.

  • The dried berries were used in soups and stews and as a rub for meats. They were mixed with dried meat and cornmeal into pemican, a nutritious, easily portable food carried by hunters and travelers.
  • Blueberry juice was used as a dye for cloth and baskets and to make cough syrup.
  • The leaves of the plant were made into tea to “fortify the blood.”
  • With the introduction of honeybees by Europeans, the berries were mixed with cornmeal, honey, and water to make a pudding called sautauthig.
  •  

    Blueberry Breakfast Salad
    [1] Blueberry breakfast salad: combine any fruits atop greens (photo courtesy Blueberry Council).

    Blueberry Yogurt Parfait
    [2] Blueberry-yogurt-granola parfait (photo courtesy Fruits From Chile).

    Blueberry Vinaigrette
    [3] Blueberry vinaigrette for salads and broiled proteins (photo courtesy Wild Blueberries).

    Salad With Blueberries
    [4] Blueberries into a grilled chicken or salmon salad (photo courtesy CFAA).

    Salmon With Blueberry Sauce
    [5] Salmon with blueberry sauce (photo courtesy Munchery).

     
    The blueberry was considered a sacred food by Native Americans because the blossom-end of the berry is shaped like a five-pointed star. American Indians believed that the berries were sent by the Great Spirit during a great famine to relieve the hunger of their children [source].
     
     
    The Blueberries The Pilgrims Ate

    Dried blueberries also sustained the Pilgrims. When they arrived at Cape Cod in November 1620, blown off course from their Virginia† destination, it was far too late to plant crops.

    The settlers nearly starved to death until the Wampanoag people shared food and taught them to grow native plants such as corn and squash. The settlers of Plymouth learned which foods to gather and dry (blueberries, cranberries) to sustain them through the winter.

    The blueberries used by the Indians were the wild or low bush variety, the state fruit of Maine, where they are a major crop.

    Most blueberries that are cultivated today are the high bush variety, domesticated in the early 20th century. The plants have been improved over the years to increase the berry’s size and color and the bush’s yield. Cultivation of the high-bush blueberry has been so successful that America now grows over 90% of the blueberries in the world.

    However, while Maine’s low-bush blueberries are significantly smaller, they are more flavorful.

    Some 20 years ago, blueberries were anointed a “superfood” after studies of the benefits of antioxidants became part of healthy eating in the U.S. Blueberries are one of foods highest in antioxidants.

    Blueberries are easily preserved by freezing, canning, and drying. They can also be juiced or made into jam or preserves. The surge in the popularity of blueberries has caused home gardeners to plant these shrubs in nearly every growing area of America.
     
     
    ________________

    *Blueberries and cranberries, along with other indigenous fruits such as mayhaws and papwpaws, were unknown in the Old World. North America has its own native species such as cherries, grapes, plums, persimmons, raspberries, and other well-known species from the Old World. Here’s the list of fruits native to North America.

    †At the time, Virginia included the region as far north as the Hudson River in the modern State of New York. The Hudson River was their originally intended destination.


    CHECK OUT WHAT’S HAPPENING ON OUR HOME PAGE, THENIBBLE.COM.


    Comments off

    TIP OF THE DAY: Creative Icebox Cakes & Homemade Chocolate Wafers Recipes

    Icebox Cake Refrigerator Roll
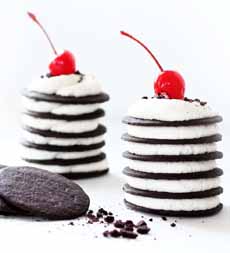
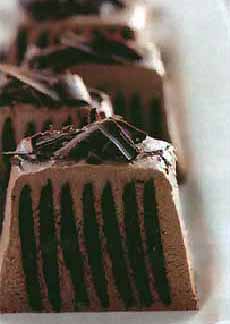
    [1] The original ice box cake was made by Nabisco. Wafers and whipped cream were assembled and then frozen, to make cutting easy. After the taller cake became popular, the original version was named Refrigerator Roll (photo courtesy Nabisco).

    Original Icebox Cake
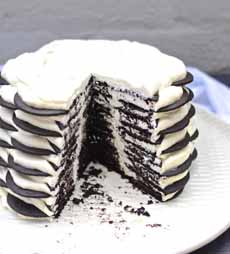
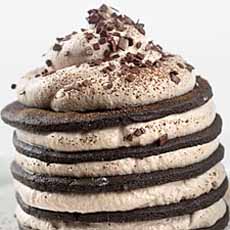
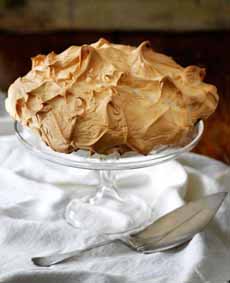
    [2] The cake evolved into the classic Nabisco Famous Chocolate Wafer Ice Box Cake, a tall affair that was impressive to look at, but not so neat to cut (here’s the recipe from The Very Kitchen).

    Chocolate Ice Box Cake
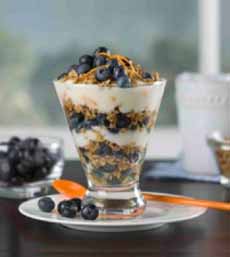
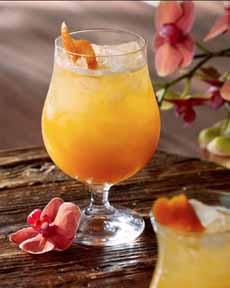
    [3] In recent decades, cooks got creative, substituting chocolate whipped cream, strawberry whipped cream and other fruit flavors, and adding layers of fruit on top of the wafers (photo courtesy The King’s Cupboard).

    Strawberry Ice Box Cake
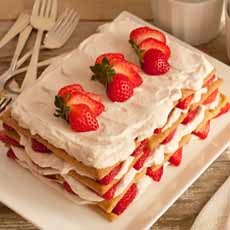
    [4] In the last decade or two, fruit crept into the recipe, exemplified by this Strawberry Ice Box Cake from Cabot Co-op (recipe).

    Lemon Ice Box Cake

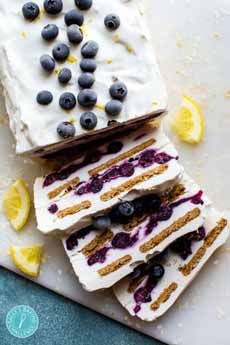
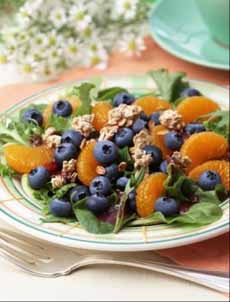
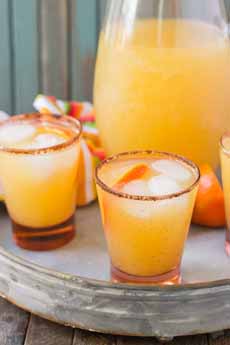
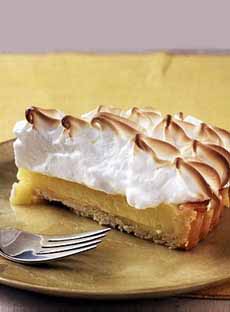
    [5] Home cooks got even more creative with the ingredients, as in this Lemon Blueberry Ice Box Cake recipe from Sally’s Baking Addiction.

      Ice Box Cake has long been popular on a hot summer day: No hot oven required.

    Instead, wafer cookies—the thin, flat kind—are layered with whipped cream and refrigerated for 4 hours or more. Moisture from the whipped cream softens the cookies, turning them into with individual refrigerator cakes.

    Nabisco Famous Chocolate Wafer Cookies date to the 1930s: very thin, crispy chocolate cookies that were used for icebox cakes and chocolate crumb crusts.

    The Ice Box Cake was created by Nabisco home economists and printed on the wrapper—as so many iconic American recipes were—to sell more product!

    We’re not talking general recipes: Oatmeal cookies existed long before Quaker Oats printed a recipe on its label. We’re talking inventions:

  • Chex Party Mix from Chex Cereal
  • Cream Cheese Frosting from Philadelphia Brand Cream Cheese
  • Green Bean Bake from Campbell’s Mushroom Soup
  • Green Bean Casserole from French’s Crispy Fried Onions
  • Key Lime Pie from Borden’s Sweetened Condensed Milk
  • Magic Bars from Eagle Brand Condensed Milk
  • Marshmallow Treats from Rice Krispies*
  • Onion Dip from Lipton Onion Soup
  • Pineapple Upside Down Cake from Dole Canned Pineapple Rings
  • Toll House Cookies from Nestle’s Semi-Sweet Chocolate Morsels
  •  
    There are hundreds of examples, and a number of cookbooks that feature these recipes from boxes, bottles, cans and jars. They were typically developed by home economists at the manufacturing company, but others came from home cooks (German Chocolate Cake, Marshmallow Treats and Toll House Cookies are some examples).
    ________________

    *Created by Mildred Day, a Campfire Girls counselor and Kellogg’s employee, who created the recipe to help her Campfire Girls raise money.
     
     
    THE HISTORY OF NABISCO FAMOUS CHOCOLATE WAFER COOKIES

    Dating to the 18th century, wafer cookies were made by home cooks and later by bake shops. By the 20th century, they were popular enough to make their way into commercial manufacture.

    The first manufactured chocolate wafers—Nabisco’s Famous Chocolate Wafers—debuted in 1924. The company sold a tin of three flavors: chocolate, ginger and sugar wafers.

    When Nabisco transitioned to cardboard packaging around 1930, the other flavors were dropped and the Famous Chocolate Wafer boxes were printed with the recipe for Icebox Cake. In the first iteration (photo #1), a log of chocolate wafers separated with whipped cream, that was then frozen.

    From that moment, Chocolate Ice Box Cake was a hit. It could be made equally well by experienced cooks as well as housewives who rarely entered the kitchen (or if they did, were not known for their culinary gifts).

    Delicious any time, it was a godsend in summer months, when, before the dawn of widespread air conditioning, no one had the desire to turn on the oven. The recipe was enlarged to a “layer cake” format (photo #2).

    Separately, the wafers were crushed and used as crusts for pies and cheesecakes, and as dessert garnishes.

    While ice box cake is an American invention, is a descendant of the charlottes and trifles that date to 17th-century Europe.

    Here’s the longer history of ice box cakes, charlottes and trifles.
     
    MODERN ICE BOX CAKE IDEAS

    With today’s ice box cakes, anything goes, with:

  • Overall cake flavors: lemon, matcha, mocha—create your favorite flavors with choices of whipped cream and fruit.
  • Fruit: Add berries or sliced stone fruits (cherries, nectarines, peaches, etc.).
  • Whipped cream flavors: Whip up some flavored whipped cream—bourbon, citrus, lavender, mint, peppermint, spice, etc.
  • Cookie types: Graham crackers have become popular; and you can bring back the ginger wafers with Anna’s Swedish Ginger Thins, lemon thins, etc.

    But do keep the cookies thin. The thinner the cookie, the more likely it is to dissolve into a soft, cakey texture. That Toll House or oatmeal cookie doesn’t work: Save them for ice cream sandwiches.

  • Garnishes: chocolate shavings or chips, cinnamon, cocoa powder, coconut, candied ginger, etc.
  •  
    You can turn the garnishes into food fun: a “decorate your own” approach. Provide bowls of:

  • Blueberries or raspberries
  • Chocolate shavings
  • Chopped nuts
  • Maraschino cherries
  • Sprinkles or confetti
  • Sugar dragées, glitter, pearls (white or Callebaut Crispearls— chocolate-covered cereal balls in dark, milk and white chocolate)
  • Other garnishes of choice (Gummi bears, anyone?)
  •  
    BAKE YOUR OWN CHOCOLATE WAFERS & MAKE INDIVIDUAL STACK ICE BOX CAKES

    These days, with all the competition on the supermarket shelf, it can be hard to find Nestle’s Famous Chocolate Wafers. Thank goodness for online shopping.

    But how about making your own? They’ll taste even better.

    Here’s a recipe from King Arthur Flour. Prep time is 30-50 minutes, bake time is 20-22 minutes.

    Whether you bake them or buy them, you can make individual refrigerator cakes by making single stack of wafers and cream instead of a larger cake. You need to refrigerate them at least 4 hours before serving, or overnight.

    This recipe makes 3½ dozen, 2½-inch cookies.
     
     
    RECIPE: HOMEMADE CHOCOLATE WAFERS FOR ICE BOX CAKE

    Ingredients For 8 Individual Stack Cakes Or 1 Large Cake

    For The Wafers

  • 1 cup granulated sugar
  • 1/2 cup unsalted butter
  • 3/4 teaspoon salt
  • 1/2 teaspoon baking powder
  • 1 teaspoon espresso powder
  • 1 large egg
  • 1 teaspoon vanilla extract
  • 1-1/2 cups unbleached all-purpose flour
  • 1/4 cup black cocoa†
  • 1/4 cup Dutch-process cocoa
  •  
    For The Filling

  • 2 cups (1 pint) heavy/whipping cream
  • 2 tablespoons Dutch-process cocoa
  • 2 tablespoons sugar
  • 1 teaspoon espresso powder
  • ________________
    †Black cocoa is a super-dark Dutch-process cocoa from King Arthur Flour. It is used sparingly for an intense, dark color and unsweetened-chocolate highlights. This rich cocoa will make the darkest chocolate cake or cookies, but you can use the cocoa you have.


    Preparation

    1. GREASE lightly (or line with parchment) two baking sheets, or more if you have them; you’ll make 3 to 4 baking sheets’ worth of cookies.

    2. BEAT together in a medium-sized bowl the sugar, butter, salt, baking powder and espresso powder. Beat in the egg and vanilla, then the flour and cocoa. Cover the dough and chill for 30 minutes. While the dough is chilling, preheat the oven to 350°F.

    3. ROLL the dough about 1/8″ thick. Use cocoa instead of flour to dust your rolling board and the dough. Cut into 2 ½”-round cookies. A biscuit cutter is handy for this.

    4. BAKE the cookies for 10 minutes. Watch them closely at the end of the baking time, and if you start to smell chocolate before 10 minutes has gone by, take them out. When they’re done, remove the cookies from the oven, and allow them to cool completely.

    5. MAKE the filling: Whisk together the heavy cream and other ingredients. When blended, whip until the cream holds a soft peak.

    6. ASSEMBLE: Place one cookie on a small plate. Put about a tablespoon of whipped cream on top; our teaspoon cookie scoop, heaped up, works well here.
    Top with a second cookie, using it to compress the whipped cream to about a ¼”-thick layer. Repeat with 4 more cookies, finishing with a layer of whipped cream. Refrigerate from 4 to 24 hours before serving.

    Flavored Whipped Cream Variations

    To flavor 1 cup of cream, add one of the following combinations 2 tablespoons confectioners sugar + 3/4 teaspoon vanilla extract. To play around with other flavors, use these guidelines:

  • Coconut: 2 tablespoons confectioners’ sugar + 1/8 teaspoon coconut flavor
  • Mocha: 1 tablespoon granulated sugar + 1 tablespoon Dutch processed cocoa + 1 teaspoon espresso powder
  • Peppermint: 2 tablespoons confectioners’ sugar + 1/8 teaspoon peppermint oil
  •  
    These are just some of the many variations that will delight you, your friends and family.

    Put on your toque and your apron and get out your artist’s palette.

      Nestle Famous Chocolate Wafers
    [6] Nabisco Famous Chocolate Wafers (photo courtesy Nabisco).

    Homemade Chocolate Wafers
    [7] An individual-portion ice box cake. Just stack the wafers and whipped cream vertically (photo courtesy King Arthur Flour).

    Individual Ice Box Cakes
    [8] Another mini ice box cake—with a cherry on top! Here’s the recipe from If You Give A Blonde A Kitchen.


    Comments off

    TIP OF THE DAY: Home Cocktail Tips From Professional Bartenders

    Drink Like A Bartender

    [1] Make better cocktails at home, and order better at bars. Get the book at Amazon.com.

    Bourbon Flip
    [2] A Bourbon Flip, made with the contents of Nana’s Fridge. Here’s a recipe from Epicurious.

    Hawthorne Strainer
    [3] Hawthorne strainer: You’ve seen it, now you know its name (available at Golden Age Bartending).
    Channel Knife

    [4] A channel knife makes peel and twist garnishes (available from Barconic).


    Our Tip Of The Day is from Thea Engst and Lauren Vigdor, authors of Drink Like A Bartender: Secrets From The Other Side Of The Bar. While there is much great information on how to order in a bar, here are their tips for home mixologists:
    Let’s just get this right out in the open: we love booze. We love creating new drinks and trying new flavors. Mixing a cocktail is an art form these days, so much so that it’s hard to imagine that cocktails were first invented as a way to mask the taste of low-quality liquor.

    Today we have the luxury of mixing bitters, fresh juices, and well-crafted liqueurs and spirits to make balanced beauties we can be proud of. We’ve come a long way from shutting our eyes and chugging moonshine for a buzz—our forefathers would be proud.
     
     
    STOCKING YOUR HOME BAR: EXPERIMENT!

    A few years ago, Thea visited her Nana’s house for Christmas. Like a lady, she arrived with nothing but a bottle of bourbon. Her Nana was downsizing and trying to clean out her fridge, so she told Thea to make whatever she wanted with whatever she could find. Thea accepted Nana’s challenge.

    She found, among other things, a bottle of crème de menthe, heavy cream, and a few eggs. Along with the bourbon brought from home, Thea mixed the heavy cream, an entire egg, and a touch of the crème de menthe (warning: it’s a potent taste!) to make minty bourbon flips for her family (photo #2).

    To be fair, they were all hesitant as they watched her throw an entire egg in the shaker, but they were happy with the result.

    What’s the moral of this story? Don’t be afraid to experiment with what you’ve got! Nana’s liquor cabinet was limited, but she had a few essentials: eggs and cream. You don’t need a citrus or fancy mixers to make a delicious drink.

    You too can be like Thea and Lauren. Here are some tools to keep on hand for when it’s your moment to impress your friends and family:

  • Boston Shaker (photo #6) Those tins you see us mixing drinks in.
  • Bar Spoon: Those long spoons you see us stirring with.
  • Jigger: Measuring device for fluid ounces. Again, choose the style you want—they come in all shapes and sizes.
  • Muddler: A muddler is a wooden (but sometimes metal) tool you’ll see behind the bar nowadays. It is used to help you crush ingredients (like mint leaves) to release the flavors.
  • Channel Knife (photo #4): Similar to a vegetable peeler, but this has a smaller blade to make a twist versus a peel, which is a larger swath of fruit peel.
  • > Twist: When you use a channel knife to peel a narrow spiral of fruit skin. A twist is actually twisted citrus peel, or, a long narrow rope of the peel only that is twisted into a corkscrew shape.
    > Peel or swath: A much wider piece of citrus peel than a twist. A swath is just the zest (or colored part) of the citrus peel with ideally no pith or meat of the fruit at all.
    > Wedge: A slice of the fruit that is often shaped like a wedge or half-moon. This does involve the meat of the fruit. You can squeeze further citrus into your drink if you’d like, as with the lime wedge on a Gin and Tonic, for example.

  • Strainer: Once you shake or stir the cocktail, if you don’t want to use dirty ice, you need to strain without your fingers, so invest in one or all of these:
  • > Hawthorne Strainer (photo #3): The strainer with the coils. It essentially looks like it has a slinky on it. This is a pretty universal strainer, so you can’t really go wrong with it.
    > Julep Strainer (photo #5) The strainer that looks like a big spoon with a small handle and big holes in it. It’s more commonly used for stirred cocktails, as there won’t be huge ice chunks to strain out of a stirred cocktail.
    > Tea Strainer: A cone-shaped mesh strainer very often used to double-strain egg white drinks or shaken drinks as well.

    Some people want to get the ice chunks out of a shaken drink and will use the Hawthorne strainer as well as the tea strainer. That’s about preference. This is a good tool to get mint bits out of a drink, too!

    Pro Tips:

  • If your cocktail has juice in it, you shake it. That’s the rule. Don’t think twice about it.
  • If it’s straight spirit, stir. That’s the rule. Don’t think twice about it.
  •  
     
    THE GOOD STUFF

    Just like Ocean’s Eleven, when it comes to drink making, you have key characters doing things that are apparently important. We got the explosive expert, the tech person, the driver, and the dude who gets everyone together and somehow gets all the credit.

    Your home bar components are just like this. You need to have:

  • Simple syrup: Don’t you dare buy this! You can make it at home in a few easy steps. It’s equal parts hot water and sugar, stirred until the sugar dissolves. So, 1 cup sugar, 1 cup hot water, stir and stir (photo #7). You can even add more sugar for a richer syrup. Just like sugar, simple doesn’t expire.
  • Sweet and/or dry vermouth: Thea’s Nana raised her to always be able to make her guests a Martini or Manhattan. Sweet vermouth goes in a Manhattan, dry vermouth in a Martini.
  • Campari: An amaro (herbal liqueur) with strong orange notes. Campari is good to have in your bar because you can make anything from a low-alcohol, stomach-calming highball (Campari & soda), or classics like a Negroni for your gin-drinking guests and a Boulevardier for your whiskey-drinking guests.
  • Citrus: lime and/or lemon. There’s not much that can top a daiquiri (photo #8) with fresh lime juice, and ifyou have lemon juice, gin, and soda water, you have a Tom Collins. Voilà!
  •  

     
    MECHANICS

    Let’s talk about the birds and the bees of bartending: shaking and stirring. You are building a cocktail—let’s say it’s a Daiquiri.

    The rum, simple syrup, and lime go in the little guy shaker (the smaller half of your shaker). Then you take a scoop of ice with the big boy shaker (the bigger half of your shaker), throw the ice into the little shaker, and lock the big shaker into the little shaker.

    Remember that you don’t want them to be directly up and down. The two sides won’t seal effectively that way. Make them crooked: The rim of the big half should be touching the side of the little half in one spot.

    Then smack the top with the heel of your hand until it locks. You are going to be throwing this bad boy around a little, after all. A poorly sealed shaker will split during the shaking process and that’s a good way to get yourself sticky.

    Now to unlock the shaker: hold the locked shakers in one hand so that your palm lines up with where the two halves meet. Take the heel of your other hand and hit the opposite side of the sealed shakers. It should unlock with one to three steady hits. Done!

    Shaken Or Stirred?

    When you shake a cocktail, you incorporate a lot of air and small chips of ice into the drink. The shaking motion whips the cocktail (think of stirring a cup of cream versus making whipped cream) and breaks the ice down by knocking it into the sides of the shaker.

    When you stir a cocktail, the ice spins around in the center of your mixing glass as one continuous piece. It slowly melts into the drink to dilute it slightly, which softens and expands the flavors, and very little air is added.

    Stirring cocktails is what gives your Martinis and Manhattans that silky smooth mouthfeel, whereas shaking is what makes your margarita so dang frothy. We’ll get more into when to shake and when to stir later.

    Dry Shake Or Wet Shake?

    A dry shake is when you put all your ingredients into the shaker and shake them without ice. A wet shake is the opposite— it’s when all your ingredients are shaken with ice.

    So when do you use a dry shake and when do you use a wet shake? We’re glad you asked!

    You should use a dry shake when you are making a drink that is served over crushed ice.

    Do you remember what we said about dilution earlier—how shaking with ice dilutes the drink ever so slightly? Using a dry shake here helps from diluting a drink further (pouring it over crushed ice dilutes it as well).

    When you’re still getting a feel for how long to dry shake, it’s super-helpful to add just one cube to the shaker. When you can’t hear the cube shaking around anymore, it’s time to add more ice.

    What about stirring?

    You don’t have to worry so much about over-stirring cocktails. Unlike shaking, the ice isn’t chipping and melting quickly in the process. Still, you don’t want to overstir. A good number of stirs to aim for is 40–50 turns.

    Pro Tip: Mixers

  • Don’t buy expensive bottled cocktail mixers that are full of chemicals and sugar. You know the ones we’re talking about. They come in plastic bottles and are sometimes created by chain restaurants.
  • Instead, take a stroll over to the frozen food aisle of your grocery store. It’s just as easy to throw some frozen fruit or a purée—maybe a can of coconut milk?—into a blender. Your cocktail will taste so much fresher than it would if you had used the bottled chemicals.
  •  
    Editor’s Note: There are more than a few artisan cocktail mixer lines that are 100% natural—no chemicals: Just read the ingredients label. There are even organic lines. All we’ve tried have been fresh-tasting and good enough to drink by themselves, as a mocktail.
     
     
    Thea and Lauren also sent us recipes for some must-try cocktails.

    Alas, we don’t have the room to print them today. You’ll just have to read the book!

      Julep Strainer
    [5] Julep strainer, available from Bar Products.

    Boston Shaker
    [6] Boston shaker available at Williams-Sonoma.

    Simple Syrup
    [7] Simple syrup is easy to make at home. Here’s the recipe from Liquor.com.

    Daiquiri Cocktail

    [8] A classic Daiquiri, invented by American engineers in Cuba. Here’s the scoop (photo courtesy Bacardi). Also: Yuzu Daiquiri recipe and Grapefruit Daiquiri, both delicious.


    Comments off

    TIP OF THE DAY: Have A Shandy Party

    Shandy Beer Drink
    [1] A shandy made with spicy ale (photo © Whole Foods Market).

    Ginger Beer
    [2] A ginger beer shandy leaves out most of the alcohol (it’s less than .5% ABV) and adds the flavor of ginger. Here’s the recipe from Homemade Hooplah.

    Passionfruit Shandy
    [3] This Island Shandy from Tommy Bahama uses passion fruit juice instead of lemonade.

    Mexican Shandy
    [4] How about a Mexican shandy? This recipe from Strawberry Blondie Kitchen, with Corona beer, lemonade and mango juice.


    Like beer? Mix it with a juice drink like lemonade or fruit soda to create a shandy.

    You can buy shandy in a bottle (photo #1)—artisan beer companies make it—but you can make your own, varying the beers, mixers, proportions, and garnishes.

    In fact, “make your own” is an idea for a summer weekend get-together. Tips for how to set up a shandy bar at your next gathering are below.
     
     
    THE HISTORY OF SHANDY

    Shandy is short for shandygaff. It’s beer that’s diluted with a non-alcoholic beverage. It’s a traditional British pub drink that mixes lager with lemon soda, ginger ale, or ginger beer. Carbonated lemonade, cider, or other citrus-flavored soda can be used.

    Whatever you use—you can even use ginger beer—you’ll find that shandy is a refreshing summertime drink. The shandy tradition dates back to the 17th century. Today, English publicans blend an English ale or beer with various lemon and lime beverages.

    No one knows the origin of the word, but the first known print reference is from 1853. The tradition no doubt began earlier.

    Shandy is a surname in the U.K.; and in Ireland, the name is a variant of Shaun (John). Gaff is an old term for a fishing hook or spear.

    Perhaps the drink was first mixed up by a steward named Shandy, to hook in customers? Or in honor of the master of an estate, for whom the drink was first served?

    Maybe, like the Cold Duck, it was an ad hoc thing: There wasn’t only half as much wine or champagne needed for guests, so some clever person thought to mix them together.

    What about an Arnold Palmer? It arrived centuries later. Here’s the difference between an Arnold Palmer and shandy.
     
     
    DIY SHANDY: CREATE A SHANDY BAR

    If you’re looking for a Labor Day activity, how about a make-your-own shandy bar? Just assemble the ingredients, print out brief “instructions” and put them in a frame next to the beer.

    Instructions can include: (1) Shandy is half beer, half non-alcoholic drink. (2) Create your own signature shandy with the soft drink and proportions of your choice. (3) Be neat and clean up your spills!

    Supermarket shelves are awash with citrus soda: orange, Fresca, Seven-Up (lemon lime). Our favorites are:

  • Pellegrino Limonata, Aranciata and Aranciata Rosso
  • Dry Soda blood orange
  • GuS Meyer Lemon, Sparkling Grapefruit, Valencia Orange
  •  
    So take stock of the options, then stock up.

    Shandy Bar Ingredients

  • Lager beer (plus wheat beer, IPA or nonalcoholic beer, if you’d like to present different options—check out the different types of beer)
  • Ginger beer* as a non-alcoholic option
  • Citrus soda, sparkling lemonade, sparkling soda
  • Ginger ale
  • Lemonade: plain, sparkling, Mike’s Hard Lemonade
  • Berry lemonade: blueberry, strawberry, raspberry (muddle the berries and mix with regular lemonade)
  • Sparkling cider
  • Optional: Bitters
  •  
    Shandy Garnishes

  • Lemon wedges
  • Lime wedges
  • Berries
  •  
    Glass Rimmers

  • Citrus Zest
  • Coarse salt
  • Flavored salt
  •  
    Plus

  • Glasses (start with small-to-medium size)
  • Swizzle sticks to stir
  • Paper towels for spills
  • Napkins
  •  
    A COMPARATIVE SHANDY TASTING

    If you don’t want a DIY shandy bar, gather whatever shandy brands you can find and have a tasting.

    Samuel Adams makes Porch Rocker, if you can still find it (the distribution period is through July). Anheuser-Busch’s Shock Top Lemon Shandy is available through August. Also look for Harp Lemon Shandy, Labatt Shandy, and Saranac Shandy Lager and Lemonade.

    Fentiman’s brews two soft drink shandy styles, non-alcoholic shandy and a low alcoholic version brewed to .5 ABV ABV (1 proof), which allows it to be sold as a soft drink.

    An Arnold Palmer is not related to a shandy, except that they both use lemonade. Here are the differences.

    We like to use shot glasses or juice glasses for this type of from-the-bottle beer tasting. It lets everyone try a small amount of each brand, and return to their favorite with a larger glass.
     
     
    WHAT’S GINGER BEER?

    Ginger beer is like ginger ale with a buzz. The big difference between ginger beer and ginger ale is that ginger beer is brewed (fermented). Most ginger ale is just carbonated water that’s been flavored with ginger, although some artisan brands brew their ginger ale.

    Since ginger beers are naturally fermented, they have less carbonation and often develop a beer-like head when poured into a glass. Some ginger beers are sold unfiltered and appear cloudy, so gently invert the before drinking or pouring, to re-incorporate any separation.

    Plus, the ginger flavor is more intense—much more intense.

    Today’s brewed ginger beers are categorized as non-alcoholic drinks because their alcohol content is less than .5% (1 proof), which meets FDA requirements.
     
     
    RECIPE: IPA SHANDY

    Like IPA (India Pale Ale)? It’s the most trending style of beer in the U.S.

    This shandy update from Whole Foods Market combines “a hoppy craft IPA and a throat-tickling ginger beer.”

    Shandys are generally made with lagers and wheat beers. If you’re not a hops fan, use one of those instead.

    You’ll also notice that the ingredients are beer and ginger beer. Play around with substituting lemon-lime carbonated drinks for the ginger beer, to see what you like best.
     
    Ingredients Per Tall Drink

  • 1 bottle (12-ounces) IPA, chilled
  • 1/4 cup ginger beer, chilled
  • Optional but recommended: 3 dashes orange or ginger bitters†
  • Garnish: orange slice (studded with cloves, if you like)
  •  
    Preparation

    1. COMBINE the ale, ginger beer, and bitters in a tall beer glass and stir lightly to blend (but not hard enough to break the bubbles).

    2. GARNISH and serve.
    ________________

    †The original Angostura bitters have a ginger undertone. They have recently released Angostura orange, in the $8.00 to $9.00 range. Connoisseurs may wish to spring for the fine artisan orange bitters from Bitter Truth in the $29.00 to $30.00 range.


    CHECK OUT WHAT’S HAPPENING ON OUR HOME PAGE, THENIBBLE.COM.


    Comments off

    RECIPE: A Classic & Variations For National Lemon Meringue Pie Day

    August 15th is National Lemon Meringue Pie Day, celebrating one of America’s favorite pies.

    The recipe for Lemon Meringue Pie is below, along with tips and variations to the recipe.

    But first: What are the top 10 pies in America, based on consumption? No one has done that survey in a truly scientific way.

    Mrs. Smith’s released a survey of their top 10 based on sales, but it only included frozen pies in the flavors made by Mrs. Smith.

    One thing we do know: Look at every list of the top pies in the country and you’ll find these nine (in alphabetical order):
     
     
    AMERICA’S FAVORITE PIES

    1. Apple Pie
    2. Banana Cream Pie
    3. Blueberry Pie
    4. Cherry Pie
    5. Coconut Cream Pie
    6. Key Lime Pie
    7. Lemon Meringue Pie
    8. Pecan Pie
    9. Pumpkin Pie
     
    What’s the 10th favorite? Depending on how the list was compiled, here are some from Top Ten Pies:

  • Chocolate Mousse/Silk Pie
  • Oreo Pie
  • Peach Pie
  • Peanut Butter/Snickers
  • Raspberry Pie
  • Strawberry Pie
  • Strawberry Rhubarb Pie
  • Sweet Potato Pie
  •  
    Some flavors are seasonal (including berry and stone fruit pies). Peppermint pies come out during the holiday season.

    Some of our favorites, such as Black Bottom Pie, Grasshopper Pie and Tarte Tatin (a French upside-down pie with caramelized apples) aren’t even on the Top 20 list of sweet pies.
     
    TRIVIA: Banana Cream Pie is a layer cake, and cheesecake is a custard pie. Check out the different types of pie.
     
     
    THE HISTORY OF LEMON MERINGUE PIE

    Lemon-flavored custards, puddings, and pies date to Middle Ages, which concluded in the 15th Century. But meringue was not perfected until the 17th century.

    The modern lemon meringue pie is a 19th-century recipe, attributed to Alexander Frehse, a Swiss baker from Romandy, the French-speaking part(s) of Switzerland.

    It combines a lemon custard single crust pie with meringue, the fluffy topping made from egg whites and sugar, baked on top. Here’s the classic lemon meringue pie recipe.


    RECIPE: CLASSIC LEMON MERINGUE PIE

    Prep time is 30 minutes, and cook time is 20 minutes.

    Ingredients For 8 Servings

  • 1 basic 9-inch pie crust*, baked and cooled
  •  
    For The Filling

  • 1-1/2 cups sugar
  • 1/3 cup cornstarch
  • 1/4 teaspoon salt
  • 1-1/2 cups cold water
  • 1/2 cup fresh lemon juice
  • 5 egg yolks, well beaten (save the whites for the meringue)
  • 2 tablespoons butter
  • 1 tablespoon freshly grated lemon zest
  •  
    For The Meringue

  • 1 tablespoon cornstarch
  • 1/3 cup cold water
  • 5 egg whites, room temperature
  • 1/4 teaspoon cream of tartar
  • 1/2 cup sugar
  • 1/2 teaspoon vanilla extract
  •  
    Optional Garnishes

  • Lemon peel curls/twists
  • Fresh mint, whole leaves or julienne
  • ________________

    *Take a look at this Egg & Lemon Juice Pie Crust from IncredibleEgg.org.

       
    Lemon Meringue Pie
    [1] One of America’s favorite pies. The classic recipe below is from the American Egg Board, IncredibleEgg.org.

    Lemon Meringue Pie
    [2] Browning in the oven can create an even color, which professional bakers often prefer for its perfect, even look (photo © McCormick).

    Lemon Meringue Pie
    [3] You can brown the meringue as much or as little as you like (photo © My Most Favorite Food).

    Lemon Meringue Pie
    [4] This meringue, from Centerville Pie Company, goes for a shade of mocha.


    Meyer Lemons
    [5] Mini-tip: Before you juice lemons for a recipe, zest them and save the zest in the freezer. Use it to perk up everyday foods like salad dressings, juices, soft drinks, hot and cold tea (photo courtesy Good Eggs).
    Pete And Gerry's Organic Eggs

    [6] Do organic eggs taste better? Frankly, yes; although freshness also enters the equation (photo courtesy BJs).


    Preparation.

    1. PLACE the oven rack in the top third of the oven, and preheat the oven to 325°F. Prepare the filling: Mix the sugar, cornstarch, and salt in a large, heavy saucepan. Gradually stir in the water and lemon juice until smooth. Add the egg yolks; stir until blended, and add the butter.

    2. COOK over medium heat, stirring constantly, until the mixture thickens and comes to a boil. Reduce the heat and simmer, stirring constantly, for 1 minute. Remove from the heat and stir in the lemon peel.

    3. IMMEDIATELY MAKE the meringue. Dissolve the cornstarch in cold water in a one-cup glass measure. Microwave on High for 30 seconds; stir. Microwave until the mixture boils, 15 to 30 seconds more. Remove and cover.

    4. BEAT the egg whites and cream of tartar in a mixer bowl with the whisk attachment on high speed, until foamy. Beating constantly, add the sugar, 1 tablespoon at a time, beating after each addition until the sugar is dissolved before adding the next.

    5. CONTINUE beating until the whites are glossy and stand in soft peaks. Beating constantly, add the cornstarch paste, 1 to 2 tablespoons at a time. Beat in the vanilla.

    6. POUR the hot filling into the pie crust. Quickly spread the meringue evenly over the filling, starting at the edge of the crust. The meringue should overlap the rim of the crust. Swirl with the back of a spoon to provide waves.

    7. BAKE in the upper third of a 325°F oven until the meringue is lightly browned, 16 to 18 minutes. Cool on a wire rack for 30 minutes to 1 hour; then refrigerate until serving. Garnish as desired.
     
     
    TIPS

  • Serve freshly made pie at room temperature, or refrigerate, uncovered, until ready to serve. Let the pie warm up on the counter.
  • For neat slices, dip the knife into a glass of water, letting the excess water drip off, before each cut. This prevents the meringue from sticking to the knife and tearing it. Be sure to cut completely through the crust.
  • A hot filling is important. The heat of the filling cooks the bottom of the meringue and prevents it from weeping and creating a slippery layer between filling and topping. Set up your equipment and measure meringue ingredients before you make the filling and work quickly to make meringue before the filling cools.
  • To check if the sugar is dissolved, rub a bit of meringue between your thumb and forefinger. If the sugar is dissolved, it will feel completely smooth. If it feels grainy, continue beating.
  • To check for soft peaks, stop the mixer and lift the beater. The peaks left in the meringue should curl at the tips. If the peaks stand straight and tall (stiff peaks), the meringue has been overbeaten.
  • Anchor the meringue. Be sure to attach the meringue to the crust all around the edge of the pie. This prevents the meringue from pulling away from the edge during baking.
  • If beads form on the refrigerated meringue, gently blot them with the tip of a paper towel.
  • Refrigerate any leftover pie promptly.
  •  
     
    VARIATIONS TO LEMON MERINGUE PIE

  • Crust: Try a chocolate cookie crust, coconut crust, graham crust, nut crust.
  • Filling: Add lemon zest, lime zest, orange zest or shredded coconut.
  • Topping: flavored whipped cream, plain or flavored, instead of whipped cream turns it into a lemon pie.
  • Garnish: If you have candied lemon peel, use it!
  •  
     

    CHECK OUT WHAT’S HAPPENING ON OUR HOME PAGE, THENIBBLE.COM.


    Comments off

    The Nibble Webzine Of Food Adventures
    RSS
    Follow by Email


    © Copyright 2005-2024 Lifestyle Direct, Inc. All rights reserved. All images are copyrighted to their respective owners.