|
Growing up, we had pork chops for dinner once a week. Mom pan-fried them with a Dijon glaze, and served them with sides of caramelized onions and her skin-on, chunky mashed potatoes.
Caramelized onions mixed into the mashed potatoes, by the way, generates an even better flavor experience greater than eating them separately.
Some caramelized onion tips:
Onions shrink down to one-quarter of their bulk when caramelized. Make four times as much as you think you’ll need.
You’ll be happy if you have extras for the next day. Here are ways to use caramelized onions.
Back to the pork chops:
We don’t often dine at restaurants that have pork chops on the menu; but when we do, we order them. Usually we’re disappointed because they’re:
Served plain, not interesting.
Served smothered in mushroom cream sauce or a variation of marinara. Both sauces are fine in their place; but to our palate, their place is not on a pork chop.
So every few months, we treat ourselves to some Kurobuta* (Berkshire) porterhipork chops from Snake River Farms, and recreate Mom’s preparation.
TYPES OF PORK CHOPS
While boneless chops are easier to eat, bone-in chops (and steaks) cook up with more flavor. That’s because the meat close to the bone has more fat, which delivers more flavor. Chefs explain that the bone also engenders a juicier, more tender piece of meat.
Plus, you get a bone to gnaw on, if you so desire.
According to the National Pork Board, there are five types of pork chops. All are cut from the loin, at the top (back) of the pig:
Blade Pork Chops. Cut from the beginning of the loin in the shoulder area, the chops may contain some blade bone as well as back-rib bone. Blade chops are usually thicker and more marbled. blade-end pork loin chop, blade steak, pork loin blade chop, pork shoulder blade steak, pork shoulder steak, pork steak and shoulder chop. They often are butterflied and sold as pork loin country-style ribs.
New York Pork Chops. Sometimes called center cut chops, these are boneless and located above the loin chops, toward the head. The 1¼ inch-thick top loin chop is also called an America’s cut.
Ribeye Pork Chops From the center of the loin in the rib area, these include some back and rib bone.
Porterhouse Pork Chops. These are cut from the lower back, just behind the rib chop. These chops include a lot of meat as well as a bit of tenderloin meat, and and have a characteristic T-bone shape.
Sirloin Pork Chops. These are cut from the area around the hip, and often include part of the hip bone.
Bone-In Versus Boneless
While boneless chops (New York/center cut) are easier to eat, bone-in chops (and steaks, the same for lamb and beef) cook up with more flavor. That’s because the meat close to the bone has more fat, which delivers more flavor. Chefs explain that the bone also engenders a juicier, more tender piece of meat.
Plus, you get a bone to gnaw on, if you so desire.
BUILDING FLAVOR FOR PORK CHOPS
Lately, we’ve sliced our way out of the box to try these preparations from Clemens Food Group, via Flavor & The Menu:
It’s just two simple steps:
1. MAKE A RUB
You can create any rub you like, but here’s one for starters:
Combine cardamom, cinnamon, cumin, sweet paprika and turmeric with olive oil. Massage into the pork, then finish with a squeeze of lemon.
2. PICK A CONDIMENT
Clemens calls these “flavor boosters,” which is the definition of condiment (actually, see the longer definition below).
Balsamic glaze
Harissa yogurt sauce (substitute harissa for the cumin in this recipe)
Horseradish sauce
Mint pesto (substitute mint for the basil)
Pico de gallo
Chimichurri
|
|
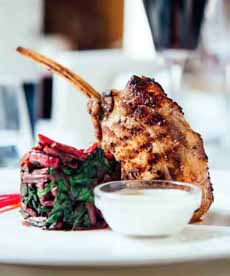
[1] This Frenched pork chop leans against a mound of red Swiss chard. Create the mound by pressing the cooked chard into a food ring (photo courtesy Clemens Food Group).
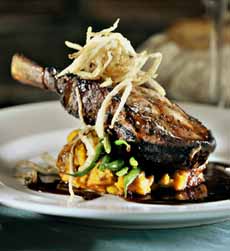
[2] This bone-in chop (photo courtesy North End Cafe | Louisville).
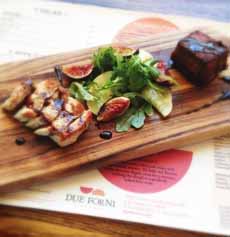
[3] Yes, please: A sliced porkchop, a cube of pork belly, and a fresh fig and mesclun salad in the middle (at Due Forni | Las Vegas).
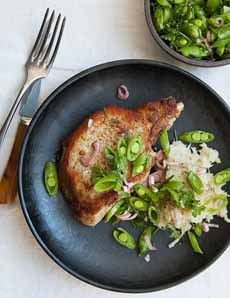
[4] A pork chop like mother made (photo courtesy Good Eggs).
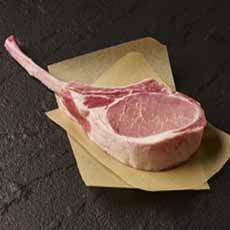
[5] We don’t have pork chops often, but when we do, it’s Kurobuta, a superior grade of the Berkshire heritage breed (photo courtesy Lobel’s | NYC).
|
While conventional practice is to place the sauce on top of the protein, we prefer these options:
Drizzle or spoon the condiment across the empty plate and place the protein on top.
Spoon it in polka dots around the perimeter of the plate (see some examples here).
Stack it against a pile of vegetables, or on top of them, as shown in photos #1 and #2.
ABOUT CONDIMENTS
A condiment is an auxiliary food product that puts spark into food. It is a spice, sauce*, or preparation (chutney, horseradish, ketchup, mustard, relish, salsa, etc.) that is served with food to enhance its flavor.
There are sweet condiments, too. For example, fudge sauce, marshmallow creme, sprinkles and whipped cream ice cream make a plain scoop of ice cream taste better.
The word is first found in print in French around 1420, and descends from the Latin condimentum, spice, which sprang from the verb condre, to season.
Condiments add an easy flourish to the most basic foods. They can transform an everyday ham sandwich or roast chicken into something special (use some of those caramelized onions!).
Condiments are also evidence of pervasive fusion cuisine at its best. Indian chutneys, French mustards, Italian pestos and Spanish salsas, to name just a few, are often paired with American dishes from eggs, roasts, salads, and sandwiches to desserts with crème anglaise from the U.K., dulce de leche and red wine sauce from Italy and rose water from Turkey.
________________
*Kurobuta is a Japanese name for a certain quality of pork, from a certain breed of pig: the black pig. In the U.S., that pig is called the Berkshire, a heritage breed. Kurobuta is a higher quality than generic Berkshire. While all Kurobuta pork comes from Berkshire pigs, not all Berkshire pigs are Kurobata grade.
|