|
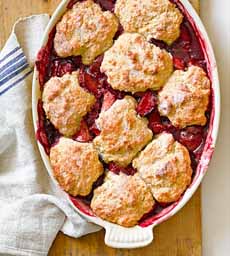
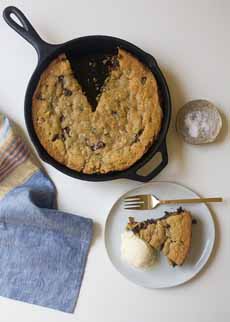
[1] Why is it called a cobbler? The top looks like cobblestones! This cobbler is made in a Le Creuset gratin dish, available at Williams-Sonoma (photo © Williams Sonoma).
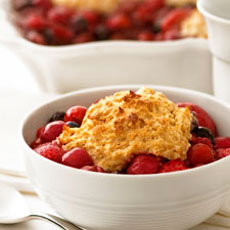
[2] You can bake individual cobblers (photo © USA Cherries).
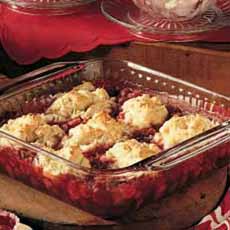
[3] The recipe for this cherry cobbler is below (photo and recipe © Taste Of Home).
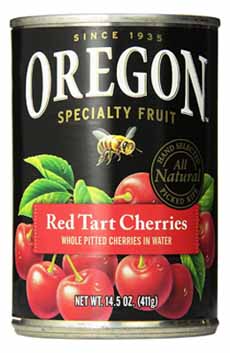
[4] In cherry season, fresh cherries have to be pitted and cooked to make a cobbler. In the off season, buy pitted canned cherries, which are already cooked in the can during pasteurization (photo © Oregon Fruit).
|
|
May 17th is National Cherry Cobbler Day, an opportunity to provide you with a cherry cobbler recipe (below) and explain the difference between cobbler, crumble, and a crisp.
In fact, here are 13 different baked fruit dishes that are so close as to be siblings. Yet, each has a particular variation to distinguish it.
For example, a cobbler tops fruit with pieces of dough; a crisp covers it with a crumb or streusel topping. The crumbs can be made with breadcrumbs, breakfast cereal, cookie or graham cracker crumbs, flour, or nuts.
Americans use the word “crisp” because the topping gets crispy. The British call the same dish a crumble, because the topping is made from crumbs.
While most cobblers are sweet, there are also savory cobbler recipes that make delicious first courses.
COBBLER HISTORY
A cobbler is typically a baked fruit dessert, although there are savory cobblers—made with vegetables—served as side dishes.
The fruit is placed in a large baking dish and covered with a dropped batter or biscuit topping. The baked batter or biscuits resemble cobblestones, hence the name*.
Cobblers were first made by British settlers in Colonial America. They lacked the right ingredients and equipment to make traditional suet† puddings for dessert. Instead, they created a stewed fruit dessert topped with biscuits or batter—much easier than rolling out pie crusts (source).
RECIPE: CHERRY COBBLER
Thanks to Taste Of Home for this recipe.
In the recipe, you make your own batter to drop for the topping. You can save time by purchasing refrigerated biscuit dough.
Some people like to serve cobbler with vanilla ice cream. We also like slightly sweetened sour cream or crème fraîche.
Ingredients
5 cups pitted canned tart red cherries (not cherry pie filling)
1/3 cup sugar
1/3 cup packed brown sugar
2 tablespoons plus 1-1/2 teaspoons cornstarch
1 teaspoon ground cinnamon
1/4 teaspoon ground nutmeg
2 tablespoons plus 1-1/2 teaspoons lemon juice
For The Topping
1 cup all-purpose flour
1 tablespoon sugar
1 teaspoon baking powder
1/4 teaspoon salt
2 tablespoons cold butter
1/3 to 1/2 cup milk
Preparation
1. DRAIN the cherries, reserving 1-1/4 cups juice; set aside. Discard the remaining juice‡.
2. COMBINE the sugars, cornstarch, cinnamon, and nutmeg in a large saucepan. Stir in the lemon juice and the reserved cherry juice until smooth.
3. BRING to a boil, then cook and stir for 2 minutes or until thickened and bubbly.
4. ADD the cherries. Pour the mixture into an ungreased 9-inch-square baking pan.
5. MAKE the topping: Combine the flour, sugar, baking powder, and salt. Cut in the butter into the dry ingredients until crumbly, and then stir in enough milk to moisten.
6. DROP by tablespoonfuls over the cherries. Bake at 450° for 10-13 minutes or until golden brown.
CHECK OUT THE HISTORY OF CHERRIES
|
________________
*Suet is raw beef fat or mutton fat, particularly the hard fat found around the loins and kidneys. It is popular in both sweet and savory British puddings.
†A citation from Wikipedia, referencing 1859, says that “it may be related to the archaic word cobeler, ‘wooden bowl.’” Stick with the cobblestones!
‡If your cherries are in juice instead of water, don’t throw it out. Mix the juice with club soda or sparkling water for a cherry soda. For an extra hit of flavor, squeeze in a slice of lime.
CHECK OUT WHAT’S HAPPENING ON OUR HOME PAGE, THENIBBLE.COM.
|