|

[1] This potato salad with classic Burmese ingredients can be served warm or chilled. The recipe was developed by Tina of Love Is In My Tummy, for the Idaho Potato Commission (photo © Idaho Potato Commission).
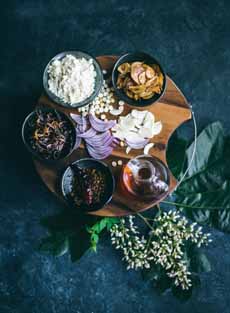
[2] Some of the authentic Burmese ingredients that are blended with the traditional potatoes and mayo (photo © Idaho Potato Commission).

[3] Green mango is often sliced into wedges and served with a spicy dip. Here’s a recipe from Tastemade (photo © Tastemade).
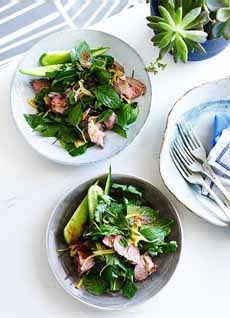
[4] Another way to enjoy green mango: in a Thai grilled pork salad. Here’s the recipe from Gourmet Traveller | Australia (photo © Gourmet Traveller).
|
|
Our mother was a great cook and baker; but when she had perfected a recipe, she didn’t have any interest in trying further variations of it.
Her apple pie was made in the classic style: no sour cream or walnuts.
Her brownies were made with walnuts: no pecans, no chocolate chips.
Her cheesecake had four pounds of cream cheese on a Zwieback crust (not graham cracker), with a baked sour cream topping (no canned cherries).
Her potato salad incorporated red jacket potatoes, Hellmann’s mayonnaise, a tiny dice of celery and red onion, shreds of carrots, snippets of dill, and parsley. Maybe, some diced bell pepper and hard-boiled eggs. Sometimes, some added Dijon mustard. And if she had it, sweet pickle relish.
Her recipes, once finalized, were set in stone (excellent, just set in stone).
But we like to try variations of everything. Since warm weather brings cookout, picnic, and potato salad season, we try at least one new recipe a year (see our past recipes below).
This recipe, developed by Tina of Love Is In My Tummy for the Idaho Potato Commission, pairs crispy, roasted Idaho® potatoes with traditional Burmese flavors, including roasted peanuts and cilantro.
Tina advises that the crisp version is best served warm and immediately. To serve it chilled, omit baking the potatoes and simply use sliced boiled potatoes.
Tina uses a spicy vegan aïoli (garlic mayonnaise) for a vegan recipe. Omnivores can use regular mayo with garlic seasoning, (here’s how to make aïoli with store-bought mayonnaise) or from scratch.
While this recipe may have extended steps, most of the components can be made a week or more in advance (see Preparation Notes, below).
For more about Burmese cooking, read Tina’s full article.
RECIPE: WARM BURMESE POTATO SALAD
Ingredients For The Roast Potatoes
3 medium Idaho® russet potatoes
Salt, to taste
1 tablespoon vegetable oil
Ingredients For Dressing
3/4 cup vegan aïoli (recipe)
4 tablespoons roasted bengal gram, ground (a.k.a. chana dal: split, polished baby chickpeas)
1/2 teaspoon fried red chilli flakes (recipe)
1 tablespoon water
Salt to taste
Ingredients For Assembly
1/2 green mango, peeled and grated (substitute Granny Smith apple*)
1/4 cup fried onions (see notes below)
2-3 tablespoons fried garlic (see notes below)
1/2 small red onion, sliced
A handful fresh cilantro, chopped
2 tablespoons roasted peanuts (plain or salted)
Preparation
1. ROAST the potatoes: Wash and peel the potatoes. Cut each one first vertically in half, then vertically in half again. Then slice them into bite-size pieces.
2. ADD the chopped potatoes to a deep saucepan; cover them with water and salt to taste. Bring to a boil, then simmer for 15 minutes. A fork inserted should go through with almost no resistance. Drain.
3. PREHEAT the oven to 450°F (230°C). Set a baking rack at the lowest position.
4. TOSS the boiled potatoes with the oil in a medium baking tray and spread them out, making sure the larger, flat surface is facing down. Sprinkle with salt to taste. Bake for 15 minutes. Remove from the oven and set aside.
5. MAKE the aïoli. Combine all the ingredients in a bowl, seasoning with salt to taste.
6. ASSEMBLE: In a bowl, combine the roasted potatoes, grated green mango, fried onion, fried garlic, red onion, and aïoli. Toss to combine. Garnish with cilantro and peanuts.
Preparation Notes
You can make a good portion of the recipe ahead, and store the individual components refrigerated in airtight containers. Make the aioli dressing up to 7 days ahead, and the fried ingredients up to a month ahead.
On the day of serving, roast the potatoes, grate the mango, and assemble.
1. LIGHTLY TOAST the roasted Bengal Gram in a skillet until fragrant, but don’t let it brown. Cool, then grind to a fine powder. This can be stored for 1 month in a clean, dry container.
|
2. THINLY SLICE the red onions and deep-fry them on medium-low heat until golden brown. Drain on paper towels. Store in a clean, dry container for up to 1 month.
3. THINLY SLICE the garlic and deep-fry it on medium-low heat until golden brown. Drain on paper towels. Store in a clean, dry container for up to 2 months.
4. BUY a green mango that is firm to the touch—almost rock-solid with bright green skin. It has the best flavor and texture for this recipe. You can use a green mango that’s slightly softened or ripened, but it will be more sweet than tangy. See more about green mangoes in the footnote below.
© 2019 Idaho Potato Commission
MORE POTATO SALAD RECIPES
Arugula Potato Salad
Barbecue Potato Salad
Baked “Fully Loaded” Potato Salad
Beer-Roasted Potato Salad With Brussels Sprouts & Bacon
Corned Beef & Cabbage Potato Salad
German Potato Salad With Bacon & Bacon Vinaigrette
Greek Potato Salad
Green Bean Potato Salad
Grilled Idaho Potato Ratatouille Salad
Grilled Potato Salad With Bacon & Blue Cheese Dressing
Grilled Potato Salad With Bacon, Corn & Jalapeño
Grilled Potato Salad With Hot Dog Chunks
Grilled Sweet Potato Salad
Healthier Potato Salad
Lebanese Blue Or Purple Potato Salad With Tabouli (Tabbouleh)
Massaman Curry, Peruvian & 20 Global Potato Salad Recipes
Mix & Match Warm Potato Salad
Purple/Blue Potato Salad Stack
Potato, Cucumber & Dill Salad
Red Chimichurri Potato Salad
Red, White & Blue Potato Salad (especially for Memorial Day and Independence Day)
Russian Beet & Potato Salad
Smoked Salmon Potato Salad
Warm Burmese Potato Salad
Warm Potato Salad
________________
*ABOUT GREEN MANGOES: You can find green mangoes, also called sour green mangoes (mamuang raad in Thai), at South Asian grocery stores. Unlike green-red mangoes, meant to be enjoyed when they soften, these tart, medium-to-dark green mango varieties are used when they are rock hard and have a tart taste. They also have white flesh, similar to an apple, as opposed to the orange flesh of sweet mangoes.
Squeeze the mango really hard at the store. Like an apple, it shouldn’t yield to pressure. In fact, Granny Smith apples have a similar crisp crunch and tartness. As a green mango ripens, its crisp apple flavor quickly turns to an overripe tropical taste (not desirable!).
Also called sour green mangoes, they are peeled and cut into slim strips—julienne or baton. When not julienned for salads, thicker slices (like wedge fries) are served with a dip, such as nam pla wan or prick glua (photo #3).
Green Mangoes are very rich in fiber content and have almost zero sugar. They also contain a high quantity of essential vitamins, including vitamins C, and many other nutrients. They’re good for you! The season is typically late May through June.
CHECK OUT WHAT’S HAPPENING ON OUR HOME PAGE, THENIBBLE.COM.
|