|
Today’s tip showcases luscious summer heirloom tomatoes in two salads.
Both are European-inspired, both are made without lettuce or other leafy greens.
RECIPE #1: RUSSIAN TOMATO & CUCUMBER SALAD
Our Russian grandmother used a lot of sour cream, dill and scallions: as salad dressing, in borscht, on boiled potatoes and as a general garnish.
We grew up loving it, and since then have regularly treated ourselves to the garnish in borscht, boiled potatoes and beet salad or side.
We made the easy transition to a garnish for baked potatoes and other foods, including fried chicken.
We even had it on toast and bagels: a worthy stand-in for cream cheese.
But we hadn’t thought about that salad dressing for quite some time.
Truth to tell, as one of our annual “eat better” New Year’s resolutions, we gave up sour cream in favor of fat-free Greek yogurt at least 10 years ago.
We simply didn’t connect that we could make the salad dressing with yogurt.
Recently, we came across this salad recipe from Vikalinka (photo #1).
Easy to make yet bursting with layers of flavor, it combines tomatoes, cucumbers, scallions, fresh dill and sour cream or crème fraîche.
It’s so refreshing: tender tomatoes, crunchy cukes, crunchy and sharp scallions and a creamy dressing with sprightly dill. We love it!
If these ingredients sound good to you, make it tonight. Note that once dressed, the salad doesn’t keep well; so don’t make more than you’re ready to eat.
Again, here’s the recipe.
RECIPE #2: MEDITERRANEAN TOMATO & FIG SALAD
This salad has a Mediterranean flair.
Wild figs originated in the Mediterranean* region, from Afghanistan to Portugal.
Figs are believed to be the first cultivated fruit. Remains have been found in the ruins of a prehistoric village near Jericho, in the West Bank, grown some 11,400 years ago [source].
Each Mediterranean country has its own seasonings and favorite ingredients.
Think figs and cheese or yogurt for breakfast, fig and olive stew for dinner, and a dessert of fig cake, or a simple plate of plump fresh figs.
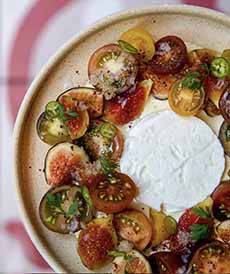
This tomato salad (photo #2), from Empellón restaurant in New York City, combines fresh figs and cheese with heirloom tomatoes.
While the upscale Mexican restaurant uses queso fresco as the cheese, you can substitute feta, goat cheese, ricotta or other favorite. Even blue cheese works.
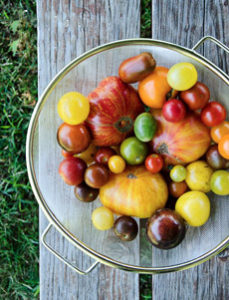
Use small heirloom tomatoes or heirloom cherry tomatoes (photo #3). Cut them in slices or wedges, cut the figs in wedges.
Dress the salad with a drizzle of extra virgin olive oil, with an optional drizzle of balsamic vinegar.
You can garnish the salad with pine nuts or chopped pistachios.
And don’t forget sea salt and the peppermill.
|