THE NIBBLE BLOG: Products, Recipes & Trends In Specialty Foods


Also visit our main website, TheNibble.com.

PRODUCT: Gluten Free Mac & Cheese From Pamela’s Products


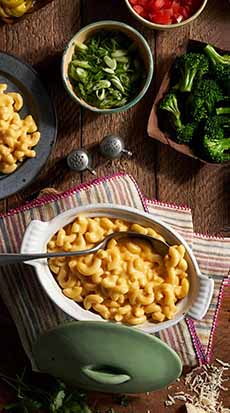
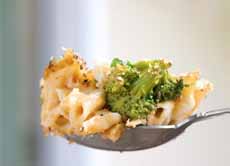
[1] Mac and cheese with toppings of choice; here, broccoli florets, chopped scallions and diced tomatoes (photo © Amy’s Kitchen).


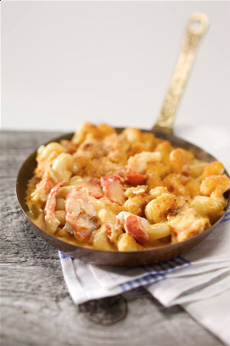
[2] Feeling flush? Top your mac and cheese with lobster (photo © Blake’s).


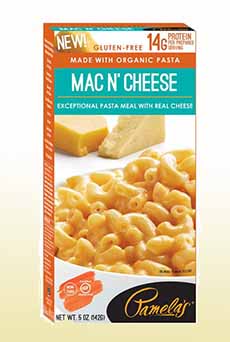
[3] One box, lots of gluten-free variations. Just add your toppings of choice, from broccoli or kale to chicken or seafood. Crab lobster are our favorites! (photo © Pamela’s Products).


[4] Ready to take a bite? (photo © Hannah Kaminsky | Bittersweet Blog).


THE NIBBLE’s gluten-free expert, Georgi Page-Smith, tries a GF version of one of America’s favorite comfort foods.

It’s been a while since I succumbed to the siren song of a good Mac and Cheese.

I’ve tried a few fancy versions at various gourmet purveyors and even an unnamed frozen variety, but nothing has quite hit the mark.

And, to be honest, because my favorites have always involved way too much cheese and because I’ve become accustomed to a low-carb lifestyle, it has always been a guilty pleasure and not part of my regular rotation.

Not since the days when I would break out the Kraft Mac and Cheese while babysitting had I ever really been tempted to taste one of the many varieties of boxed Macs.

But, when gluten-free specialist Pamela’s Products stepped up recently, releasing two gluten-free Macaroni and Cheese flavors (one is vegan), with organic noodles, it was time to take a trip down memory lane.

The pasta is organic, made from gluten-free flour (organic white rice flour, organic pea protein, organic sprouted brown rice flour).

  • Mac N’ Cheese uses a blend of cheddar and blue cheeses, and 14g protein per serving.
  • Vegan Mac has a rich and creamy sauce made from pumpkin and sweet potato powders, with 10g protein per serving.
  •  
    All ingredients are non-GMO.
     
     
    WHIPPING UP PAMELA’S MAC & CHEESE

    Enjoy it as a lunch on-the-go, or dress it up with a few vegetables, herbs and assorted trimmings for dinner.

    Toasted breadcrumbs are a traditional mac & cheese garnish—recipe below).

    I chose to make my Macs for a late lunch, putting their flavor, convenience and fuel potential to the ultimate test.

    The standard Mac N’ Cheese was my first flavor, so that I could establish a ‘true North’ for the rest of my tastings. The instructions on the box are fairly standard, though they did call for boiling the noodles, then draining and mixing the butter, flavor packet and milk in the saucepan separately.

    In our home the noodles were drained by holding the pan over the sink and pouring the water off while fencing the noodles using a warped and fire-scarred wooden spoon. Whatever water remained in the saucepan, or tucked into the noodles, was incorporated into the sauce.

    So it was that with this first Mac from Pamela’s all of the additional ingredients went into the pan at once, over the al dente noodles, including 2 tablespoons of butter (not 3 tablespoons, as the recipe called for) and—for me—a “milk” that I hacked together by blending 50/50 heavy cream and water.

    I am happy to report that Pamela’s is a very forgiving Mac N’ Cheese indeed! The first bite was incredibly, satisfyingly tangy and toothsome, with a springy, chewy texture to the noodles that created the perfect vehicle for the sauce.

    But the sauce deserves a special shout-out, because after the addition of the butter and the milk, it did not merely settle for being a sauce; it was a legitimate, full-bodied cheese experience.

    The cheese flavors had dimension, with a beginning-middle-and end notes that unfolded as I chewed. I highly recommend this variety without reservation, it is a definitive example of the genre.

    Hats off to Pamela’s for coming up with a gluten-free pasta products that helped me give Mac N’ Cheese another try. These varieties are an extremely convenient comfort food ‘go to’ that people with gluten sensitivities should try, for a quick and tasty meal or side.
     
     
    WHERE TO FIND IT

    And it’s easy to order directly from Pamela’s website, where you’ll get to see all the other gluten-free products as well.

    There’s a store locator on the website.

    Call ahead to be sure the Mac & Cheese is in stock.


    —Georgi Page-Smith


    Comments off

    RECIPE: Heirloom Tomato Tart For A First Course Or A Side

    September is California Wine Month, and the Wine Institute of California has wine pairings to go with the last of the great summer produce—like this Heirloom Tomato Tart.

    This savory, colorful tomato tart in perfect for late summer, when tomatoes are at their flavor peak. Serve it in:

  • Thin slices as an appetizer.
  • Medium slices a side dish with dinner.
  • Large portions with a side salad for lunch.
  •  
    Tomatoes, which are acidic, aren’t the easiest wine match, but the buttery crust of the tart expands the possibilities.
    White wine pairing: Try a Chardonnay or Sauvignon Blanc if you’re serving the tart as an appetizer, or if it’s a light lunch with a side salad.
     
    White wine pairing: If if it’s a side dish with fish or meat:, bring out the Pinot Noir or Zinfandel.

    Red wine pairings:

  • Reach for Pinot Noir if you’re serving the tart with chicken, pork, salmon or tuna. Pinot Noir tends to be more delicate, with raspberry and cherry aromas and moderate tannin.
  • Grab a Zin with beef or lamb. Zinfandel is often (but not always) more robust, with more alcohol that stands up to red meat.
  •  
    > The Difference Between A Pie & A Tart
     
     
    RECIPE: HEIRLOOM TOMATO TART WITH KALAMATA OLIVES & GOAT CHEESE SAUCE

    This tomato and olive tart is topped with a thick sauce made from goat cheese. You can make the sauce a day in advance.

    You can also partially make the crust a day in advance, just prior to baking it (step #5). The crust is the most time-consuming part of the recipe.

    Overall prep time is 30 minutes (divided), rest time is 75 minutes (divided), and bake time is 60 minutes (divided).

  • 1 cup (125 g) unbleached all-purpose flour
  • 1 teaspoon sugar
  • ½ teaspoon sea salt
  • ½ cup (115 g) unsalted butter, cut into 16 pieces, at room temperature
  • 1 tablespoon water
  • 1-1/2 pounds (680 g) heirloom tomatoes, cored and sliced ¼ inch (6 mm) thick, ends discarded
  • 1-1/2 teaspoons sea salt
  • 1 dozen Kalamata olives, pitted and halved (substitute Picholine or Gaeta olives)
  • 1 tablespoon extra virgin olive oil
  • 3/4 teaspoon dried oregano, crumbled fine
  • 2 tablespoons (28 g) goat cheese, at room temperature
  • 2 tablespoon plain yogurt, or as needed
  • 1 small clove garlic, very finely minced
  • Garnish: fresh basil
  •  
    Preparation

    1. COMBINE the flour, sugar and salt in a food processor and pulse to blend. Add the butter and pulse until the mixture resembles fine crumbs. Sprinkle 1 tablespoon of water over the mixture and pulse until it begins to come together into a dough.

    2. TURN the dough out onto a large sheet of plastic wrap and, using the plastic wrap as a barrier to avoid touching the dough, shape the dough into a ball. Wrap in the plastic, then flatten into a thick round disk. Let it rest at room temperature for 30 minutes.

    3. UNWRAP the dough and place it in the center of a 9-inch (23-cm) tart pan with a removable bottom. (Do not use a black metal tart pan or the dough will likely overbrown.) Again, using the plastic wrap as a barrier to avoid touching the dough, press the dough with your hand to flatten it until it covers the bottom and sides of the tart tin. You should have just enough dough to make a thin crust with no trim. Take care to make the dough evenly thick or it may burn in spots.

    4. PRICK the tart shell with a fork in several places. Lightly cover with plastic wrap and freeze for at least 30 minutes or up to 1 day.

    5. PREHEAT the oven to 375°F (190°C). Place a sheet of aluminum foil in the tart shell to cover the bottom and top with pie weights or dried beans in an even layer. Bake for 15 minutes, then remove the pie weights and the foil. Return the tart pan to the oven and continue baking until the crust is lightly browned all over, about 15 minutes longer. Set on a rack, and leave the oven on.


    Goat Cheese Tart
    [1] A buttery-crust tart filled with heirloom tomatoes and Kalamata olives, and a goat cheese topping (photo © Discover California Wines).

    Heirloom Tomatoes
    [2] Heirloom tomatoes (photo © Okonomi | Brooklyn)

    Kalamata Olives On A Wood Cutting Board
    [3] Kalamata olives come from the area of Kalamata, Greece, the second most populous city of the Peloponnese Peninsula (photo © I. Gordutina | Panther Media).

    Fresh Goat Cheese Log
    [4] Fresh goat cheese is typically rolled into a log shape (photo © Murray’s Cheese).

     
    While the tart crust bakes…

    6. PLACE the tomato slices on a double thickness of paper towels. Sprinkle evenly with the salt. Let stand for 30 minutes. Pat the surface with paper towels to remove excess moisture. Transfer the slices to a cutting board and cut them in half, taking care to preserve their shape.

    7. ARRANGE the tomato slices in the baked tart crust in concentric circles, working from the outside in and overlapping the slices. You should be able to fit all or most of the slices, but reserve any extra for a salad. Tuck the olive halves into any crevices.

    8. BRUSH the surface with olive oil and scatter the oregano over the top. Return the tart to the oven and bake until the tomatoes are soft and sizzling, about 30 minutes. Cool on a rack for 15 minutes. The tart is best when warm, not hot.

    9. MAKE the topping. In a small bowl, blend the goat cheese and yogurt until very smooth. Add more yogurt if needed to create a sauce you can drizzle. Add the garlic (use less, if you prefer) and salt to taste.

    10. TO SERVE: Remove the tart from the tin and place on a serving plate. Drizzle with the goat cheese mixture and top with a few torn leaves of basil. Serve warm.


    Comments off

    FOOD FUN: Chocolate Bacon Potato Chips Recipe


    [1] Chocolate bacon potato chips, a delicious snack or dessert with ice cream (photos #1 and #2 © Castle Ranch Steakhouse [since closed]).


    [2] If you prefer, you can cut crinkle chips, but they will be thicker.

    Idaho Russet Potatoes
    [3] Idaho Russet Potato† (photo © Idaho Potato Commission).


    [4] Huckleberries are a different species in the same genus as blueberries and cranberrries* (photo © Artem Beliaikin | Unsplash)


    September 5th is International Bacon Day, a day to enjoy bacon from all over the world (here are the different types of bacon).

    How about food fun with bacon?

    You can have these Chocolate Bacon Potato Chips as a snack or as dessert, with chocolate or vanilla ice cream.

    This recipe includes homemade huckleberry sauce, which is a berry native to Idaho (and the official state fruit).

    Not everybody can get hold of huckleberries. You can substitute blueberries, which are a different genus* in the same species.

    Or, use no dipping sauce whatsoever.

    And, you can take the easy way out: Buy the potato chips and just make the chocolate-bacon topping.

    Thanks to Idaho Potato for sending us this recipe created by Executive Chef Dean Fuller, when he was at Castle Ranch Steakhouse in Boise, Idaho (since closed).
     
     
    > The Different Types Of Potatoes

    > The History Of Bacon
     
     
    RECIPE: CHOCOLATE BACON POTATO CHIPS

    Ingredients For 30-35 Chips

  • 1 large Idaho® potato (about 12 ounces)
  • 3 bacon slices
  • 2 tablespoons brown sugar
  • ¼ – ½ teaspoon red pepper flakes
  • Idaho Huckleberry Sauce (recipe follows)
  • 8 ounces chocolate chips or chopped chocolate
  • Oil for deep frying
  •  
    For The Huckleberry Dipping Sauce

    Ingredients For 1 Cup

  • 4 ounces huckleberries
  • ½ cup sugar
  • ¼ cup water
  • 2 teaspoons lemon juice
  •  
    Preparation

    1. MAKE the Huckleberry Sauce: Place the sugar and water into a small saucepan over medium high heat. Once the mixture starts bubbling, cook for 2 minutes. Add the huckleberries and cook for 1 minute. Remove from the heat and stir in the lemon juice. Let the sauce come to room temperature, stirring occasionally.

    2. COOK the bacon. Preheat the oven to 350°F. Line a baking sheet with parchment paper. Lay the bacon slices onto the prepared pan. Sprinkle each slice with the brown sugar, then with the red pepper flakes. Bake for 10-12 minutes until they are cooked completely. Set aside to cool. Once cool, dice the bacon into ¼” pieces.

    3. HEAT the frying oil to 350°F. Slice the potato on a mandoline to about 1/10th of an inch slices. Line a baking sheet with parchment paper.

    4. BLANCH the potato slices in the oil for 5 seconds, then lay them on the prepared baking sheet in a single layer. Bake them at 350°F for 8-10 minutes until they are all golden brown. Let them cool. Meanwhile…

    5. MELT the chocolate in the microwave in 20-second intervals, stirring each time until completely melted. Dip each chip into the chocolate, covering about 85% of the chip. Place back onto the parchment-lined baking sheet.

    6. PLACE a few pieces of the bacon onto the chocolate-covered chip. Repeat until you have dipped all of the chips and added all the bacon. Cool for 1 hour at room temperature or place in the refrigerator for one minute. Place chips on a serving platter and serve with the Idaho Huckleberry Sauce.

     
    ________________

    *The Ericaceae family of flowering plants, commonly known as the heather family, includes 124 genera. The genus Vaccinium includes bilberries, blueberries, cranberries and huckleberries. Blueberries are Vaccinium sect. cyanococcus, huckleberries are Vaccinium parvifolium.

    †“Idaho Potato®” is a trademarked variety of russet potato, that ensures the potato has been grown in Idaho soil and its specific terroir. Terroir, pronounced tur-WAH, is a French agricultural term referring to the unique set of environmental factors in a specific habitat that affect a crop’s qualities. It includes climate, elevation, proximity to a body of water, slant of the land, soil type and amount of sun. These environmental characteristics gives the potato (or other agricultural product) its unique character.


    Comments off

    RECIPE: Savory Cheesecake As A First Course

    We love cheesecake. Ninety-nine percent of the time it’s a sweet cheesecake, but every once in a while we come across—or decide to bake—a savory cheesecake.

    There’s no sugar.

    Using a base of cream cheese—just like dessert cheesecake—it’s an unsweetened cheesecake that combines savory ingredients: herbs, vegetables, seafood and/or other cheeses.

    Savory cheesecakes are always a big hit, because few people have ever had one—and most people welcome a new way to enjoy cheese.

    They can combine just about any flavors, from shrimp to jalapeño to roquefort.

    Savory cheesecakes can be served as/at:

  • Party Food: Served it as a cocktail spread, with party bread and crackers.
  • Buffet: Slice the cheesecake and place on a buffet with its garnishes.
  • First Course: Serve as first course or cheese course with a mesclun salad.
  • Cheese Course: Serve it before or instead of a dessert.
  • Tea Time: Serve at afternoon tea, instead of tea sandwiches and scones.
  • Sliced Or Individual: Can be a large cheesecakes or individual cheesecakes.
  •  
    In addition to the featured Garlic & Herb recipe below, try these delicious recipes, courtesy of the Wisconsin Milk Marketing Board.

    Just take a look at the photos: You’ll want to make them all!

  • Blue Cheese Cheesecake Recipe
  • Cool & Creamy Tuna Cheesecake Recipe
  • Grand Cru Gruyère & Lobster Cheesecake Recipe
  • Nacho Cheesecake Recipe
  • No Bake Savory Basil Cheesecake Recipe
  • Provolone & Corn Cheesecake Recipe
  •  

    GARLIC & HERB CHEESECAKE WITH BOURSIN

    This is a savory cheesecake using Boursin Garlic & Fine Herbs Cheese, with a Parmesan cracker crust, topped with whipped Boursin® and a fresh tomato-olive salsa.

    Chef James Musser used the lighter Boursin Garlic & Fine Herbs Cheese instead of cream cheese.

    The crust is made from parmesan crackers, but you can use wheat crackers or any savory cracker (we used Wheat Thins).

    This is a party-size recipe, but you can cut it in half. Alternatively, since it’s made with two pans, you can freeze the second pan (here’s how to freeze cheesecake batter).

    For a first course or a cheese course, serve it with a salad lightly dressed with Dijon vinaigrette.

    For a wine pairing, try a Chardonnay or Chenin Blanc. If you prefer a red wine, try a lighter style like Beaujolais or Pinot Noir.
     
     
    Ingredients For 24 Slices

  • 18 ounces wheat crackers
  • 1¾ packed cups grated parmesan cheese
  • 1 cup unsalted butter, melted, plus extra for brushing
  • 8 packages Boursin Garlic & Fine Herbs Cheese
  • 6 eggs
  • 3 egg yolks
  • 1 cup sour cream
  • 1 cup shredded colby or mild cheddar cheese
  • ¼ cup sliced scallions
  • 1 teaspoon kosher salt
  • ¼ teaspoon black pepper
  • ¼ teaspoon white pepper
  •  
    For The Tomato-Olive Salsa

  • 2 pints grape tomatoes, quartered
  • 1 pint herb-marinated kalamata olives, sliced
  • ¼ cup shaved red onion
  • 2 tablespoons red wine vinegar
  • Salt and pepper to taste
  •  
    For The Whipped Boursin Topping

  • 4 packages Boursin Black Pepper Cheese
  • 1 cup heavy cream
  • 2 teaspoons dried herbs, such as herbes de Provence
  • Salt and pepper to taste
  • Optional garnish: microgreens, slice of red onion, halved cherry tomato (see photo #1)
  •  


    [1] Garlic-herb cheesecake made with Boursin cheese. The recipe is below (photo © Carlos Garcia | Flavor & The Menu).

    Basil Cheesecake Recipe
    [2] A no-bake savory basil cheesecake. Here’s the recipe (photo courtesy Eat Wisconsin Cheese).

    Nacho Cheesecake Recipe
    [3] Nacho cheesecake. Here’s the recipe (photo © Taste Of Home).

    Slice Of Savory Blue Cheese Cheesecake
    [4] Blue cheese cheesecake. Here’s the recipe (photo © Wisconsin Milk Marketing Board).

    Savory Goat Cheese Cheesecake With Basil
    [5] Goat cheese and basil cheesecake. Here’s the recipe from Love And Olive Oil (photo © Love And Olive Oil).

     
    Preparation

    1. MAKE the cheesecake: Preheat a convection oven to 350°F. Line the bottom of two 9-inch springform pans with parchment paper. Brush the sides and bottom with melted butter.

    2. PROCESS the wheat crackers into a fine crumb (we pulsed it in a food processor), then combine with 1 cup of the parmesan cheese and the melted butter, until moistened. Press the crumbs into the bottom of each pan and bake for 5 minutes. Remove and allow to cool. Turn the oven down to 250°F.

    3. PLACE the Garlic & Fine Herbs Boursin in a stand mixer fitted with the paddle attachment. Mix on medium speed for 3 minutes.
    Scrape down the sides and blade and add the eggs, yolks and sour cream. Mix for 3 minutes, until incorporated with no lumps remaining. Scrape the sides and blade and mix in any unincorporated cheese.

    4. ADD the colby, the remaining ¾ cup Parmesan, the onions, salt, black pepper and white pepper. Mix for 3 minutes on medium until incorporated. Divide the filling between the two pans.

    5. BAKE at 250°F for 1½ hours, until set and lightly browned on top. Remove and allow to cool at room temperature for 1 hour before wrapping and refrigerating. Once cooled…

    6. UNWRAP and run a knife around the perimeter of the cheesecakes to release from the pans. Cut each pie into 12 even slices.

    7. MAKE the Tomato-Olive Salsa: In a bowl, combine the tomatoes, olives, onion, vinegar, salt and pepper until incorporated. Allow the salsa to marinate while the cheesecakes are cooking. Taste and adjust the seasoning as needed.

    8. MAKE the whipped Boursin topping: In a food processor, combine the Black Pepper Boursin, heavy cream and dried herbs. Process to combine, then adjust seasoning with salt and pepper.

    9. TO PLATE: Rewarm the cheesecake slices in a 350°F oven for 4 to 6 minutes, until heated throughout. Place a dollop (about 1 tablespoon) of whipped Boursin on top of each. Add the Tomato-Olive Salsa to the side of each slice. Garnish the top with microgreens.
     
     
    > Discover The History Of Cheese

    > Find More Types Of Cheese In Our Cheese Glossary


    Comments off

    RECIPE: A Welsh Rarebit For National Welsh Rarebit Day


    [1] A modern execution of the Welsh Rarebit, topped sauce instead of a pourover (photo by Tristan Kenney is licensed under-CC-BY-2.0).


    [2] This upscale version uses an artisan bread loaf with the crusts cut off (photo by The Food Place.co_.uk is licensed under CC-BY-2.0).


    [3] This creation has a side of tomatoes, a fried egg and sliced avocado. Do we spy cubes of ham? That’s not a Welsh Rarebit; it’s a Welsh Meatbit—for the bit o’ meat (photo by by Tim Brauhn is licensed under CC-BY-2.0).


    [4] This version couldn’t be simpler, with a side of berries (photo by by Pod Chef is licensed under CC-BY-2.0).


    [5] A tasty execution of toast, tomatoes and lots of sauce (photo © Wisconsin Milk Marketing Board).


    [6] A Buck Rarebit, topped with an egg (photo by Tubblesnap is licensed under CC-BY-2.0).


    [7] An “Irish Rarebit” turns the cheese sauce green with lots of herbs (photo by Brian Fling is licensed under CC-BY-2.0).


    [8] How classy has Rarebit become from its peasant origins? It’s sold in jars at tony Fortnum & Mason (photo by Viv Lynch is licensed under CC-BY-2.0).


    September 3rd is National Welsh Rarebit Day, but it’s a misnomer, as you’ll see in the next section.
     
     
    THE HISTORY OF WELSH RAREBIT

    The simple dish of melted cheese over toasted bread—and possibly some beer or ale—was originally called Welsh Rabbit.

    It was so named because it was a meal for poor families who had no meat.

  • It was a dinner substitute when the man of the family had been unsuccessful in hunting down a rabbit.
  • In town, there was no hunting and meat came from the butcher. Poor people could not afford a rabbit, or even a chicken—much less beef or pork.
  •  
    Perhaps ironically, perhaps hopefully, it the dish was called a rabbit. Certainly, no one would refer to a mean meal of toasted stale bread topped with a sauce of melted cheddar bits as a “rare” bit.

    The earliest known use of the term “Welsh Rabbit” was in 1725.

    The misnomer, rarebit, is first noted 60 years later, in 1785.

    Why a misnomer? The word “rarebit” has no meaning beyond referring to this dish.

    Was “Rarebit” made up on purpose, was it a typo, or did someone simply mis-year “rabbit?”

    We don’t know.

    So “rarebit” it remained. It’s now a traditional British dish, available everywhere from pubs and finer restaurants alike (photo #2)—with a pint of beer or ale, of course.

    The modern cheese sauce is more tasty than the original, flavored with not only beer or ale, but with Worcestershire sauce, cayenne, mustard and paprika—ingredients unknown to a poor family (and Worcestershire sauce not invented until 1837).

    Sometimes an egg is served atop the Rarebit, and then it’s called a Buck Rarebit (although a “cluck” rarebit sounds more logical to us).
     
     
    RECIPE: WELSH RAREBIT

    You can use this cheese sauce on anything, from mac and cheese and Eggs Benedict to cheeseburgers and vegetables (how about a loaded baked potato?).

    Don’t just cut the cheddar into large hunks, place it in the microwave and hope for the best. Shred, grate, or chop the cheese finely. Place your ingredients into a heavy-bottomed saucepan, then use a low heat to melt the cheeses. It is very helpful here to stir constantly, especially with a whisk.

    Keep stirring and don’t allow the melting cheese to settle in any area on the bottom of the pan—it could scorch.

    Welsh rabbit is similar to fondue, except that the melted cheese is poured over toast instead of dipping bread chunks into a pot of melted cheese.

    Ingredients For 2 Servings (2 Slices Each)

  • 2 tablespoons butter
  • 2 tablespoons all-purpose flour
  • 1/3 cup milk
  • 1/2 cup beer or ale
  • 1 teaspoon dry mustard
  • 1/4 teaspoon each cayenne pepper and paprika
  • 1 teaspoon Worcestershire sauce
  • 1-1/2 cups sharp Cheddar, shredded
  • 1 egg yolk
  • 4 slices bread for toast
  • Optional: sliced tomato
  • Optional garnishes: fresh snipped chives, parsley or thyme
  •  
    Variations

    Cheddar was most common in poor households, but you can afford any cheese you like. In fact, you can:

  • Vary The Cheese: You can use any semi-hard cheese, or a blend of cheeses. Like fondue, Welsh rabbit is a great way to use up scraps of cheese. If it’s a blend, you can even add softer cheese.
  • Vary The Alcohol: Instead of beer or ale, use white wine. You can also add Kirschwasser* along with the wine, as is done with fondue.
  • Add Herbs To The Sauce. Any herb or combination of herbs will enhance the sauce. If you like heat, add chiles, too; or more cayenne.
  • Make A Playful Sauce. Add sliced olives or sweet gherkins, diced pimento or artichoke hearts—whatever.
  • Vary The Bread: You can (and should!) use artisan bread. We like a rustic country loaf; although semolina and raisin or raisin-nut bread elevate the dish, indeed. Perhaps an English muffin?
  • Add Vegetables. Top the bread with tomatoes, broccoli florets, kale, sliced baby potatoes, whatever you like. Then pour the sauce over them.
  • Add Bitter Greens: Arugula or watercress in a Dijon vinaigrette is an excellent counterpoint to the richness of the cheese.
  • Add A Side Salad: A salad dressed in vinaigrette .
  • Add An Egg: Atop the cheese, a fried egg turns the Welsh Rarebit into a Buck Rarebit.
  • Add Fruit: A side of sliced apples or grapes is a different variation of “cheese and fruit.”
  • Serve With Toasted Baguette & Crudités: Instead of pouring over toast, use the cheese sauce to dip small toasts and raw vegetables.
  •  
    Preparation

    1. PREPARE THE TOAST. If you’re not using artisan bread, try rye toast or whole grain toast because of the added flavor; but use whatever bread you have.

    2. MAKE THE ROUX. Melt the butter in a saucepan over low heat; whisk in the flour until smooth and simmer the roux for two minutes.

    3. ADD THE LIQUIDS. Whisk in the milk, then the beer. You can use leftover beer: The effervescence cooks out. The more flavorful the beer, the better the dish.

    4. ADD THE SEASONINGS. Add cayenne, mustard and paprika one at a time, whisking until smooth. Add the Worcestershire sauce and whisk to combine.

    5. ADD THE CHEESE. Whisk in the cheddar, 20% at a time, and blend until smooth.

    6. ADD THE YOLK. Remove the pan from the flame; whisk in the egg yolk for extra richness and body.

    7. PLATE. Place two pieces of toast on each plate. Top with tomato slices. Pour the cheese sauce over toast. Garnish with herbs.

    Who needs a real rabbit: This “poor man’s supper” is delicious!
     
     
    > Find More Types Of Cheese In Our Cheese Glossary
     
     
    > Discover The History Of Cheese


    Comments off

    The Nibble Webzine Of Food Adventures


    © Copyright 2005-2026 Lifestyle Direct, Inc. All rights reserved. All images are copyrighted to their respective owners.