|
August 25th is National Banana Split Day, celebrating an iconic sundae invented in 1904 by a 23-year-old apprentice pharmacist in Pennsylvania.
In those days, pharmacies contained soda fountains, and it wasn’t unusual for a junior pharmacist to fill in as a soda jerk*.
He made the sundae in a long dish called a boat (hence the alternate term, banana boat). The banana was cut in half lengthwise (the “split”) and placed on the bottom of the boat. The banana was topped with three scoops of ice cream—vanilla, chocolate, and strawberry ice cream.
Chocolate, pineapple, and strawberry sauces were spooned over the ice cream, and the sundae was garnished with whipped cream, crushed nuts, and a maraschino cherry.
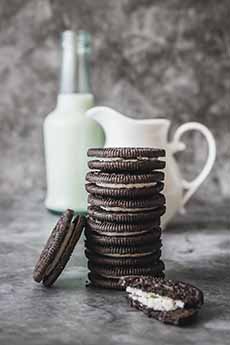
And voilà: the banana split we all know and love was born (photo #4).
Here’s the history of the banana split.
There have been numerous creative approaches to the original. In addition to today’s Banana Split Ice Pops, we have more fun banana split-inspired recipes below—from banana split waffles to sushi and s’mores.
Plus, a banana split party bar!
AMERICAN HERITAGE FINELY GRATED BAKING CHOCOLATE
The ice pops recipe, from American Heritage Chocolate, uses the brand’s Finely Grated Baking Chocolate (photo #3).
We really like this product, which incorporates the brand’s old-fashioned approach to artisan chocolate.
While you can use any grated chocolate in the recipe, American Heritage chocolate, which is 57% cacao, has been enhanced with subtle flavors of anise, cinnamon, nutmeg, and red pepper. Most chocolate uses only vanilla.
The American Heritage spices pay tribute to the original chocolate drink of the Olmecs, Mayas, and Aztecs, which was flavored with chili pepper, cinnamon, cornmeal, musk, and vanilla. (Here’s more about it.)
American Heritage Chocolate, made in the style of Colonial-era artisans (that’s the “American heritage”), is sold exclusively by “living history” sites, museums, and specialty gift shops like Colonial Williamsburg, Mount Vernon and the Old North Church in Boston; and on Amazon.
American Heritage products are OU Kosher, Rain Forest Alliance Certified, and preservative-free.
RECIPE: BANANA SPLIT ICE POPS
This recipe combines the flavors of a banana split that features the flavors of banana with chocolate ice cream, and toppings of crushed pineapple, strawberries, and peanuts.
It has everything but the maraschino cherry and whipped cream. So we got creative:
We added a maraschino cherry to the top of the pop. When ready to serve them, simply attach the cherry to the top of the pops with some whipped cream, and hand them to the lucky recipients.
Prep time is 15 minutes; freeze time is 6 hours.
A note about copyright: Popsicle®, Fudgsicle® and Creamsicle® are trademarks of brands owned by
For The Pops
2 bananas
2 cups half and half
1⅓ cup American Heritage® Finely Grated Baking Chocolate or substitute
2 tablespoons sugar
Pinch of coarse salt
1 tablespoon cornstarch
2 tablespoons crushed pineapple in juice, drained
4 large strawberries, finely diced
For The Garnish
½ cup, melted American Heritage® Finely Grated Baking Chocolate
¾ cup salted peanuts, roughly chopped
Optional: maraschino cherries
Preparation
1. PURÉE 1 banana until very smooth. Thinly slice the second banana; set aside.
2. COMBINE in a heatproof bowl the half and half, the grated chocolate, sugar, and salt. Set the bowl over a pan of gently simmering water, stirring frequently until chocolate melts, about 5 minutes.
3. ADD the cornstarch, banana purée, and pineapple. Stir until mixture thickens, about 3 minutes. Remove from the heat and let the mixture cool slightly before stirring in the strawberries.
4. POUR the mixture into 10 to 12 ice pop molds, filling each to 1 inch below the top. Use an ice pop stick to press the banana slices into each mold cavity. Place the lid on the mold and insert the sticks according to the manufacturer’s directions. Freeze for at least 6 hours or overnight.
5. GARNISH the pops. Briefly dip molds in a bowl of hot water to loosen. Remove the pops and transfer them to a baking sheet lined with waxed paper. Drizzle with the melted chocolate and sprinkle with the chopped peanuts. The pops will keep in the freezer, tightly wrapped in plastic, for up to one month.
MORE BANANA SPLIT RECIPES
Banana Split Party Bar
Banana Split Sushi
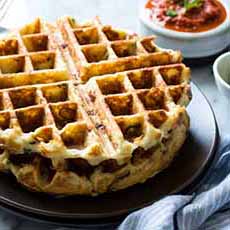
Banana Split Waffles
Deconstructed Banana Split
Grilled Banana Split
S’mores Banana Split
________________
*That’s not an insult: Soda jerk was job title of drugstore assistants who operated the soda fountain. The name was inspired by the “jerking” action of pulling the fountain handle back and forth to dispense the soda.
|
|

[1] Banana Split Ice Pops: all the flavors of a banana split, frozen on a stick (photos #1, #2 and #3 © American Heritage Chocolate).
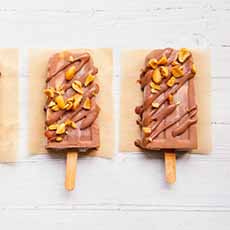
[2] What’s missing? The maraschino cherry!

[3] American Heritage Finely Grated Chocolate.

[4] The classic banana split (photo © The Wholesome Junk Food Cookbook).
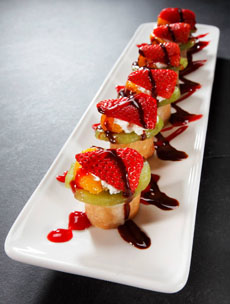
[5] Banana Split Sushi. Here’s the recipe (photo © RA Sushi | Orlando).
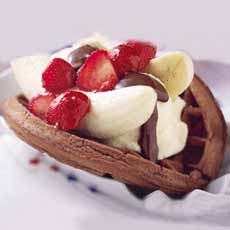
[6] Banana Split Waffles, for brunch or dessert. Here’s the recipe (photo © Krusteaz).
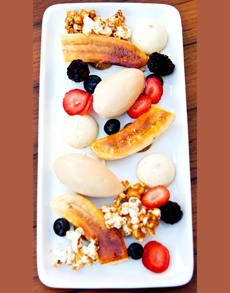
[7] This Deconstructed Banana Split uses grilled bananas. Here’s the recipe (photo © Sushi Samba [alas, now closed]).
|