THE NIBBLE BLOG: Products, Recipes & Trends In Specialty Foods


Also visit our main website, TheNibble.com.

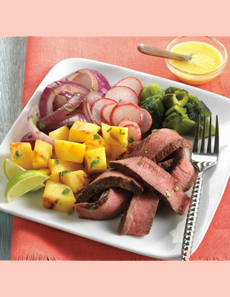
RECIPE: Deconstructed Fajita Salad

Beef-Fajita-Salad-with-Mango-Serrano-Vinaigrette-beefitswhatsfordinner-230
Ditch the tortilla carbs and have a fajita
salad. Photo courtesy Beef It’s What’s For
Dinner.
  According to Cabo Flats cantina and bar, there are 54,000 Mexican restaurants in the U.S., and $39 billion is spent each year on Mexican restaurant food.

Instead of an elaborate fajita spread with six different condiments and sides (see the history of fajitas, below), try this “deconstructed” Beef Fajita Salad with Mango-Serrano Vinaigrette. It’s from the Cattlemen’s Beef Board and National Cattlemen’s Beef Association, BeefItsWhatsForDinner.com.

You can substitute a green salad for the diced mangoes. Or, serve a large green salad on the side with a different vinaigrette (we like balsamic).

RECIPE: BEEF FAJITA SALAD WITH MANGO-
SERRANO VINAIGRETTE

Ingredients For 4 Servings

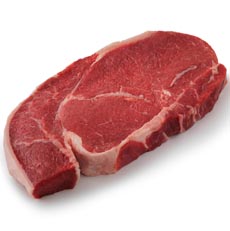
  • 1 beef boneless top sirloin steak (about 1 pound), cut 1 inch thick
  • 3 medium mangoes, peeled, cut in half
  • Olive oil
  • 2 medium poblano chiles
  • 1/2 teaspoon ground black pepper
  • 1 large red onion (about 11 ounces), cut into 1/2-inch thick slices
  • 1 cup radishes (about 1 bunch), thinly sliced
  • 2 tablespoons chopped fresh cilantro
  • For The Vinaigrette

  • 3 tablespoons fresh lime juice
  • 3 tablespoons water
  • 1 to 2 serrano chiles
  • 3 tablespoons olive oil
  •  
    Optional

  • Flour or corn tortillas
  •  

    Preparation

    1. BRUSH the mangoes lightly with oil. Place the mangoes and poblanos in the center of the grill over medium, ash-covered coals. Grill the chiles, covered, 9 to 10 minutes (gas grill times remain the same) or until the skins are completely blackened, turning occasionally. Grill the mangoes 8 to 14 minutes (gas grill times remain the same) or until very tender, turning occasionally. Place the chiles in a food-safe plastic bag; close bag. Let stand 15 minutes. Set the mangoes aside.

    2. PRESS the black pepper evenly onto the steak. Brush the onion slices lightly with oil. Place the steak in the center of the grill over medium, ash-covered coals; arrange the onion slices around steak. Grill the steak and onions, covered, turning occasionally. Cook for 11 to 15 minutes over coals, 13 to 16 minutes over medium heat on preheated gas grill, or until the steak is medium rare (145°F) to medium (160°F) and the onion is tender. Keep warm. Meanwhile…


    top-sirloin-lockestmeats.ca-230
    A top sirloin steak, grilled and ready for a fajita salad (or a regular fajita!). Photo courtesy Red Marble Steaks.

     
    3. PREPARE the vinaigrette. Cut the grilled mangoes into 3/4-inch pieces. Combine 1/2 cup mango, lime juice, water and serrano chiles in a food processor. Cover and process until smooth. With the motor running, slowly add the oil through the opening in the lid, processing until well blended. Season with salt to taste. Set aside.

    4. REMOVE and discard the skins, stems and seeds from the the poblano chiles and cut them into 3/4-inch pieces. Slice the steak. Cut the onion slices in half.

    5. PLACE the beef, remaining mango pieces, onion, chiles and radishes on serving platter. Season with salt as desired. Drizzle the salad with vinaigrette. sprinkle with cilantro and serve.
     

    ABOUT FAJITAS

    Fajita is a Tex-Mex term for strips of meat cut from the faja, or beef skirt (skirt steak is the most common cut used to make fajitas, but you can also use top sirloin). The word faja is Spanish for band, belt, sash or strip.

    The dish was popularized in the 1970s by Mexican restaurants in Texas. The meat was served sizzling, usually cooked with onions and bell peppers. Tortillas were used to roll the meat, with a choice of add-ins from shredded lettuce and cheese to guacamole, pico de gallo or other salsa, sour cream, and tomato.

    Today, you can order fajitas in all popular proteins: chicken, pork, shrimp, and all cuts of beef.


    Comments off

    TIP OF THE DAY: One Pot Clambake

    One-Pot-Clambake-WS-230sq
    No sand pit on the beach is needed for this
    one-pot clambake. Photo courtesy Williams-
    Sonoma.
     

    The clambake has long been a popular New England summer festivity. Sand pits are dug on the beach to steam the seafood. It’s not only delicious food—it’s a fun event.

    But you don’t need a beach to enjoy the deliciousness. This recipe from Williams Sonoma’s One Pot of The Day Cookbook will do the trick.

    Get out or borrow a large, heavy-bottomed stockpot (16-20 quarts) and fill it to the brim with everybody’s favorite clambake ingredients: clams, corn, lobsters, mussels, potatoes and sausages.

    Advises Williams-Sonoma: Just provide plenty of napkins, a bowl for the discards and crusty bread to soak up the broth.

    We’ll add: bibs and a clam chowder starter!

    For vegetables: Prepare a green salad without adding dressing. If anyone’s still hungry after the main course, dress and serve the salad. Otherwise, keep it for the next day.

    TIPS

  • While traditional clambakes serve cold beer, you can pour your favorite white wine or rosé.
  • If you want everyone to have a lobster, get four. Otherwise, detach the tails of the two lobsters prior to cooking, so two people will have tails and two get the upper body with the claws and legs.
  • If you have large bowls, consider using them instead of plates. Then, each person can have as much broth as he prefers with his/her meal.
  •  
    RECIPE: ONE-POT LOBSTER CLAMBAKE

    Ingredients For 4 Servings

  • 2 tablespoons olive oil
  • 1 yellow onion, chopped
  • 3 cloves garlic, minced
  • 1 small fennel bulb, chopped, any fronds reserved for garnish
  • 3 sprigs fresh thyme
  • Salt and freshly ground pepper, to taste
  • 1-1/2 cups white wine
  • 3 cups chicken broth
  • 1 pound red-skinned potatoes, quartered
  • 1 pound kielbasa or other smoked sausage, thickly sliced
  • 2 one-pound lobsters
  • 2 ears of corn, each cut into 3 pieces
  • 24 mussels*, scrubbed and debearded
  • 24 clams*, scrubbed
  • 12 large shrimp in the shell
  • 1 lemon, cut into wedges
  •  
    Plus

  • Crusty bread, sliced
  • Absorbent napkins
  • Bibs (we use hand towels)
  •  
    *Discard any clams or mussels that are cracked or open before cooking. Mollusks should be closed before cooking and open afterward.


    Preparation

    1. HEAT the oil in the stockpot over medium-high heat. Add the onion, garlic, fennel and thyme. and season with salt and pepper. Sauté until the fennel is soft, about 8 minutes.

    2. ADD the wine and cook until reduced by half, about 5 minutes. Add the broth and then layer the other ingredients on top in this order: the potatoes, the kielbasa and the lobsters. Cover the pot tightly and cook for 10 minutes. Remove the lid and nestle in the corn, clams, mussels and shrimp. Cover tightly and cook for another 10 minutes. Discard any unopened mussels or clams.

    3. TRANSFER the corn, potatoes, sausage and seafood to a large platter, using a slotted spoon. Season the broth in the stockpot to taste with salt and pepper and spoon it over the top of the seafood (we pour the excess broth into a pitcher for the table and reserve whatever is left for to enjoy next day). Garnish with fennel fronds and lemon wedges, and serve immediately.


    one-pot-of-the-day-ws-230

    Find more easy one-dish dinners in this cookbook by Kate McMillan. Order yours online. Photo courtesy Williams-Sonoma.

     
    CLAMBAKE HISTORY

    A lobster clambake is a 2,000-year-old tradition that began with Native Americans in what is now New England. The Pilgrims first learned about it by watching them gather the seafood from the water and prepare the community meal on the beach.

    Native Americans did not have large cooking vessels. Instead, a sand pit was dug and lined with hot rocks and coals. The seafood was set into the pit and covered with wet seaweed and more hot rocks, steaming the food in seawater. (Today, a tarp is added to keep the steam in.)

    What was a subsistence meal for the Native Americans of Connecticut, Maine, Massachusetts and Rhode Island has evolved into a modern-day festive beach dinner, often held at sunset.

    At some point after the Europeans arrived, seafood was not considered sufficient protein source for the men working hard to dig the pit and gather the seafood. Meat was added as an energy food—first as hame or bacon in clam chowder, and then in the “bake” itself.

    The only “given” in a clam bake are the clams; but if you don’t eat seafood you can include different fish fillets.


    Comments off

    TIP OF THE DAY: Make A Lattice Pie Crust

    lattice-crust-blueberryjamtart-goboldwbutter-230sq
    Many people think a lattice is the prettiest
    pie crust. Photo courtesy Completely
    Delicious via Go Bold With Butter.
     

    “A home-baked fruit pie with a lattice crust is a guaranteed crowd pleaser,” says Annalise Sandberg of CompletelyDelicious.com. If you’ve always wanted to make one but haven’t yet, Annalise is here to help with a step-by-step photo tutorial.

    A lattice crust is a top crust for pies or tarts made from strips of dough woven into a criss-cross pattern.

    In addition to the eye appeal, the openings between the strips of dough allow steam to escape during baking. Some of the water in the fruit juices evaporates, which can caramelize the filling and makes for a less drippy filling. That’s why you typically find a lattice top on fruit pies.

    The lattice is made from the top crust dough of a double crust pastry recipe. The dough is cut into strips using a sharp knife or, preferably, a pastry wheel cutter which provides a beautiful crimped edge.

    If you need to buy a pastry wheel, we like this one which has both crimped and straight cutting blades. You can use the same tool to cut ravioli.

    LATTICE CRUST TIPS

  • Chill the dough before cutting.
  • If you don’t want to rely on your eye, use a ruler to make the strips even-width.
  • Some people use an egg wash to make their top crusts golden brown. We think a lattice looks nicer without the egg wash.
  • Here’s a video.
  •  
    RECIPE: LATTICE PIE CRUST

    Ingredients

  • Your favorite fruit pie recipe and a double pie crust recipe (how about a delicious peach pie recipe?)
  •  

    Preparation

    1. MAKE the fruit filling of your choice. Set aside and make your favorite pie crust recipe, divided into two disks. Chill the dough.

    2. ROLL out first disk of dough, place it in the pie pan and fill it with the fruit.

    3. ROLL out second disk of dough. Use a plain or decorative pastry wheel cutter (or a very sharp knife) to slice the dough into strips approximately 1-inch wide. Use 10 strips as you first master the technique. Later you can get creative with the width of the lattice and the number of strips you use.

    4. PLACE 5 dough strips on top of pie, spaced evenly. The longest strips should be in the center.

    5. WEAVE the second group of strips under and over the first five (and if these instructions sound confusing, look at the photo at right, watch the video or this photo layout).

      Lattice-unbaked-230sq
    Ready, set, bake! Photo courtesy Annalise Sandberg of CompletelyDelicious.com. Here’s her recipe.
    > PULL back the second and fourth strips halfway and place another strip down center of the pie, perpendicular to first set. Lay folded strips back down.
    > FOLD the first, third, and fifth strips back and place another perpendicular dough strip on top of pie. Unfold those strips, and again fold second and fourth strips. Lay one more perpendicular strip.
    > ROTATE the pie 180 degrees and repeat on the other side until you have finished the lattice.
    > TRIM the ends of the strips so that they match up with the overhang of the bottom crust. Pinch the top and bottom crusts together to seal, fold under and crimp as desired.

    6. BAKE as directed and impress your friends and family!
     

    LATTICE TRIVIA

    Before it was adapted to a pie crust design, a lattice was a structure of crossed wooden or metal strips, often arranged to form a diagonal pattern on trellises (for vines), gazebos, summerhouses, arches and other structures.

    The word first appears in print as an English noun in the late 13th century, derived from an Old English variant of laett, from the German latte—which is not a beverage but a thin slat of wood. The root can be found in numerous old languages, including Proto-Germanic, Old Norse and Old Saxon. The verb appears in the 1530s.

    Im Middle English the word was spelled latis; in Middle French, lattis. The French spelling is the same today.
      

    Comments off


    © Copyright 2005-2026 Lifestyle Direct, Inc. All rights reserved. All images are copyrighted to their respective owners.