THE NIBBLE BLOG: Products, Recipes & Trends In Specialty Foods


Also visit our main website, TheNibble.com.

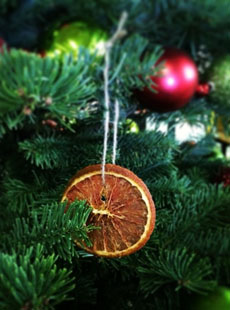
TIP OF THE DAY: Make Christmas Tree Ornaments From Dehydrated Citrus

dehydrated-grapefruit-tree-ornament-specialtyproduce-230

Ruby Red Grapefruit
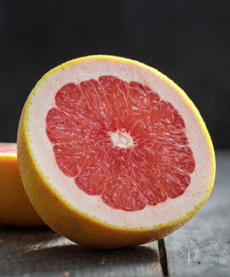
Dehydrate lemons, limes oranges and grapefruit to make tree ornaments. TOP PHOTO: An orange slice ornament. Photo courtesy Specialty Produce. BOTTOM PHOTO: Red or pink grapefruit make pretty slices. Photo courtesy Good Eggs.


You—or your kids—can make these dehydrated citrus ornaments in your oven. You don’t need an electric dehydrator, but if you have one, great.

The fruit slices become translucent after drying, adding color and textural interest to any display.

A convection oven is better than a conventional oven, but the latter works, too.

In addition to tree ornaments:

  • Use the dehydrated citrus in garlands or wreaths.
  • Add them to potpourri.
  • Give them as stocking stuffers.
  • Use them for party favors.
  •  
    MAKE YOUR OWN CITRUS CHRISTMAS ORNAMENTS

    Ingredients

  • Your choice of citrus (we especially like blood oranges and red grapefruits)
  • Optional: cloves for the citrus rims
  • Metallic gift wrap string or other decorative tie
  • Optional: gift tags (for stocking stuffers)
  •  
    Preparation

    1. PREHEAT Preheat the oven to its lowest temperature setting, usually 140°F. (To use a food dehydrator, set the temperature to between 125°F and 135°F and dry for 2-12 hours. Remember to rotate your dehydrator trays for even drying.)

    2. CLEAN the skins of the citrus with a damp towel.

    3. CUT the citrus into slices from 1/4″ to 3/8″ thick. If using the cloves, use an ice pick to punch holes for them in the surface skin (not in the white pith). TIP: Pressing in cloves can create a sore spot on your finger. Use a thimble.
     
    *If you need a lot of cloves, it’s best to buy them in bulk (e.g., a one-pound bag).


    4. PLACE a wire rack atop a baking sheet(s), and arrange the slices on the rack. Place the sheet(s) in the oven, but leave the door open 2 to 4 inches. This enables the air to circulate and the moisture to escape, dehydrating the fruit. If you are preparing more than one tray, rotate the trays halfway through for even drying.

    TIP: You can set a fan just outside of the oven to supply further air circulation, and to help speed drying.

    5. DRY the orange slices in the oven for 6 to 12 hours, or until the peel is hard and the fruit is brittle. Allow the slices to cool completely; then store in an airtight container until ready to create the hanging loops or otherwise use them.

    6. USE an ice pick or other sharp implement to puncture a hole for hanging through the flesh of each piece. Use string (the metallic wrapping string is great here) to create a loop for hanging on tree branches. If you’re using a gift card, place it on the string before tying the knot.
      

    Comments off

    TIP OF THE DAY: Winter Fruit Compote Recipe

    First: What’s a compote?

    A popular medieval European dessert that faded out of style in the mid-20th century, compote (COM-poat), also referred to as poached or stewed fruit, is mix of fruits cooked in a syrup. Although a single fruit can be cooked in the same manner, a variety is more interesting.

    In fact, the name derives from the Latin compositus, mixture. Think of it as a cooked fruit salad. It was once so popular that people of means served it from a stemmed compote dish, designed to show off the fruits (see a photo below).

    The syrup is made from the cooking liquid—typically water or wine—plus sugar and spices.

    The syrup could be seasoned with the cook’s choice of cinnamon, cloves, lemon or orange peel, vanilla or other spices. The cooked fruit could be enhanced with candied fruit, grated coconut, ground almonds and/or raisins.

    In the absence of fresh fruit, compote could be made entirely with dried fruits, plumped in water that was optionally enhanced with kirsch, rum or sweet wine.
     
    HOW TO SERVE COMPOTE

    Thus, compote was especially popular in fall and winter, when fresh fruit was limited. Our Nana made it at least once a week during the season.

  • Compote can be served either warm or cold, with or without a dab of whipped cream or mascarpone. Except in Italy, the mascarpone is a modern touch. Nana and the rest of her generation had never heard of it.
  • You can use compote to garnish panna cotta or custard, in an ice cream parfait, even atop plain cake like angel food or pound cakes.
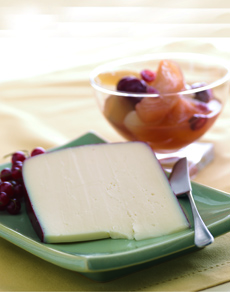
  • You can even serve compote with a cheese course, with or instead of fresh fruit.
  •  

    RECIPE: POACHED WINTER FRUIT COMPOTE


    [1] Apple and cherry compote on ice cream (both photos © Dairy Farmers Of Wisconsin).

    Apple Cherry Compote

    [2] Compote with a cheese course.

     
    This recipe, from the Wisconsin Milk Marketing Board, combines classic seasonal fruits—apples, pears, quince and dried fruits—with modern touches like star anise, another ingredient that wasn’t in American grocery stores in Nana’s time.

    For a holiday version, here’s another recipe: compote with cranberries, oranges and maple syrup.
     
    Ingredients

  • 1/2 cup sugar
  • 1/2 cup honey
  • Juice of one lemon
  • 2 cups water or juice
  • 1 cup dry or off dry white or rosé(juice may be substituted)
  • 2 cinnamon sticks
  • 6 whole star anise*
  • 6 allspice berries
  • 2 bay leaves
  • 4 to 6 apples, pears or quince (2-3 pounds), peeled and quartered
  • 1/2 cup dried plums, apricots or cranberries
  •  
    _______________

    *If you don’t have star anise and don’t want to buy it, for each star you can substitute: 3/4 teaspoon crushed anise seed, 1/4 to 1/2 teaspoon anise extract, 1/2 teaspoon Chinese five-spice powder or 1 tablespoon anise liqueur or other licorice liqueur.
     
    Preparation

    1. PLACE the first nine ingredients (up to and including the bay leaves) into a pot and bring to a boil. Stir to dissolve the sugar; then reduce the heat to low and add the fruit.

    2. COVER the pot and simmer, removing the fruit with a slotted spoon as it softens.† Arrange the fruit in a glass bowl. (Nana mixed everything together like fruit salad, although you can layer the fruits if you wish.) Once all the fruit has been removed…

    3. BRING the poaching liquid to a boil and reduce it by half (it takes 5 to 10 minutes). Taste; if necessary add more lemon juice to balance the flavor. Strain the syrup and carefully ladle it over the poached fruit. The cooked fruit will keep in the refrigerator for about a week.
     
    _______________

    †The fruit should be tender but not mushy. Cooking times vary for different fruits: 10 to 15 minutes for dried fruits, 20 to 30 minutes for pears, 30 to 45 minutes for apples and one hour for quince.


    Compote Dish
    [3] A simple compote dish. Compote dishes could be quite elaborate: etched crystal, garnished in gold, etc. (photo © Abigails | Amazon).
     

    THE HISTORY OF COMPOTE

    No doubt, fruits have been stewed since the invention of clay pots, some 17,000 years ago in China. But the oldest known recipe we have, for a pear and fig kompot, dates to the early Byzantine Empire (330 C.E. to 1453 C.E.).

    Here’s the recipe for that ancient fruit compote. It’s made with dried fruit, date syrup and pomegranate molasses.

    Compote ultimately made its way to Europe. According to Wikipedia, in late medieval England the compote was served as one of the last courses of a feast. Later, during the Renaissance, it was served chilled at the end of a dinner, e.g., a predecessor of the modern dessert.‡

    Because it was easy to prepare, made from inexpensive ingredients and contained no dairy products, compote became a staple of Jewish households throughout Europe.

    Make it one of your household’s desserts!

     
    __________________

    ‡Sugar was little known in Europe until the 12th century or later, when the it was brought back from the Crusades. Even then it was rare and costly; honey or dried fruits were the common sweeteners. In southeast Asia, where sugarcane originated, it has been in use for 1,000 years or so.


    CHECK OUT WHAT’S HAPPENING ON OUR HOME PAGE, THENIBBLE.COM.


    Comments off

    RECIPES: Cranberry Cheesecake

    We [heart] cheesecake. Every October, we switch to pumpkin cheesecake in its many forms. But as soon as the Thanksgiving leftovers are gone, we start baking cranberry cheesecake recipes.

    Because cheesecake is such a rich and heavy dessert, we usually don’t serve it following a big dinner, but as a “tea time” snack (and honestly, we’ve been known to eat it for breakfast).

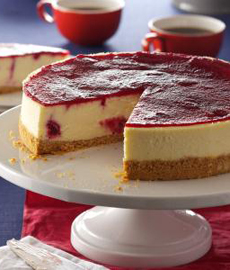
    The first recipe is a plain cheesecake with a cranberry topping, analogous to cherry cheesecake. The second recipe has a different look, with a cranberry swirl inside the cheesecake and a thin layer of cranberry gelée on top.

    Both recipes are made in a nine-inch springform pan. A nine-inch cake yields 12 slices.
     
     
    RECIPE #1: CHEESECAKE WITH CRANBERRY TOPPING

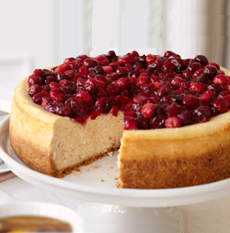
    This recipe (photo #1) is Philadelphia Cream Cheese’s classic cheesecake, with a cranberry topping. The result is the cranberry version of a cherry cheesecake.

    Ingredients

  • 1-1/2 cups graham cracker crumbs
  • 1-1/2 cups sugar, divided
  • 1 teaspoon ground cinnamon, divided
  • ¼ cup butter, melted
  • 4 packages (8 ounces each) cream cheese, softened
  • 4 eggs
  • 1-1/2 cups fresh cranberries (half of a 12-ounce package)
  • ½ cup water
  • Optional: 1 tablespoon orange zest
  •    
    Cranberry-Cheesecake-sliced-philadelphia-kraft-230
    [1] Like cherry cheesecake, but with a cranberry topping. Photo courtesy Kraft.
     
    Preparation

    1. HEAT the oven to 325°F. Mix the graham cracker crumbs, 1 tablespoon sugar, ½ teaspoon cinnamon and the butter until blended. Press onto the bottom of a 9-inch springform pan.

    2. BEAT the cream cheese and 1 cup of the remaining sugar in a large bowl with a mixer, until blended. Add the eggs, one at a time, mixing on low speed after each just until blended. Pour over the crust.

    3. BAKE from 55 minutes to 1 hour and 5 minutes, or until the center is almost set. Cool on a rack for 15 minutes. Run a knife around the rim of the pan to loosen the cake; cool before removing the rim. Refrigerate the cheesecake 4 hours. (You can leave it in the spring mold for the time being.) Meanwhile…

    4. BRING the cranberries, water, remaining sugar and cinnamon to boil in a saucepan on medium-high heat. Reduce the heat and simmer on low for 8 to 10 minutes, or until the sauce is slightly thickened and the berries have softened; stir occasionally. Cool slightly; thrn refrigerate until ready to serve.

    5. SPREAD the cranberry topping over the cheesecake just before serving.


    Cheesecake With Cranberry Gelee
    [2] Cooked cranberries are swirled into the cheesecake and puréed into a gelée topping. Photo and recipe courtesy Taste Of Home.

    Fresh Cranberries In Bowl
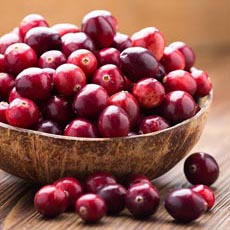
    [3] Fresh cranberries (photo courtesy Ocean Spray).

       
    RECIPE #2: CRANBERRY SWIRL CHEESECAKE WITH CRANBERRY GELÉE

    In this recipe from Taste Of Home (photo #2), cooked fresh cranberries are swirled through the batter; and then strained in a food mill or sieve to create a gelée topping.

    Prep time is 30 minutes, cook time is 55 minutes plus chilling.

    Ingredients For 12 Servings
     
    For The Crust

  • 2 cups graham cracker or shortbread cookie crumbs
  • 1/3 cup butter, melted
  •  
    For The Topping

  • 2 cups fresh cranberries
  • 2/3 cup sugar
  • 1/3 cup water
  • 1 teaspoon lemon juice
  •  
    For The Filling

  • 4 packages (8 ounces each) cream cheese, softened
  • 1 cup sugar
  • 1 tablespoon lemon juice
  • 5 large eggs, lightly beaten
  •  
    Preparation

    1. PREHEAT the oven to 325°F. Place a greased 9-inch springform pan on a double thickness of heavy-duty foil, about 18 inches square). Wrap the foil securely around pan and place the pan on a baking sheet.

    2. MIX the graham cracker crumbs and butter in a small bowl and press onto bottom of the prepared pan. Bake for 6 minutes and cool on a wire rack. Meanwhile…

    3. COMBINE the cranberries, sugar and water in a large saucepan. Cook, uncovered, over medium heat until the berries pop, about 12-15 minutes. Add the lemon juice. Press the cranberry mixture through a food mill into a small bowl; discard pulp and seeds. Set aside.

    4. MAKE the filling. In a large bowl, beat the cream cheese, sugar and lemon juice until smooth. Add the eggs and beat on low speed until just blended; pour into the crust. Spoon 1/4 cup of the topping over filling. With knife, cut through the filling to make a cranberry swirl.

    5. PLACE the springform pan in a larger pan and add 1 inch of hot water to larger pan. (This creates a water bath, or bain-marie, which adds moisture to the oven and keeps the top of the cheesecake from cracking.) Bake for 55-65 minutes or until the center is just set and the top appears dull.

    6. REMOVE the springform pan from the water bath. Cool the cheesecake on a wire rack for 10 minutes. Loosen the sides from the pan with a knife; remove the foil.

    7. COOL for 1 hour longer. Pour the remaining topping over cheesecake. Refrigerate overnight, covering the cheesecake when it is completely cooled. Remove the rim from the pan.


    Comments off


    © Copyright 2005-2026 Lifestyle Direct, Inc. All rights reserved. All images are copyrighted to their respective owners.