|
March 16th is National Artichoke Hearts Day, and January is Artichoke and Asparagus Month. Yes, there’s a holiday for just about everything: Here are the food holidays.
If you shop at a club store, you may run across large cans of artichoke hearts or artichoke pieces, nicely priced. There are also occasional sales on regular formats (13.85 ounce cans). Grab them!
Should you grab marinated or plain? It’s a toss-up.
Canned artichokes, packed in water, are more bland out of the can, but fine for dips, soups and other recipes where you don’t want the vinaigrette that comes with marinated artichoke hearts.
Marinated artichoke hearts are marinated in white vinegar and cheaper oil: soybean, sunflower or lower-quality olive oil.
If your palate notices the difference, you’re better off marinating your own, adding salt and spices to taste. They’re best in antipastos, salads and on sandwiches.
If you score a jumbo size, what should you do with all that artichoke?
The good news is that artichokes are low in calories: a 14 ounce can has 165 calories. So use them wherever and whenever.
Below:
> 14 ways to use artichoke hearts.
> A recipe for spinach and artichoke dip and variations.
> The history of spinach and artichoke dip.
> The most popular dips and spreads.
> More dip recipes.
Elsewhere on The Nibble:
> The history of artichokes.
> The year’s 60+ vegetable holidays.
20 WAYS TO USE ARTICHOKE HEARTS
Here’s a starter list.
Antipasto: Create a platter with marinated artichokes, cheese, pimento (roasted red peppers), salami, olives, etc.
Baked Potato: Check out this recipe.
Crostini: Combine plain or marinated chopped artichoke hearts with seasoned ricotta (lemon zest, pepper, salt) and spread on grilled or toasted bread. Or, first spread the seasoned ricotta on the bread and top with a whole or sliced artichoke.
Dips: Artichoke dips are very popular. There are three recipes below—with crab, gorgonzola and sundried tomatoes.
Eggs Sardou: A twist on Eggs Benedict with spinach and artichokes*.
Fish topping: Do a quick sauté of plain artichoke hearts in olive oil with halved cherry/grape tomatoes, minced garlic and olives. Or, make a more intense sauce with brown butter, capers and sage.
Fried: Serve fried artichoke hearts as a side, or as a first course with a yogurt sauce.
Grains: Add plain artichoke hearts to cooked whole grains (barley, couscous, brown rice, quinoa, etc.), either hot or a grain salad. Mix with other ingredients of choice, from raisins to nuts
Gratin: Place plain artichoke hearts in a baking dish, with or without other cooked vegetables; top with shredded Gruyère and breadcrumbs, and bake at 400°F until the cheese is melted and the artichokes are warmed through.
Lamb: Add to lamb shanks or stew.
Omelet: Toss in plain artichokes alone, with other vegetables and/or with cheese (feta, Gruyère, mozzarella, etc.): an easy, fancy side dish.
Pasta and risotto: Mix plain artichoke hearts with chopped or whole artichoke hearts, olives and olive oil or sauce of choice (recipe). Add to a lasagna or other baked pasta dish.
Pizza: top with plain artichoke hearts, optional anchovies, capers, olives, red onion, etc.
Potatoes: Roast potatoes, adding the artichokes toward the end. Toss with lemon zest and dill or parsley.
Roasts: Roast the hearts with chicken or lamb (here’s a recipe with lamb).
Salads: Add plain or marinated artichoke hearts to a green salad.
Sandwiches: Top the main filling with marinated artichoke hearts.
Spreads: Add to hummus, or try this artichoke tapenade recipe.
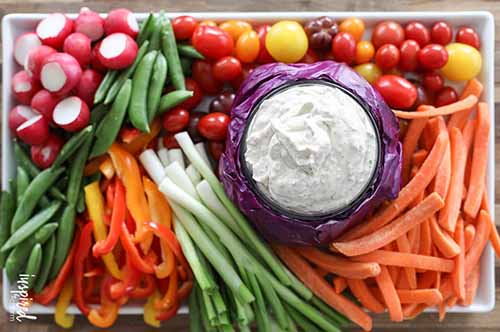
[10] How impressive is this dip served in a hollowed-out red cabbage? Here’s the recipe (photo © Inspired by Charm).
RECIPE: SPINACH & ARTICHOKE DIP OR SPREAD
Ingredients
1 box frozen chopped spinach, defrosted, drained and squeezed
1/2 cup sour cream
2 tablespoons mayonnaise
1 clove garlic, minced
1 lemon, juiced (and zested if desired)
2 tablespoons chopped green onion and/or parsley
Salt and freshly ground black pepper
Optional: a few dashes of nutmeg or Worcestershire Sauce
Optional: diced sundried tomato
Optional for hot dip: grated Emmental, Fontina, Gruyère, Jarlsberg or similar cheese
1 cup artichoke hearts, drained and quartered (we use canned; you may be able to find hearts that are already quartered)
Plus
Baguette slices, crackers, pita chips/wedges, toast points, tortilla chips, etc.
Preparation
1. DRAIN the spinach in a strainer and press with the back of a large spoon to press out the remaining water. Further blot with paper towels if needed.
2. COMBINE the spinach in a food processor with the sour cream, mayonnaise, garlic, lemon juice and optional zest and nutmeg; blend. Taste and season with salt and pepper to taste.
3. ADD the artichokes and pulse a few times. For a cold dip, refrigerate spread in a tightly-capped container for several hours or overnight, to enable the flavors to blend.
4. FOR A HOT DIP: Preheat oven to 375°F. Blend in the grated cheese and fresh-ground black pepper. Place in an oven-proof dish, top with more grated cheese and bake at until golden brown, about 15–20 minutes.
Artichoke Dip Variations
There are as many different types of artichoke dip as there are people who think of what to add or change. Popular examples:
Bacon-artichoke dip: Here’s a recipe.
Basic hot baked artichoke dip: chopped artichokes with cream cheese, sour cream, mayonnaise, and Parmesan, sometimes with garlic or dill, baked until bubbly.
Beyond spinach: use a different leafy green. Here’s a recipe with collard greens.
Chile and artichoke dip: chopped green chiles add a mild peppery bite; can be baked or chilled. Here’s a recipe.
Cold artichoke dip: a spreadable dip, often blending chopped artichokes with cream cheese or sour cream, Parmesan, and herbs, where the artichokes stand out more.
Crab and artichoke dip: the cheese can vary, it can have spinach, it can be baked or room temperature. Here’s a recipe.
Marinated artichoke dip: made with marinated artichoke hearts, it gets a tang from the oil, vinegar, and herb marinade. Often still baked with cream cheese and mayonnaise and/or sour cream.
Mediterranean artichoke dip: more herb/lemon/garlic-forward; sometimes yogurt-based rather than cream cheese or sour cream. Spinach, popular in Greek cuisine, can be added.
While many recipes include cream cheese and Parmesan, we like grated Emmental or Gruyère cheese atop a hot dip.
THE HISTORY OF SPINACH & ARTICHOKE DIP
The 1950s were the decade that launched mid‑century “party dips” to feed the postwar TV/snacking culture and more casual get-togethers.
Artichoke dip, in particular, got a boost when artichoke hearts—canned, jarred, or frozen—became widely available. No one had to wait for artichoke season, cook an artichoke and remove the heart.
While home dips took off mid‑century, spinach–artichoke dip’s modern identity—hot, gooey, cheese-forward, and served with baguette slices, crackers, or potato chips—appears to have been strongly reinforced by restaurant and chain menus. People went home and created copycat recipes. (Here’s the copycat recipe for Applebee’s version).
|
|
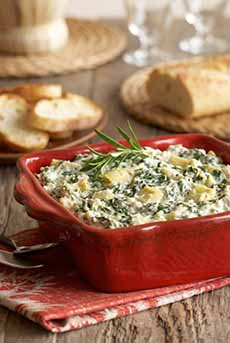
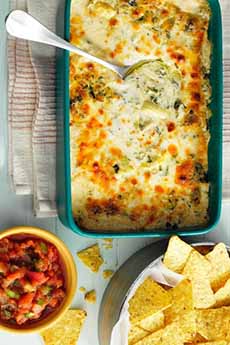
[1] Spinach Artichoke Dip. The recipe is below (Abacus Photo).
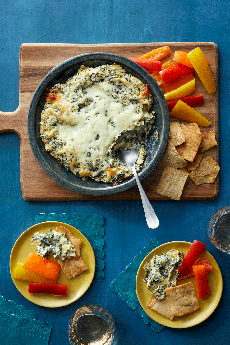
[2] Here’s a recipe for a hot version of Spinach-Artichoke Dip (photos #2, #6, #7. #8 © Taste Of Home).
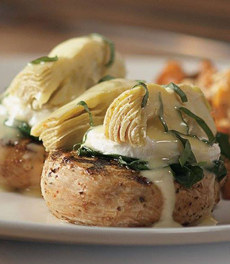
[3] Forget the dip and make an artichoke baked potato. Here’s the recipe (photo © Bonefish Grill).
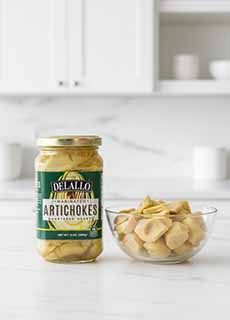
[4] If you can find artichoke hearts already halved or quartered, it saves time (Gemini Photo).
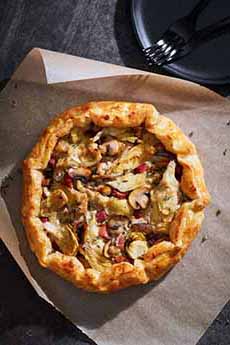
[5] How about an artichoke galette: for brunch, lunch or a first course at dinner. Here’s the recipe (photo © DeLallo).

[6] Beyond artichoke dip: Buffalo Chicken Dip is one of America’s favorites. Here’s the recipe.

[7] This dill pickle dip was is so popular, when we serve it guests often bring spoons to eat the dip from the bowl. Here’s the recipe.
[8] A copycat recipe of Applebee’s popular spinach and artichoke dip. Here’s the recipe.

[9] If you steam fresh artichokes, here’s a tip: Don’t discard the stem. It tastes just like the artichoke heart (photo © Melissa’s Produce).
|
Our Mom recalls that in the 1950s or 1960s, a recipe appeared on the containers of mayonnaise or sour cream, and possibly on packages of Knorr or Lipton dry soup mixes, both of which featured spinach dip with sour cream, mayonnaise and chopped water chestnuts. Such recipes were typically developed by home economists employed by food producers, to encourage popular new ways to use their products.
The recipe above is what Mom’s used, transferred from the package to an index card and kept in a metal index card box with her other recipes.
Today, bagel, pita, and tortilla chips; crostini and other toasts; and crudités have joined the dip-and-spread lineup, along with artichoke dip served in a bread bowl (use a round loaf).
The dip can be served hot or room temperature.
Sunset Magazine lauded the dip as a “gooey, melty, mayonnaisey 1960s classic…you can even use as a sauce for grilled fish or chicken.” Here’s their recipe.
Spinach and artichoke dip is one of the most popular dips in the U.S., so it’s surprising that we can’t find information on its origin. If you know it, please let us know.
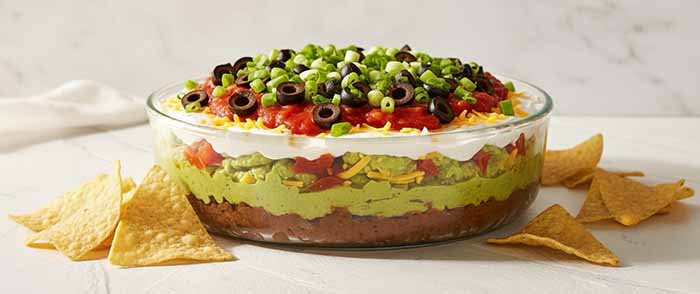
[11] One of America’s most popular party dips is Seven Layer Dip, a Tex-Mex recipe that has inspired similar dips in other cuisines, like Greek Seven Layer Dip (Abacus Photo).
THE MOST POPULAR SAVORY DIPS OR SPREADS
As we were researching this, we came across “Our 10 Most Popular Party Dips Of All Time,” published last October by Southern Living magazine. While their dips skew “southern” and our group of Northerners has never heard of most of them, we’ll append our list following theirs—which contains no artichoke or spinach:
Seven-Layer Dip (Tex-Mex layered dip)
Hot Crawfish Dip
Beau Monde Dip (classic creamy seasoning-based dip)
Neiman Marcus Dip (cheese, bacon, almonds)
Boat Dip (zesty ranch-style)
Tennessee Onion Dip
Texas Caviar / Cowboy Caviar
Old Bay Corn Dip
Pepper Jelly Dip (cream cheese + pepper jelly)
Pimiento Cheese
Our list, in alphabetical order:
Buffalo Chicken Dip (hot)
Dill Pickle Dip (cold)
Greek Layered Dip (cold)
Guacamole
Hummus
Lipton Onion Soup Dip
Pico de Gallo (cold—can be plain or mixed with sour cream or yogurt)
Seven-Layer Dip (Tex-Mex, cold)
Smoked Salmon & Cream Cheese Dip
Queso (hot cheese dip)
Bonus:
Clam Dip (cold)
We do like the idea of Southern Living’s Pepper Jelly Dip. We’ll make a batch for our next gathering.
|