Preparation
1. LIGHTLY GREASE a 10″ square pan or 9″ x 13″ pan.
2. MIX the rum or apple juice with the dried fruit and raisins, cover with plastic wrap, and microwave briefly, just until the fruit and liquid are very warm and the plastic starts to “shrink wrap” itself over the top of the bowl. Set aside to cool to room temperature. When the fruit is cool…
3. MIX together all of the dough ingredients except the fruit. Knead, using an electric mixer or bread machine, until the dough is soft and elastic. Mix in the fruit and any liquid. Let the dough rise for 1 hour, covered. It should become puffy, though it may not double in bulk.
4. DIVIDE the dough into billiard ball-sized pieces. That’s about 3-3/4 ounces each—about 1/3 cup, a heaped muffin scoop. Use greased hands to round the dough into balls and place them in the prepared pan.
5. COVER the pan, and let the buns rise for 1 hour, or until they’ve puffed up and are touching one another. While the dough is rising, preheat the oven to 375°F.
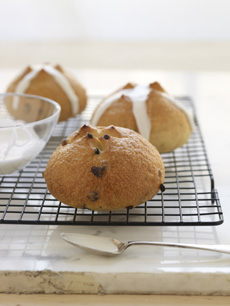
6. WHISK together the reserved egg white and milk, and brush it over the buns. Bake the buns for 20 minutes, until they’re golden brown. Remove from the oven and transfer to a rack to cool.
7. MIX together the icing ingredients, and when the buns are completely cool, pipe a cross shape atop each bun.
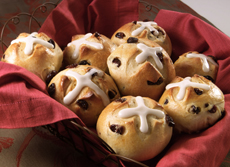
THE HISTORY OF HOT CROSS BUNS
The first recorded use of the term “hot cross bun” appears in 1733. A sweet yeast bun filled with raisins or currants, the cross on top was originally made with knife cuts. Over time, icing was piped over the cuts.
The cross symbolizes the crucifixion, and the buns are traditionally eaten on Good Friday.
They are believed to predate Christianity: Similar buns were eaten by Saxons to honor Eostre, the goddess of spring. In their ancient pagan culture, the cross is believed to have symbolized the four quarters of the moon.
“Eostre” is believed to be the origin of Easter. Many pagan holidays were ported into Christianity in its early days, to encourage pagans to convert to the new faith.
You don’t have to wait for Good Friday to enjoy hot cross buns. They’re too delicious to save for one day of the year. You can variety the recipe with dried cherries or cranberries instead of raisins.
___________________________________
*You can refrigerate the completed dough for the first rise (first proof), from a few hours to a few days. For loaves of bread, refrigerate unshaped dough; then shape it after removing it from the fridge. Refrigerate the dough immediately after mixing, not after a rise. After removing from the fridge, let it rise a second time on the counter. This can take one hour or several, depending on the yeast. Refrigeration actually yields tastier results because the yeast has more time to do its work. Allow the dough to warm up a little before baking.
You can shape loaves before refrigeration, but it may produce an uneven rise because the center of a large loaf will warm much more slowly after removal from the fridge. However, buns are small enough to avoid this problem, so feel free to shape before you refrigerate. [Source]
|