|
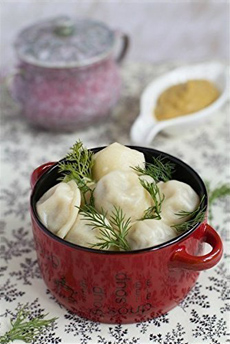
[1] Pelmeni with Russia’s favorite herb, dill (photos #1 and 32 Amazon).
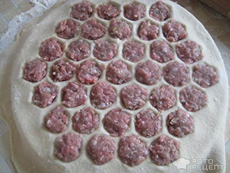
[2] Meat stuffing in a pelmeni mold (photo Amazon).
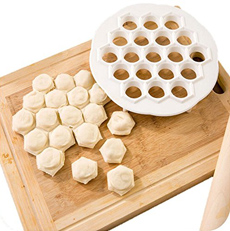
[3] Ready to cook (photo © Mums Prefer).
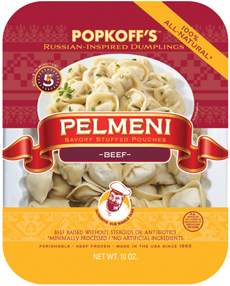
[4] A package of Popkoff’s Pelmeni. Check out recipes here (photos #1 through #6 © Popkoff’s).

[5] Pelmeni in miso soup.
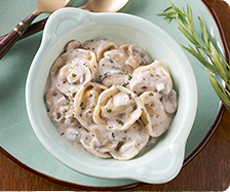 [6] Pelmeni in mushroom sauce (recipe below).

|
You may have had Polish pillow pasta—pierogi—but how about their Russian cousin, pelmeni (pell-MEN-ee).
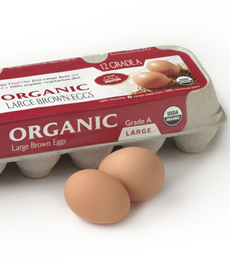
As with dumplings the world over—including ravioli—a simple dough rolled out and stuffed with beef, cheese, chicken, mutton, pork, seafood, or vegetables. Or, they can be a blend: A traditional recipe combines beef, mutton, and pork. In Europe, add some garlic, onions, and pepper to the mix.
1. THE HISTORY OF PELMENI
Historians agree that pelmeni originated among the indigenous Siberian people and later became part of Russian cuisine; they are also called Siberian dumplings in Russia. The word translates to “ear bread”: The bite-size dumplings can be seen as little ear pasta (although not nearly as ear-like as Italian orrechietti, which have the advantage because they aren’t stuffed).
Pelmeni were a particularly good way to preserve meat during the six months of Siberian winter, with temperatures as low as -47°F and snow on the ground through April. It became a tradition in Siberia households to make thousands of pelmeni as soon as temperatures fell below freezing, in November. Long before electric refrigeration, Siberians had natural refrigeration, i.e., in an unheated barn or shed. A bonus: Livestock could be harvested before the freeze, eliminating the cost to feed them over the long winter.
Pelmeni have evolved from labor-intensive food prepared by housewives to quality frozen versions to the Russian student substitute for instant ramen noodles!
Pelmeni Cousins
European stuffed boiled dumplings may be a simplified version of Chinese wontons. The list of cousins includes Chinese jiaozi, Georgian khenkali, Italian ravioli, Japanese gyoza, Jewish kreplach, Korean mandu, Middle Eastern shishbarak, Mongolian bansh, Nepalese and Tibetan momo, Polish uszka, Turkish and Kazakh manti, Ukrainian vareniki and Uzbek chuchvara, among others.
2. EASTERN EUROPEAN DUMPLINGS: THE DIFFERENCE
In the U.S., the term pierogi is often used to describe every type of Eastern European dumpling. Of course, there are differences: in shape, size, and thickness of dough (these are the differences between all dumplings, as well as cooking technique: boiled versus fried, boiled in water vs. broth or stock).
With pelmeni and vareniki, the dough is as thin as possible, and the proportion of filling to dough is high.
Pelmeni fillings are usually raw, while pierogi and vareiyki can be sweet.
Pelmeni are bite-size, like raviolini.
3. MAKE THEM OR BUY THEM FROM POPKOFF
Similar to making ravioli, you can short-cut the process by purchasing a pelmeni mold in plastic or aluminum—and make other types of stuffed pasta with it.
Or, look for a good brand. We recently tried Popkoff’s, and were very pleased. Use the store locator to find the nearest retailer.
POPKOFF’S PELMENI & VARENIKI
These delicious dumplings, full of Old World flavor, are easy to prepare. It takes just 5 minutes from boiling water to plate. The simplest preparation is a traditional one: butter and sour cream, with fresh dill.
The dumplings can be served as an appetizer, side, or main dish. Or, add a bit of smoked salmon and caviar for a luxurious hors d’oeuvre.
Why do Popkoff’s pelmeni taste so good?
Their “farm to frozen” pelmeni and vareniki are made from 100% all-natural ingredients from the best vendors: King Arthur Flour, Mary’s Free Range Chicken, Meyer Natural Angus Beef, Marcho Farms Veal, and Good Nature All-Natural Pork. All ingredients are domestic and the dumplings are made in California and are packaged in GoGreen sustainable packaging.
The meats are antibiotic-free and hormone-free, and the fruits and vegetables are locally grown and non-GMO. There are no artificial colors, flavors, or preservatives.
We tried four varieties of pelmeni, all so good that we can’t wait to try the vareniki. Traditionally, pelmeni are filled with meat, and vareniki, a Ukrainian variation, were filled with cheese or vegetables; vareniki are larger, like ravioli. Popkoff’s choices:
Pelmeni Varieties
Pelmeni With Beef
Pelmeni With Chicken
Pelmeni With Farmer’s Cheese
Pelmeni With Pork & Beef
Pelmeni With Veal & Pork
Vareniki Varieties
Vareniki With Beef
Vareniki With Cabbage & Carrots
Vareniki With Cheese & Cherry
Vareniki With Chicken
Vareniki With Potato & Onion
Vareniki With Sweet Farmer’s Cheese
|
4. PELMENI & VARINIKI TOPPINGS
Pick a topping, pick a sauce. Some of these are traditional, and some reflect modern tastes.
Toppings
Raisins or other dried fruit
Fresh chives, dill or parsley
Lemon zest
Onions: caramelized, frizzled or sautéed
Sliced almonds
Sauces
Horseradish sauce
Melted butter
Mushroom sauce
Mustard sauce
Plain yogurt
Sour cream
Soy sauce and chopped chives or green onions
Tomato sauce
Vinegar sauce
You can also add pelmeni to broths and green salads. They are traditionally boiled; vareniki can be boiled or pan-fried.
Also, check out our 50 ways to serve pierogi and adapt them to pelmeni.
5. RECIPE: PELMENI IN MUSHROOM SAUCE
You can make this recipe from Chef James Bailey from scratch (recommended), or take a shortcut with canned cream of mushroom soup.
It’s a variation of the famous Russian dish that originated in the mid-19th-century rage, Beef Stroganoff, which has a sauce made with sour cream (smetana in Russian).
Prep time is 15 minutes, and cook time is 20 minutes.
Ingredients For 6 Servings
10-ounce package Popkoff’s Beef Pelmeni (or another flavor)
2 cups button mushrooms, sliced
½ cup onions, finely diced
2 tablespoons parsley, chopped
3 garlic cloves, minced
2 tablespoons butter
Salt & pepper to taste
1 cup heavy whipping cream
½ cup sour cream
16 ounces low sodium beef broth
Garnish: fresh dill leaves, minced
Preparation
1. MELT the butter over medium heat; add onions and cook until softened. Add the garlic and mushrooms; stir and cook for 3-5 minutes until the mushrooms have softened.
2. ADD the beef broth and cook over medium heat until the liquid is slightly reduced. Add the heavy cream and season with salt and pepper. Cook for 2-3 minutes until the sauce is combined.
3. BRING a large pot of water to a boil and add a pinch of salt. Carefully add Popkoff’s Beef Pelmeni and cook for 5 minutes until cooked through. Drain and reserve.
4. MIX in sour cream and chopped parsley into mushroom stroganoff, portion dumplings onto plates, and top with sauce, optional toppings, and dill garnish.
6. DESSERT PELMENI & VARENIKI
Pelmeni stuffed with delicate farmer’s cheese is a charming dessert or a sweet lunch.
Vareniki are typically used for dessert because the cheese can be sweetened. Cheese pelmeni has no sweetener.
But with sweet toppings, you won’t even notice. We enjoy dessert pelmeni with a few of the following:
Cherry preserves
Brown sugar, cinnamon sugar, or powdered sugar
Dried fruit (blueberries, cherries, cranberries, raisins)
Fruit purée
Grated chocolate and hand-whipped cream
Honey or maple syrup
Mascarpone
Mixed fresh fruits
Plain or sweetened sour cream
Sliced almonds
Sweetened chestnut purée and hand-whipped cream
CHECK OUT WHAT’S HAPPENING ON OUR HOME PAGE, THENIBBLE.COM.
|