THE NIBBLE BLOG: Products, Recipes & Trends In Specialty Foods


Also visit our main website, TheNibble.com.

Overnight Breakfast & Brunch Casseroles: Cinnamon Buns & Blueberry Muffins

February 21st is National Sticky Bun Day. Sticky buns and cinnamon rolls were the biggest treat of our childhood breakfasts: Better than waffles or pancakes.

The Horn & Hardart Automat, Americas’s first fast food chain, had such popular items that customers clamored to take them home. They set up a retail arm to package and sell some of them in retail stores.

Our family devoured many boxes of the honey buns. Today, they’d be called pecan sticky buns.

Below:

> Cinnamon buns, honey buns, and sticky buns: the difference.

> Recipe: The easiest way to make cinnamon buns is an overnight cinnamon bun casserole.

> The difference between rolls and buns.

> Recipe: overnight blueberry muffin casserole.

> The history of sticky buns.

Elsewhere on The Nibble:

> The year’s 116 breakfast holidays.
 
 
CINNAMON BUNS VS. STICKY BUNS: THE DIFFERENCE

The terms are often used interchangeably, but there are two categories of sweet yeast buns: cinnamon buns and honey (now called sticky) buns. Other terms include cinnamon rolls, cinnamon swirls, honey buns, and sticky buns, among others (cinnamon pecan rolls, e.g.).

All are made with a cinnamon swirl inside; they may have raisins as well.

But a honey bun or sticky bun needs to have a sticky topping: caramel, honey, maple syrup, or sugar syrup. These typically have a garnish of nuts. Those topped with white icing fall into the cinnamon bun category.

See a comparison of the two in photo #7, below.

Only the sticky bun has its own holiday.

Now: What if you could bake a pan of sticky buns or cinnamon buns with ease, and bring them to the table warm and fragrant?

If this sounds like your kind of good time, McCormick has created the easiest recipe, an “overnight” casserole. But below we have recipes for:

  • Overnight Cinnamon Rolls Casserole
  • Overnight Lemon Blueberry Muffin Casserole
  •  
     
    THE EASIEST WAY TO MAKE “CINNAMON BUNS”

    Mix five ingredients together the night before—bread, milk, cinnamon, and vanilla—just 10 minutes of prep time.

    The next morning, just bake the casserole for 25 minutes until golden brown. It then gets a drizzle of cream cheese frosting: 30 minutes total.

    We served it yesterday, and a very good time was had by all—with some leftover for today.

    While the recipe is a casserole, you slice it into square, bun-size pieces. The difference:

  • Conventional buns are individually shaped and then baked together side-by-side in a pan, and then pulled apart.
  • The casserole has bread cubes like a bread pudding. It bakes as a whole and is then cut into pieces.
  •  
     
    RECIPE #1: OVERNIGHT CINNAMON ROLLS CASSEROLE

    Ingredients For 12 Servings

  • 12 eggs
  • 1-1/2 cups plus 3 tablespoons milk, divided
  • 2 tablespoons ground cinnamon, divided
  • 5 teaspoons pure vanilla extract, divided
  • 1/4 teaspoon baking powder
  • 1 loaf brioche or challah bread, cubed
  • 1/4 cup butter, melted
  • Cooking spray
  • 1/4 cup firmly packed brown sugar
  • 1/2 cup whipped cream cheese
  • 3 tablespoons confectioners sugar
  •  
    Preparation


    Cinnamon Roll Casserole
    [1] and [2] Overnight Cinnamon Roll Casserole. See the process step by step, from Gimme Some Oven (photos #1 and #2 © Gimme Some Oven).

    Cinnamon Roll Casserole
    [2] You can also serve the casserole as a dessert, with vanilla or cinnamon ice cream. You can even add a sprinkle of Grand Marnier.


    [3] Sticky buns have a honey or other sticky topping, with chopped nuts. You can get them from Wolferman’s (photo © Wolferman’s).

    Cinnamon Rolls
    [4] Conventional: A pan of cinnamon buns with their conventional glaze. Here’s the recipe from The Baker Chick (photo © The Baker Chick).

     
    1. WHISK the eggs, 1-1/2 cups of the milk, 1 tablespoon of the cinnamon, 3 teaspoons of the vanilla, and the baking powder in a large bowl until well blended. Add the bread cubes and toss to coat well.

    2. GENTLY POUR into a 13″ x 9″ baking dish, sprayed with no-stick cooking spray. Cover and refrigerate for at least 4 hours or overnight.

    3. PREHEAT the oven to 350°F. Remove casserole from the refrigerator. Mix the melted butter, brown sugar, and remaining 1 tablespoon of cinnamon in a small bowl until well blended. Drizzle the over casserole. Let stand 10 to 15 minutes.

    4. BAKE for 20 to 25 minutes or until golden brown. Meanwhile…

    5. MAKE the cream cheese topping. Mix the cream cheese, confectioners sugar, and remaining 2 teaspoons of vanilla in a small bowl until smooth. Slowly stir in the remaining 3 tablespoons of milk.

    6. REMOVE the casserole from the oven and let stand for 5 minutes. Drizzle over the casserole before serving.
     
     
    ROLL OR BUN: THE DIFFERENCE

    There are many Standards Of Identity defined by the USDA and the FDA, but buns and rolls are not among them.

    Thus, there is no official answer. According to the American Institute of Baking:

  • A roll is usually a hard-crusted small bread, such as French rolls and Kaiser-rolls. However, some hard-crusted individual breads are soft, like hot dog rolls.
  • A roll can also contain a filling, such as cinnamon rolls (which, in many areas, are sold as cinnamon buns) and Danish rolls.
  • A bun is generally more bread-like in shape (round or elongated) and soft. It typically does not contain a filling. An exception to this is hot-cross buns.
  •  
    So the answer is, there is no answer. Historic, regional, and family traditions often determine what is a bun and what is a roll.

    You may buy hot dog and hamburger rolls, for example; we buy buns.


    McCormick Blueberry Muffin Casserole
    [5] Lemon Blueberry Muffin Casserole (photo © McCormick).

    Blueberry Muffin Casserole
    [6] A conventional blueberry muffin (here’s the recipe from Unwritten Recipes).


    RECIPE #2: OVERNIGHT LEMON BLUEBERRY MUFFIN CASSEROLE

    If you prefer blueberry muffins to cinnamon buns, McCormick adapted the muffin concept as well.

    Prep time is 15 minutes the night before, and cook time is 30 minutes.

    Ingredients For 12 Servings

    For The Streusel Topping

  • 1/2 cup firmly packed light brown sugar
  • 1/2 cup flour
  • 2 teaspoons ground cinnamon
  • 1/4 cup (1/2 stick) cold butter, cut into chunks
  •  
    For The Casserole

  • 6 eggs
  • 1 cup plus 2 tablespoons milk, divided
  • 1/4 cup plus 2 tablespoons granulated sugar, divided
  • 1 teaspoon ground cinnamon
  • 1 loaf French or Italian bread, cut into 1-inch cubes (about 8 cups)
  • Cooking spray
  • 1 package (8 ounces) cream cheese, softened
  • 1 tablespoon pure lemon extract*
  • 2 cups blueberries, divided
  •  
    Preparation

    1. MAKE the streusel: Mix the brown sugar, flour, and cinnamon in a medium bowl. Cover and set aside until ready to assemble in the morning.

    2. MAKE the casserole: Whisk together the eggs, 1 cup of the milk, 1/4 cup of the granulated sugar and the cinnamon in a large bowl until well blended. Add bread cubes and toss gently to coat.

     
    3. POUR evenly into 13″ x 9″ baking dish sprayed with no-stick cooking spray.

    4. MIX the cream cheese, the remaining 2 tablespoons each of milk and sugar, and the lemon extract in a medium bowl, until well blended. Gently stir in 1 cup of the blueberries. Spread evenly on top of bread cubes. Top with the remaining 1 cup of blueberries. Cover and refrigerate overnight.

    5. PREHEAT the oven to 350°F. Remove the casserole from the refrigerator and let stand for 10 to 15 minutes. Meanwhile…

    6. CUT the butter into the streusel mixture with a pastry blender or 2 knives, until the mixture resembles coarse crumbs. Sprinkle over the casserole. Bake for 30 minutes or until golden brown. Let stand 5 minutes before serving.
     
     
    THE HISTORY OF STICKY BUNS

    Sticky buns have a Germanic origin, where they originated as yeast pastries called schnecken†. The breakfast pastry was brought to Philadelphia in the 18th century by German immigrants, who became known as Pennsylvania Dutch (a mishearing by English speakers of “Deutsch,” German).

    Schnecken were made from a rich yeast dough enriched with egg, sour cream, and butter. A pastry the size of a modern sticky bun or cinnamon roll (a normal one, not Cinnabon), they were filled with sugar, cinnamon, raisins, and ground pecans or walnuts or pecans.

    Many Germans arrived in the U.S., bringing their schnecken with them. Schnecken became popular among bakers in Germantown, a Philadelphia suburb, as early as the 1680s. They (and their subsequent name, sticky buns) are considered a Philadelphia specialty.

    There’s no record of exactly when English-speaking Philadelphians started calling them “sticky buns.” In some cities they were called honey buns, referencing the honey that created the stickiness.

    The sticky top is the result of an upside-down baking technique. Before the dough is placed in the baking pan, the pan is lined with the sticky ingredients—brown sugar, honey or both—as well as nuts and raisins. After the buns are baked, the pan is inverted so that the caramelized “bottom” becomes the top of the pastry. This is the original German schnecken technique.
     
    Sticky Bun-Cinnamon Bun Comparison
    [7] Sticky bun, front left, with pecans; and cinnamon bun, front right, with white icing (photo © Wolfermans).
     
    ________________

    *You can substitute twice as much lemon zest (2 tablespoons) for the lemon extract. You can also make your own lemon extract by soaking lemon zest in vodka for two weeks, and then straining out the zest.

    German schnecken are different from German-Jewish schnecken. The latter are rugelach (a cookie) rolled in a snail shape. Both yeast-pastry schnecken and Jewish cookie schnecken existed simultaneously in Germany. Immigrants to the U.S. from Eastern Europe (Poland, Russia and the Ukraine) called their version of schnecken—the same cookie dough, rolled in a different shape—rugelach.

    Jewish schnecken/rugelach are made with a cream cheese cookie dough, not a yeasted dough (although cream cheese, invented in the U.S., was not known in Europe). These rolled cookies can be filled with any types of jam or with chocolate; simply with cinnamon and raisins.


    CHECK OUT WHAT’S HAPPENING ON OUR HOME PAGE, THENIBBLE.COM.


    Comments off

    TIP OF THE DAY: Make Easter Eggs Filled With Cake!

    Steph of The Cupcake Project created a recipe called How to Make Cupcakes in Egg Shells.

    But, if you decorate the eggs before serving, you have Easter Egg Surprise: an egg with cake inside.

    It’s fun and memorable: Most people won’t have seen anything like it.

    Here’s the recipe.

    We took it one step further, using white eggs and decorating them.

    This protects everyone from any bacteria on the egg, and protects the eggshells from any oils on hands that may prevent the dye from adhering.
     
     
    HOW TO DECORATE CAKE EGGS AFTER THEY’RE COOKED

    We used a wide paintbrush and took the advice of Incredible Egg to use water warmer than the eggs.

    They also caution that hands should be washed in hot, soapy water before and after handling eggs—even if they’ve already been cooked or decorated.

    Because a hole has been punched into the top of the shells to insert the cake batter (photo #1), you can’t fully dip cooked cake eggs in dye (well…maybe if you use dark chocolate cake, a bit of color won’t show).

    Instead, you can try one of these three techniques.

  • Option 1: Try this if you have an exceedingly nimble grip, and can hold the eggs at the top while dipping them into the dye. We filled a juice glass with dye (diluted in water) that would not reach the top of the egg when the egg was added to the glass. The narrow glass held the egg upright. We could lift the egg out using doctors’ gloves and a spatula, but it wasn’t easy.
  • Option 2: We next moved to the hand-painted approach. Using wide hobby paintbrushes, we placed food coloring in ramekins, placed the egg upright on a nonslip mat and held it with one hand, as we painted swaths of color with the other.
  • Option 3: We didn’t try this one for lack of time, but we think it will work and could be the easiest. Dye the eggshells before adding the cake batter, and bake the cake in the colored shells. The cake eggs bake at 350°F for 23 minutes, so they should retain their colors.
  •  
    You can practice the first two techniques with the raw eggs in your fridge (and return them for subsequent cooking).

    Or, you can color whole eggs and then bake them in the oven to get hard boiled eggs.

    The hard boiled eggs look and taste the same.
     

    THE HISTORY OF EASTER EGGS

    The tradition of painting hard-boiled eggs during springtime pre-dates Christianity. Fertility and rebirth are fundamental to life—not just for people but for the crops and animals that sustain them.

    The most ancient known decorated eggs are 60,000 years old: engraved ostrich eggs found in Africa. Decorated eggs have also been found from prehistoric Egypt and the early cultures of Mesopotamia and Crete [source].

      Cake Easter Eggs
    [1 & 2] It’s an egg. No, it’s a little cake (photos © Cupcake Project). Use white eggs if you plan to color them.

    Cake Easter Eggs

    Dyed Easter Eggs
    [3] Here’s how to get these beautiful colors, from Urban Comfort (photo © Urban Comfort).

     
    Easter was a pagan holiday adopted by Christians; it has no relation to Christ.

    The Christian custom of Easter eggs began among the early Christians of Mesopotamia, who stained eggs with red dye in memory of the blood of Christ (more).

    The Easter holiday itself is named for the Germanic goddess Eostre (Eostra, Eostur, Ostara, Ostare, Ostern and other names), a fertility goddess. Her name derives from the ancient word for spring, eastre,

    She was very popular with Anglo-Saxon pagans in Brittania as well, many of whom were descended from Germanic tribes who migrated to the island.

    Eostre’s sacred animal is the rabbit, a symbol of fertility; and the egg is her symbol of fertile purity, both of which involve the spring and new birth.

    In Old German, the month of April was called Ostar-manod: Easter month, or month of the Goddess Eostre. In Old English, it became Easter-monab (pronounced eh-AH-ster moh-NATH).

    The English word April derives from the Latin aperire, to open (e.g. buds).


    Comments off

    FOOD FUN: Passover Matzoh

    Chopped Chicken Liver & Matzoh

    Chopped Chicken Liver & Matzoh

    Chopped Chicken Liver & Matzoh
    [1] Chopped chicken liver on matzoh: a classic. Here’s the recipe from Williams-Sonoma. [2] A deconstructed version from Chef Alex Guarnashelli at Butter restaurant. [3] Mr. Alpenglow created his recipe, inspired by Guarnashelli’s. Here’s the recipe.


    When is a piece of matzoh with chopped chicken liver (photo #1) greater than the sum of its parts?

    When creative chefs turn it into something spectacular.

    Here, the first idea (photo #2) inspired the second (photo #3).

    Chef Alex Guarnaschelli of Butter in New York City tops a board of matzoh with:

  • Chicken liver mousse
  • Crispy shallots
  • Concord grape jelly
  • Schmaltz vinaigrette
  • Parsley leaves
  •  
    As an alternative to the grape jelly and the crispy shallots, we made these honey-balsamic roasted red onions from Chef Tyler Florence:

    RECIPE: HONEY BALSAMIC ONIONS

    Ingredients

  • 6 tablespoons butter
  • 3 tablespoons balsamic vinegar
  • 1/2 cup honey
  • 1/2 bunch fresh thyme
  • Salt and freshly ground black pepper
  • 4 red onions, halved
  •  
    Preparation

    1. PREHEAT the oven to 350°F.

    2. COMBINE the butter, vinegar, honey, thyme, salt, and pepper in a small saucepan over medium heat. Bring to a boil, turn down to simmer and cook for 1 minute to reduce slightly.

    3. PLACE the onions, cut sides up, in a single layer on a baking pan. Drizzle with the honey butter mixture over and roast until soft and slightly caramelized, about 45 minutes.
     
    THE SECOND RECIPE

    Try this recipe (photo #3) from Mr. Alpenglow.
     
    CREATE YOUR OWN

    Schmaltz and gribenes, anyone? Or how about foie gras?

    Here are reciped for the first two, and the history of chopped chicken liver.


    Comments off

    An Old Fashioned Sponge (Honeycomb) Candy Recipe, For Passover & Anytime

    How about an old-fashioned sponge candy recipe? It has that “honeycomb crunch” and can be made for Passover. A recipe is below, thanks to our colleague Hannah Kaminsky of Bittersweet Blog.

    She wondered about the old-fashioned confection variously known as:

  • Angel food candy (Wisconsin)
  • Cinder toffee (Canada and U.K.)
  • Dalgona (South Korea)
  • Fairy food candy (Chicago, Wisconsin)
  • Hokey pokey (New Zealand)
  • Honeycomb candy (Australia, South Africa, U.K.)
  • Honeycomb toffee (Australia)
  • Karumeyaki (Japan)
  • Old fashioned puff (Massachusetts)
  • Puff candy (Scotland)
  • Sea foam (California, Maine, Michigan, Oregon, Utah, Pacific Northwest)
  • Sponge candy (Buffalo and Western New York (photos #1 and #2); Milwaukee, Wisconsin; St. Paul, Minnesota; and Northwest Pennsylvania)
  • Sponge toffee (U.K.) and tire éponge (sponge candy in French-speaking Canada)
  • Törökméz, Turkish honey (Hungary)
  •  
    ….and, no doubt, other names in other places [source].

    They all describe a confection that’s crunchy, crisp in the center, and melts in your mouth.

    While there’s no molasses in it, the caramelization of the sugar gives it a bit of molasses flavor. You can have it covered in chocolate, or not (Hannah’s recipe goes for the chocolate).

    Hannah wondered: “Where did all those names come from, and why did they keep renaming the exact same candy?” She set out on a mission to make her own.

    “I cooked and caramelized, stirred and stewed, bubbled, boiled, and crystallized my very own sweet. If anything, what I created was even darker and more powerful than the old-fashioned candies you can purchase.

    “I used cocoa and dark chocolate, of course, and cacao nibs for extra crunch. But the real secret ingredient here is the chocolate extract.”

    The spongy airiness of the candy is based on the middle school volcano trick demonstrated in science class: Baking soda plus vinegar equals bubbles.

    You’ll have a mini-volcano in your mixing bowl in Step 5, below. It’s fun, as long as you’re forewarned.

    As with Chocolate Matzoh, a.k.a. Matza Toffee, a.k.a. Matzo Buttercrunch, a.k.a. whatever, sponge candy is a treat you can make for Passover.

    But don’t make it in the summer heat and humidity and plan to serve it at a picnic or barbecue. If you need a fix, make it and eat it in the comfort of your air-conditioned home.

    Ready to make some four-chocolate sponge candy (photos #3 and #4)?

    > September 21st is National Sponge Candy Day.

    > The history of sponge candy.

    > The year’s 60+ candy holidays.

    > The year’s 69 chocolate holidays.

       
    Sponge Candy
    [1] Sponge candy from Watson’s Chocolates in Buffalo, New York, a town famous for its sponge candy.

    Sponge Candy
    [2] If you don’t know what’s inside, you’ll be delighted by the honey crunch.

    Sponge Candy
    [3] You can find sponge candy worldwide, often under different names. This angel food candy is from Kitch Me in Australia.


    Sponge Candy
    [4] Homemade sponge candy from Hannah Kaminsky of Bittersweet Blog (photos #4 and #5 © Bittersweet Blog).

    Sponge Candy
    [5] Bet you can’t eat just one piece!

    Honeycomb Candy Recipe

    [6] Hold the chocolate! This recipe for “honeycomb candy” is from The Pioneer Woman.

      RECIPE: HANNAH KAMINSKY’S QUADRUPLE CHOCOLATE SPONGE CANDY/HONEYCOMB CANDY

    If you don’t want chocolate, you can make sponge candy without it. Here’s a recipe.

    Ingredients

  • 1 cup granulated sugar
  • 1 tablespoon agave nectar
  • 5 tablespoons water, divided
  • 1 teaspoon white vinegar
  • 2 tablespoons cocoa powder
  • 1 teaspoon chocolate extract
  • 2-1/2 teaspoons baking soda
  • 2 ounces quality dark chocolate, finely chopped
  • 1 tablespoon cacao nibs
  •  
    Plus

  • Cooking thermometer
  •  
    Preparation

    1. LINE an 8 x 8-inch baking dish with parchment paper and lightly grease. The parchment doesn’t need to fit perfectly inside the pan, as long as it covers the bottom and sides without any holes for the liquid candy to escape through.

    2. COMBINE the sugar, agave, 4 tablespoons of water, and vinegar in a medium saucepan. Stir just to moisten all of the sugar, and place over medium heat. Swirl the pan gently to mix the ingredients as the sugar slowly melts, but avoid stirring from this point forward to prevent premature crystallization. Meanwhile…

    3. MIX together the remaining tablespoon of water, cocoa powder and chocolate extract in a small dish; set this cocoa paste aside.

    4. COOK the sugar until the mixture is caramelized and reaches 300° to 310°F, also known in candy-making as the hard crack stage. Remove the pan from the heat. Things will move very quickly from here, so be on your toes.

    5. VIGOROUSLY STIR in the cocoa paste along with the baking soda, allowing the mixture to froth and foam violently. Immediately transfer the liquid candy mixture to your prepared baking dish but do not spread or smooth it down. Allow it to settle naturally to maintain the structure of the fine bubbles trapped within.

    6. COOL for at least 1 hour until fully set. To finish, melt the dark chocolate in a microwave-safe dish, heating at intervals of 30 seconds and stirring thoroughly between each one, until completely smooth. Pour over the top of the candy base and spread it evenly across the surface. Sprinkle with the cacao nibs and let rest until solidified.

     
    7. BREAK the candy into pieces and enjoy—but enjoy it quickly. Enjoy it within three days at room temperature, storing in an airtight container.

    If you’re bringing it as a gift: It’s fragile, so transport it carefully.

    And may we suggest: crushed or sliced sponge candy makes an exquisite topping for vanilla ice cream, or layers in a parfait.
     
     
    THE HISTORY OF SPONGE CANDY

    Sponge candy is known by so many different names that it’s difficult to discern where it originated. The closest we can find in English is that sponge candy was produced as early as 1913 in Beamish, a village in northwestern England’s Durham County. It was made in copper pans over an open fire.

    We do know that in the U.K., the Cadbury Sponge Candy Company first mass-produced sponge toffee in 1929, and created the Crunchie chocolate bar with a sponge candy center.

    In the U.S., the product called sponge candy took root in Buffalo, New York, which is still the sponge candy capital of the country.
    It is an airy variation of toffee with a light, sponge-like texture.

    Different versions of sponge candy have come and gone, as you can read in this article from an octogenarian who remembers it from 1940s New England.

    But look internationally, and you can find that the Turkish version, törökméz, dates back to ancient Turkish cuisine and was adopted in Hungary during the Ottoman Era* [source].

    Did a candy maker from Hungary settle in Buffalo? Does sponge candy date to Anatolia (most of modern Turkey).

    Neighboring Persia (the modern Islamic Republic of Iran) was cultivating sugar by the sixth century C.E. The ancient Sumerians in Babylonia were making vinegar from way, way back to 5000 B.C.E.

    So, what we think of as 20th-century sponge candy may have been the continuation of an ancient recipe.

    ________________

    *Ottoman Hungary was the territory of Medieval Hungary that was ruled by the Ottoman Empire from 1541 to 1699. More.


    CHECK OUT WHAT’S HAPPENING ON OUR HOME PAGE, THENIBBLE.COM.


    Comments off

    For National Burrito Day: Burrito History & Gourmet Burrito Ideas

    The first Thursday of April National Burrito Day. You don’t have to twist most arms to enjoy one.

    THE NIBBLE is having a lunch of gourmet burritos. Below:

    > Gourmet burrito ingredients.

    > Burrito history.

    > The modern burrito.
     
    Elsewhere on The Nibble:

    > The year’s 25+ Mexican and Tex-Mex food holidays.
     
     
    BURRITO HISTORY

    A step back in history: In 1519 the Spanish conquistadors arrived in what today is Mexico, bringing with them wheat flour and pigs. This enabled flour tortillas and carnitas. Flour tortillas are more flexible than corn tortillas, and therefore, easily rollable.

    A modern question is: Why are carnitas in a flour tortilla called a burrito—“little donkey” in Spanish?

    No one knows for sure, but the leading guess is that it was named for its shape, which resembles the bedrolls carried on the back of donkeys.

    While the modern burrito is no more than 100 years old, Mesoamericans often rolled their food in tortillas for convenience (no dishes or utensils needed). Avocados, chili peppers, mushrooms, squash, and tomatoes were sliced and rolled.

    The Pueblo peoples of the Southwestern U.S. were even closer to the mark. They made tortillas with beans and meat sauce fillings, prepared much like the modern burrito [source].

    But the word “burrito” doesn’t appear in print until 1895, in the Spanish-language Dictionary of Mexicanisms. It was a name used in the region of Guanajuato, in north-central Mexico. It is described as “a rolled tortilla, with meat or other food within, called coçito in Yucatan and taco in the city of Cuernavaca and in Mexico City.”

    That there was a rolled food called burrito in 1895 dispenses with the folk tale of a man named Juan Méndez, who sold tacos from a street stand during the Mexican Revolution (1910–1921) in Ciudad Juárez. As he used a donkey for transport, customers began to call his tacos “food of the burrito,” the little donkey and the name eventually stuck.

    Food historians opine that the modern burrito may actually have been invented in the U.S., as a convenient lunch for Mexican agricultural workers.
     
     
    THE MODERN BURRITO: BORN IN THE U.S.A.

    The precise origin is not known, but it is generally believed to have originated in a Mexican-American community in the U.S., among farm workers in California’s Central Valley (Fresno, Stockton).

    According to Wikipedia, the farm workers who spent all day picking produce in fields would bring lunches of homemade flour tortillas, beans, and salsa picante (hot sauce)—inexpensive and convenient.

    Burritos first appeared on American restaurant menus in the 1930s, beginning with El Cholo Spanish Cafe in Los Angeles. El cholo is the word used by Mexican settlers in California for field hands.

    Burritos were mentioned in the U.S. media for the first time in 1934, appearing in the Mexican Cookbook, a collection of regional recipes from New Mexico by historian Erna Fergusson.

    The book includes “celebrated favorites such as enchiladas, chile rellenos, and carne adovada, as well as the simple, rustic foods traditionally prepared and served in New Mexican homes.”

    It was “inspired by the delight and enthusiasm with which visitors to the Southwest partook of the region’s cuisine.” You can still buy a copy.

    In 1999, food writer John Mariani wrote that “What makes burritos different from most other Mexican-American foods is the metamorphosis of this dish.

    “We tracked down the earliest print references for ‘burritos’ cited by food history in American/English reference books. They are nothing like the burritos we are served today…

    “When and where did the change happen? In the early 1960s, in Southern California. The who and why remain a mystery.

    Our survey of historic newspapers suggests food trucks played a role. Burritos are efficient, economical, easy, and delicious.” [Source: Encyclopedia of American Food and Drink, John F. Mariani [Lebhar-Friedman:New York] 1999 (p. 48)]
     
     
    TODAY’S BURRITOS

    In Mexico, meat and beans or refried beans can be the only burrito fillings. In the U.S., things get more elaborate.

    American burrito fillings may include not only the refried (or other) beans and meat but rice, lettuce, salsa (pico de gallo, salsa picante), guacamole, shredded cheese (cheddar or jack), sour cream and vegetables.

    Burrito sizes vary—they’re super-sized in the U.S., up to 12 inches. You can also find them in 9- and 10-inch diameters.

    In 1964, Duane R. Roberts of Orange County, California sold the first frozen burrito. He made so much money that he was eventually able to buy Riverside’s iconic Mission Inn and refurbish it.

    Tia Sophia’s, a Mexican café in Santa Fe, New Mexico, claims to have invented the original breakfast burrito in 1975, filling a rolled tortilla with bacon and potatoes. It was served “wet,” topped with chili and cheese.

    Many Americans had their first breakfast burrito when McDonald’s introduced the Sausage Burrito in 1991: a flour tortilla, sausage, American cheese, scrambled eggs, onions, and peppers.

    Taco Bell didn’t introduce a breakfast burrito until 2014.

    This brings us to the choice of the grab-and-go burrito, eaten by hand, and wet burritos, on a plate covered with sauce and other garnishes, eaten with a knife and fork.

    And then there’s the burrito bowl, pioneered by Chipotle: the fillings of a burrito eaten with a fork, no tortilla.

    Chipotle now sells more bowls than conventional burritos. The bowls save 300 calories [source].

    The U.S. even developed the breakfast burrito, and astronauts eat them in outer space!
     
     
    GOURMET BURRITO INGREDIENTS

    We’re not the type to put gold leaf, foie gras, and sturgeon caviar on food just to create the world’s most expensive [fill in the blank]. But we do enjoy the luxury of playing with top-drawer ingredients.

    Rice and beans are fillers. You can make a burrito without them or can serve them on the side.

    Or, you can take them up a notch with fancier rice and beans.

    Here are typical burrito ingredients and their upscale variations. If you don’t like our ingredients, tell us what you’d use instead.

  • Beans (kidney, pinto, refried) > heirloom beans: cranberry, scarlet runner, yellow Indian woman…or lentils.
  • Carnitas (braised pork) > pork belly.
  • Cheese (cheddar or jack) > gruyère.
  • Diced tomatoes > heirloom tomatoes, marinated yellow cherry tomatoes, fresh tomato sauce (diced tomatoes with seasonings), tomato jam.
  • Chicken (thigh meat): ditto, with the skin removed, crisped, and tossed into the burrito (cracklings).
  • Cilantro > cilantro plus basil and parsley.
  • Diced onions > Caramelized onions, onion preserves.
  • Fried fish > roasted or grilled salmon.
  • Garlic > roast garlic cloves, whole or mashed.
  • Iceberg or romaine lettuce > butter lettuce, curly leaf lettuce, mesclun mix with baby arugula, red endive or radicchio, red leaf lettuce, watercress.
  • Lime wedge > lime zest sprinkled on top before rolling.
  • Rice > jasmine rice, multigrain rice, saffron rice, wild rice, and other grain (barley, quinoa, e.g.).
  • Exotic rice > Bhutanese red rice, black rice (forbidden rice), Kalijira rice from Bangladesh (considered the finest tiny aromatic rice in the world) (types of rice)
  • Shrimp the same (it’s hard to improve on grilled shrimp).
  • Steak (skirt or hanger) > filet mignon, roast lamb.
  •  
    For lunch today, we’re having:

  • Filet mignon and wild rice burrito with shredded gruyère and [leftover] beluga lentils.
  • Grilled shrimp burrito with romaine and arugula, green rice (parsley), gruyère, and dilled sour cream.
  • Grilled salmon burrito, with dilled rice, sour cream, salmon caviar, and [leftover] yellow lentils.
  •  
    Have whatever burrito you like, but definitely have a burrito. Where would we be without them?


    Steak Cilantro Burrito
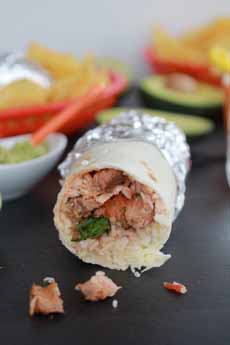
    [1] Steak and cilantro burrito. Here’s the recipe from Half Baked Harvest (photo © Half Baked Harvest).

    Shrimp Burrito
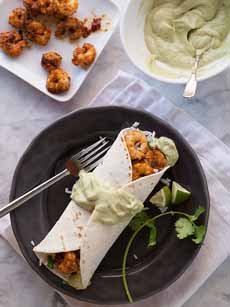
    [2] Gourmet burrito: grilled shrimp and avocado cream. Here’s the recipe from Foodie Crush (photo © Foodie Crush).

    Wet Burritos
    [3] Breakfast burrito: Now an American staple, it first appeared in 1975. Here’s a recipe from She Wears Many Hats (photo © She Wears Many Hats).


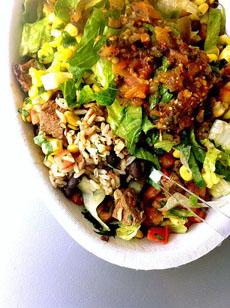
    [4] Chipotle restaurants brought burritos and burrito bowls across America, like this steak burrito bowl (photo © Chipotle).

    Green Chili Chicken Burrito
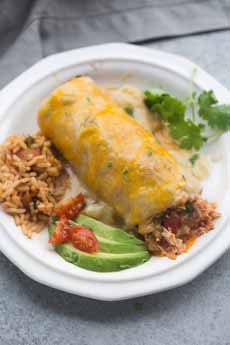
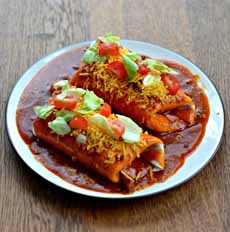
    [5] Wet burritos: definitely not grab-and-go. Here’s the recipe from Hezzi D’s Books & Cooks (photo © Hezzi D’s Books & Cooks).

    Wet Burritos
    [6] Not wet, but smothered in a poblano-cheeese sauce. Here’s the recipe from Tastes Better From Scratch (photo © Tastes Better From Scratch).

    Burrito Bowl
    [7] A burrito bowl provides the fillings without the tortilla (photo © Simply Recipes).

    Kale & Bean Burrito
    [8] Trendy and vegan: a kale burrito with black beans and avocado. Here’s the recipe from Cookie and Kate (photo © Cookie and Kate).


    CHECK OUT WHAT’S HAPPENING ON OUR HOME PAGE, THENIBBLE.COM.


    Comments off

    The Nibble Webzine Of Food Adventures


    © Copyright 2005-2026 Lifestyle Direct, Inc. All rights reserved. All images are copyrighted to their respective owners.