|
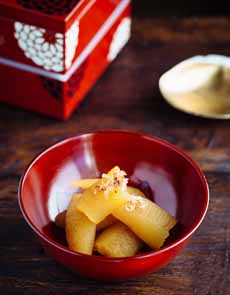
[1] This golden herring caviar (kazunoko) is not particularly flavorful, but is served with seasonings for the Japanese new year (photo © Just One Cookbook).
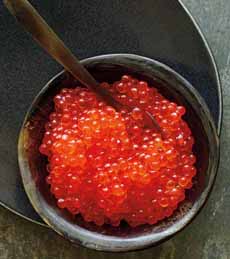
[2] Salmon caviar is much less pricey than sturgeon caviar, but if you want to eat a lot of it, prepare to open your wallet (photo © Petrossian).

[3] Avruga, herring “caviar,” is not caviar at all, but made from different ingredients (including herring meat and squid ink) to resemble black caviar (photo © Pescaviar).
|
|
July 18th is National Caviar Day. When we looked into our purse, we decided we could not afford the “good stuff”: sturgeon caviar (prices* range from $123 to $349 for the rareat; prices per 30g/1.06 ounce).
We couldn’t even afford sturgeon’s relatives, hackleback (a.k.a. shovelnose, $76/ounce) and paddlefish caviar ($32/ounce).
That’s why we created a list of affordable caviar, below.
But first…
WHAT IS CAVIAR
When the term is used by itself, “caviar” refers to unfertilized eggs (roe) harvested from any species of sturgeon.
Fifty years ago and in the centuries prior, that meant Beluga, Osetra, and Sevruga caviar from sturgeon that swam in the Caspian and Black Seas, in Russia and Iran. Caspian caviar was considered the world’s most luxurious and expensive caviar. There was enough stock so that anyone who could afford it could have it—and if you had to ask, you couldn’t afford it. Sturgeon also lived in some rivers in Germany and Eastern Europe…and in the U.S., too.
Beginning in the 1990s, the stocks were reduced by shameful poaching, pollution and river dams that cut off the beluga’s spawning grounds. The beluga sturgeon became an endangered species, and the other two were on the critical list.
Laws were passed in 2001 by The United Nations Convention on International Trade in Endangered Species to halt the caviar trade in Azerbaijan, Kazakhstan, Russia and Turkmenistan. It then proposed a ban on exporting Caspian caviar by the Russian states that border the Caspian Sea (i.e., it could be sold to locals, but not exported to Europe, the U.S., or anywhere else (more).
This spawned an international frenzy on how to replace that fine sturgeon caviar. Farming of other species of sturgeon began all over the world, resulting in access to whomever could afford it (farmed caviar is less expensive than wild, but still $70 an ounce, compared to $200 an ounce for wild sevruga).
The good news is, there is a lot of local, sustainable caviar produced right here in the United States. According to the Monterey Bay Aquarium Seafood Guide, your best choice for caviar is produced by U.S. farmed white sturgeon and paddlefish.
THE HISTORY OF CAVIAR
Caviar was first prepared by the ancient Chinese, from carp roe. The Persians learned the technique from the Chinese, and were the first to use the technique on sturgeon from the Caspian Sea.
The word “caviar” comes from the Persian khavyar, from khayah, egg. It came into the English language in the 16th century.
While “Russian caviar” has a global reputation as “the best” (some might vote for the lesser-known Iranian caviar), the Russians themselves do not call any fish roe caviar. They use the Russian word for egg, ikroj (pronounced EEK-ruh with a rolled “r”).
In Japan, the Russian ikroj was transformed into ikura—the name by which it is ordered at sushi bars the world over.
In the trade, the eggs of a fish are also called berries, grains and pearls. Once the roe has been salted it becomes caviar.
However, the rising popularity of other types of fish roe in modern cuisine and the growth of the American hackleback and white sturgeon farming, have caused the definition of “caviar” to broaden.
Today, the terms caviar and roe are interchangeable for consumers. Basically any fish egg is referred to as caviar; although in the U.S. only sturgeon caviar can be labeled simply “caviar.” Non-sturgeon caviars must be modified with the name of the fish (salmon caviar, whitefish caviar, etc.).
|
A number of these more recently popular roes come from fish that are plentiful, like flying fish, trout and whitefish. This means affordable caviar.
Their roe was not mainstream for decades. In many cases they were tiny, colorless, and/or marginally flavorful.
But faced with the demands of the American palate, which has grown steadily since the rise of California cuisine in the 1980s, producers have rose to the occasion, to present caviar options that were both affordable and sustainable.
Today there’s a broad choice of attractive and delicious roes. They taste like sturgeon roe as much as a meatball tastes like filet mignon. But most are very palate-worthy, and will expand your horizons.
How much caviar should you buy? Well, you can get between 8 to 10 (1/2 teaspoon) servings per ounce of caviar. Figure at least 1/2 to 1 ounce of caviar per person.
While this is a small amount, it’s enough for a tasting of different caviars. Buy what your pocketbook can afford. When we treat ourselves, we can eat a 7-ounce jar of salmon caviar or truffled whitefish roe as a garnish with dinner (yes, the whole jar).
________________
*Prices vary widely, depending on supply and demand, as well as the graded quality. For example, Tsar Nicoulai offers six different grades of American white sturgeon caviar alone, with prices ranging from $40 to $210, and everything in between. The highest-regarded retailers also charge more than other stores and e-tailers. You can find less expensive caviar online, but unless it is from a truly reputable vendor, you may be getting caviar that is old (there is no expiration date on caviar tins) or not what it is purported to be.
Prices are stated in ounces, although European-based vendors like Petrossian use the European weight, grams. Since 30 grams equals 1.06 ounces, think of it as a wash.
†Prices are provided for relative comparison. They were obtained from different websites, because we could not find one vendor who offered all or most of the options. Note that the price will also vary based on the amount purchased: A single ounce costs more than an eight-ounce jar or tin. Prices shown were in effect in July 2017.
________________
|
AFFORDABLE CAVIAR
If you can’t afford $70 an ounce and up for sturgeon caviar, what are your choices? They’re on this list. We’ve provided Japanese names to reference the types most often found in sushi bars.
Avruga, Spanish herring roe. It looks like large, glossy black caviar pearls, but it isn’t caviar at all! Avruga is a roe-free caviar substitute made by a Spanish company, Pescaviar, from herring in Spanish waters. It comprises 40% local Spanish herring plus squid ink, salt, corn starch, lemon juice, citric acid and stabilizers (about $7/ounce; (more).
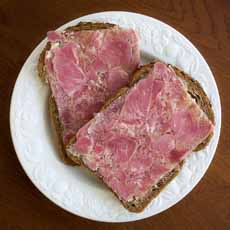
Bottarga is cured, dried fish roe: no longer in the form of caviar, but pressed into a block that can be sliced or grated (and is sold as the whole roe (about $6/ounce) or a grated in a jar (about $9/ounce). It is typically made from the roe of the grey mullet, and is very popular in Italy, for grating over pasta, rice, salads and other dishes (more). Also see mullet.
Bowfin caviar comes from a fish in the southern U.S. that is not related to the sturgeon. Its eggs visually resemble sturgeon roe, but taste entirely different (muddy, some call it, and it lives on mud river bottoms). That’s why it’s also called mudfish, swampfish, cypress trout, and by the Cajun name “choupique.” It was considered a trash fish, the flesh used to make fish cakes, until the ban of imported Caspian caviar led to a search for alternatives ($4.75/ounce; more).
Capelin roe or smelt roe, called masago at sushi bars (more).
Herruga caviar (another brand name is stromluga) is a version of avruga, a product made from herring meat to look like caviar. The herring comes from the North Atlantic and Baltic seas. The color of the beads ranges from dark gray to black, and they have a light smokey character ($5/ounce†).
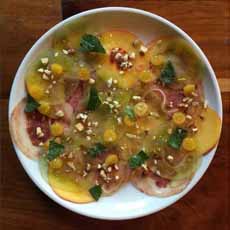
Kazunoko comes from the golden herring, and is available during the holiday season, eaten for the Japanese new year by those hoping for children (gold color symbolizes fertility). Its bright roe sac (the ovary) contains thousands of tiny eggs, which crunch like tobiko. While the roe is not particularly flavorful, it is marinated in a dashi-soy seasoning. its golden beauty makes it a popular New Year’s dish in Japan. The name is made up: kazu means number and ko means child. Here’s more (about $2/ounce).
Lumpfish roe from the North Atlantic lumpfish. If your family used Romanoff caviar as as garnish back in the day, you’ve had it. The pale, crunchy eggs are dyed black, red or golden, but the food coloring runs. It is used mostly as a garnish on hors d’oeuvre (about $4/ounce; more).
Mentaiko and tarako are roe of the Alaskan cod or pollock. Mentaiko is spiced with powdered red pepper, which makes it pink to dark red in color. Tarako is not spiced, but is salted instead.
Mullet roe (karasumi in Japanese) is the Japanese equivalent of Italian bottarga. The the roe sac of the mullet is cured and vacuum packed. The whole roe sac is sold, to be sliced for hors d’oeuvre served with saké, sliced on top of rice, or grated as a garnish. It’s considered a delicacy, .
Pollock roe, called tarako in Japanese. Not widely available in the U.S., we couldn’t even find it on Amazon!
Salmon caviar, called ikura at sushi bars, is popular in the U.S. as a colorful, tasty garnish. As with any product, prices and quality vary (and start at about $7 to $10/ounce). The imported roe from the keta salmon of Russia has larger eggs, which are considered more desirable.
|
|

[4] No sturgeon need apply for this caviar sampler from Firebird in New York City (photo © Firebird Restaurant [closed 2017]).

[5] Clear roe from different species of fish are colored and flavored into tasty garnishes (photo © Nutra Ingredients).

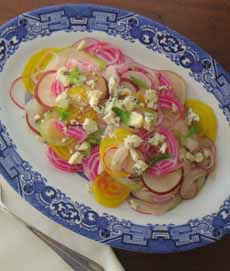
[6] The results: colored and flavored roe like these whitefish caviars (photo © Tsar Nicoulai).
|
|
Smelt roe, called masago in Japanese, looks like the pricer, higher-quality flying fish roe (tobiko); but is crunchy rather than flavorful like tobiko. California rolls are often coated with a splash of masago; while the gunkan maki are filled with tobiko. You can use a few beads of garnish to add color to canapés (about $2/ounce).
Tarama, the tiny roe of carp, cod or mullet (more). Pale orange in color, they are most often found blended into taramosalata but also available in their original form from Krinos (an 8-ounce jar is about $5.00). Tarama means fish roe in Greek and Turkish.
Tobiko, roe from the Icelandic flying fish (a superior product to the similar-looking masago—more). It is typically dyed orange, but can be found in red, green (with wasabi flavor) and black (about $2/ounce).
Trout roe, pale yellow in color, has become a popular garnish, especially when colored red-orange to resemble the pricier salmon roe, which it resembles (about $6/ounce).
Whitefish roe, also pale, has been colored and flavored into delights such as beet (red), ginger (yellow), mango (orange), truffle (brown), wasabi (green), even black (about $4/ounce).
CAVIAR TIPS
Take care of the eggs. Caviar is very fragile and must be handled with care to keep the eggs from bursting.
Caviar hates metal. Never touch a metal utensil of any kind to caviar: Metal oxidizes the roe and will make it taste metallic. Use a caviar spoon made of bone, tortoise shell, or mother of pearl. A plastic spoon works, too.
Keep it cold. Caviar that is not shelf-stable (i.e., pasteurized) should be kept in the coldest part of the refrigerator (between 28 to 32°F.) Don’t freeze it! The caviar can last 15 to 20 days, unopened, in the fridge. Don’t open the caviar jar or tin until it’s ready to serve.
Cover and refrigerate any leftovers promptly and use within a day or two. If caviar is left in the tin, the surface should be smoothed and a sheet of plastic wrap pressed directly onto the surface. Turn the tin over each day so the oil reaches all of the eggs.
> Here are more caviar tips.
> Find much more about caviar in our Caviar Glossary.
CHECK OUT WHAT’S HAPPENING ON OUR HOME PAGE, THENIBBLE.COM.
|
|