|
We were thrilled to receive sample bags of Maddy & Maize, small batch gourmet popcorn handmade in St. Paul, Minnesota.
More accurately, we were thrilled when we tasted them. Could they be the best flavored popcorns anywhere?
The line is all-natural, which means no artificial flavors and color, no HFCS, non GMO, peanut-free. And most flavors are vegan.
But none of that would mean much to us if it weren’t so very delicious. We couldn’t stop eating it (justifying to ourselves that popcorn is a whole grain).
The popcorn is sold in four-ounce bags for $6.00, and worth every cent. For party favor boxes, custom wraps are available for wedding, corporate gifts and other occasions.
The only challenge is where to start.
As a professional taster, we always recommend the sweet-to-savory transition. By the time you’ve had enough sweetness, you need the savory to balance it out.
And while we don’t want to single out a particular flavor because all are stellar, the Bourbon & Barbecue is the best BBQ popcorn we’ve ever had. It has a touch of heat that makes it memorable.
Similarly, Lemon Raspberry Layer Cake won the sweet flavors for us; but as we often say, it’s like the Miss America pageant. Any one of them could be the winner.
MADDY & MAIZE: GLORIOUS FLAVORS
Sweet Flavors
Birthday Cake*, vegan and gluten-free
Cookies & Cream, vegan and gluten-free
Dark Chocolate Caramel, gluten-free
Lemon Raspberry Layer Cake, vegan and gluten-free
While the Dark Chocolate Caramel corn has the drizzles you’d expect, the other sweet flavors have a drizzle of icing that truly is, the icing on the [popcorn] cake.
Savory Flavors
Aged White Cheddar, gluten-free
Bourbon Barbecue (With Sweet Heat), vegan and gluten-free
Thai Coconut Curry, vegan and gluten-free
________________
*While the bag ingredients say only “natural flavor,” which is par for the course, we picked up a flavor that we could swear is rum extract. It’s more complex than the typical “birthday cake” flavor: tasty for adults, probably not right for kids.
Maddy & Maize is available at retail largely on its home turf, Minnesota. But it deserves to be everywhere.
Until then, order it online at MaddyAndMaize.com.
WHAT’S IN OUR EASTER BASKET?
Bunnies and eggs, plus Maddy & Maize!
The colorful bags and happy flavors fit right in.
|
|

[1] Lemon Raspberry Layer Cake Popcorn. The fruit flavors are so fresh, the popcorn can substitute for a slice of cake. (photo @TheCuratedLiving | Maddy & Maize | Instagram).

[2] The lineup, taken at the Golden Globes, shows bright and cheery packages that are ready to go into an Easter basket (photo courtesy Maddy & Maize).
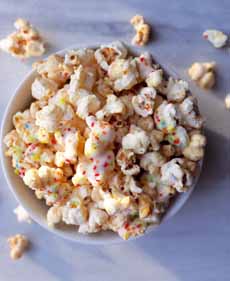
[3] Birthday Cake popcorn, with icing and sprinkles (photo People And Things Magazine).
|