|
The photos could be ice cream or sorbet. But they’re mashed potatoes.
There are few people who don’t like mashed potatoes. Here’s a way to bring them to the next level.
Taste the rainbow with these artful mashes. Mashed potatoes are blended with bold flavors, with vegetable purées providing vibrant colors and tastes.
Serve them as a side or the center of a vegetarian plate. Layer them in stacks with colorful vegetables. Have a great time with them.
PARTY BAR
Thanks to Potato Goodness for this recipe.
Beautiful for Mother’s Day dinner, we also like them for a DIY party food bar: four colors (five if you add the original, plain version) with a choice of toppings: bacon, caramelized onions, cheese, chives, sour cream, toasted pumpkin seeds and much, much more.
What else to put on a “main meal” party bar?
Barbecued pork or pork chops
Beef stew/beef bourguignon, chicken stew, pork stew, vegetarian stew (e.g. lentil-mushroom)
Chicken, fried or roasted
Coq au vin
Curry
Fish: baked, grilled, pan-sautéed
Glazed ham
Grilled or steamed vegetables
Grilled sausages (“bangers and mash”)
Meatloaf or meatballs
Roast beef
Steak
Plus optional gravy/sauce:
Chunky tomato sauce
Beef or turkey gravy
Other sauce of choice
RECIPE: BASE FOR RAINBOW MASHED POTATOES
This recipe is ready to party: It makes 24 four-ounce scoops. Cut down the recipe to meet your needs.
After you make the base, you’ll purée different vegetables to mix into it (recipes follow).
Prep time is 30 minutes, and cook time is 60 minutes. First:
Make The Base
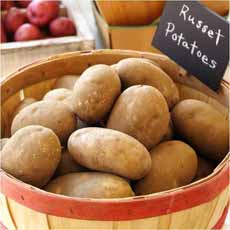
2 quarts (bout 20 large potatoes) russet potatoes, baked, scooped, & riced
2 cups butter
2 cups heavy cream
2 teaspoons salt
2 cups dehydrated potato flakes
Preparation
1. ROAST the potatoes at 450°F until the skin is crisp and the flesh is tender all the way through.
2. CUT the potatoes in half and scoop the flesh into the bowl of a mixer with the paddle attachment.
3. HEAT the cream, butter, salt, and pepper on the stove until hot. With the mixer on the lowest speed, slowly pour the hot cream mixture into the riced potatoes. Mix on low at first, and then medium speed until the mashed potatoes have a smooth consistency. DO NOT OVER-MIX. You should have 2 quarts.
4. SET aside. This is your potato “base.” You need to make a batch of vegetable purée for each flavor.
FOLLOWING ARE THE INGREDIENTS AND DIRECTIONS TO MAKE THE VEGETABLE PURÉES FOR EACH OF THE FIVE FLAVORS.
1. BEET & DILL MASHED POTATOES
8 medium red beets, trimmed
2 teaspoons fresh dill, chopped
½ cup olive oil
2 teaspoons salt
Water as needed
Preparation
1. TRIM the tops and bottoms from the beets; place them in a deep pan. Add water until halfway up beets. Cover tightly with foil and place in a 400°F oven until fully cooked, about 1 hour.
2. REMOVE the pan from the oven, carefully remove the foil (watch out for steam), and remove the beets. Reserve the cooking liquid. When the beets are cool enough to handle…
3. REMOVE the skin. Place the cooked and peeled beets into a blender and purée with the dill, olive oil, salt, and pepper.
4. POUR 1 quart of purée into a mixing bowl and mix together by hand with a whisk with one of the five portions (2 quarts) of mashed potatoes.
2. KALE, SPINACH & BASIL MASHED POTATOES
1 cup basil, packed
1 cup baby spinach, packed
2 tablespoons garlic, chopped
6 TBSP Lemon Juice
2 teaspoons salt
½ teaspoon pepper
½ cup grated parmesan
Preparation
1. PREPARE a pot of boiling water and an ice bath, ready to blanch the kale. Place the kale in boiling water for 30 seconds. Remove it from the water and immediately place it into an ice bath to shock to retain the color.
2. REMOVE the kale from the ice bath and squeeze all of the water from it. Then chop the kale.
3. PLACE the garlic, lemon juice, salt, pepper, parmesan cheese, kale, basil, and olive oil in a food processor, and process into a smooth pesto.
4. POUR 1 quart of pesto into a mixing bowl and mix together by hand with a whisk with one of the five portions (2 quarts) of mashed potatoes.
3. RED PEPPER & CARROT MASHED POTATOES
4 red bell peppers, roasted, skin removed
8 medium carrots, cooked (1 cup)
2 tablespoons garlic
2 teaspoons salt
1 teaspoon pepper
2 ounces water (more as needed)
|
|
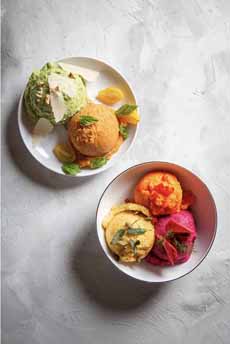
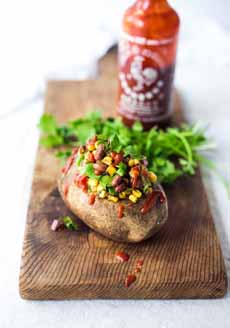
[1] Top dish: Kale & Spinach Pesto, Tomato & Basil mashed potatoes. Bottom dish: Red Pepper & Carrot, Beet & Dill, Butternut Squash & Sage (photo courtesy Potatoes USA).

[2] Pureéd vegetables are blended into plain mashed potatoes (photo courtesy Copper Pot).
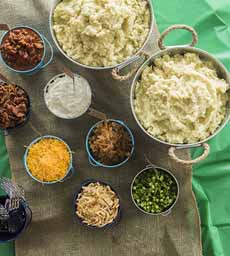
[3] A mashed potato bar. Keep the potatoes warm in slow cookers or hot plates (photo courtesy Betty Crocker).

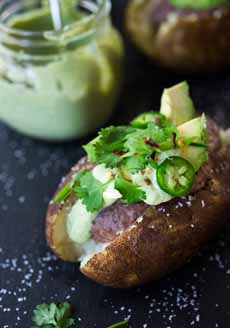
[4] Everyone creates his/her own garnished mashed potatoes (photo courtesy Just A Pinch).

[5] Like beets? They create a beautiful blend, paired with their classic partner, dill (photo courtesy Burpee)
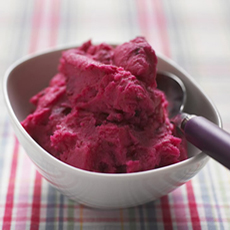
[6] Beet mashed potatoes are also a go-to for Valentine’s Day dinner (photo courtesy Love Beets).

[7] Dill is the perfect herb complement to beets (photo courtesy Paper Chef).
|
Preparation
1. PEEL the carrots, slice ½”, and cook in boiling water until very tender. Strain from the water and add to the blender with the roasted red peppers, garlic, salt, pepper, and olive oil. Purée until smooth.
2. POUR 1 quart of squash purée into a mixing bowl and mix together by hand with a whisk with one of the five portions (2 quarts) of mashed potatoes.
4. TOMATO & BASIL MASHED POTATOES
4 cups sundried tomatoes in oil
3 tablespoons garlic, chopped
2 teaspoons salt
1 teaspoon pepper
1 cup basil, packed tight
Water as needed
Preparation
1. PLACE the tomatoes with their oil, salt, pepper, garlic, and basil in a blender and purée on medium speed until smooth.
2. POUR 2 cups of sundried tomato purée into a mixing bowl,
and mix together by hand with a whisk with one of the five portions (2 quarts) of mashed potatoes.
5. BUTTERNUT SQUASH MASHED POTATOES
2 butternut squash, medium-large
4 tablespoons butter
10 sage leaves
2 teaspoons salt
1 teaspoon pepper to taste
1/4 cup olive oil
Preparation
1. PEEL the butternut squash, cut it in half lengthwise, remove the seeds and membrane and cut it into 1” pieces. Place into a mixing bowl and toss with olive oil.
2. ROAST in the oven at 400°F until tender, but no browning occurs. Remove from the oven and keep warm.
3. ADD the butter to a saucepan. Brown it over medium heat on the stove with the sage, until the sage is crispy. Remove from the heat, set aside, and keep warm.
4. PLACE the cooked squash, the brown butter with sage, salt, and pepper into a blender and purée. Pour 1 quart of squash purée into a mixing bowl and mix together by hand with a whisk with one of the five portions (2 quarts) of mashed potatoes.
CHECK OUT WHAT’S HAPPENING ON OUR HOME PAGE, THENIBBLE.COM.
|