THE NIBBLE BLOG: Products, Recipes & Trends In Specialty Foods


Also visit our main website, TheNibble.com.

How To Store Potatoes For National Potato Month

Quick tips for National Potato Month, September, on how to buy and store potatoes (National Potato Day is August 19th).
 
 
HOW TO BUY POTATOES

  • FIRM. Choose potatoes that are firm, with smooth skin. Avoid potatoes that are too soft, greenish in color or have cuts, sprouts or blemishes. These are more likely to be bitter, and green-tinged potatoes and those that are sprouting can even be toxic.
  • SIZE. Choose potatoes that are uniform in size, so that they will take the same amount of time to cook when you prepare them.
  • RECIPES. Potatoes are cheaper when you buy more of them. If you think a large bag will be more than you can use, expand your potato repertoire: not just as a side dish but in potato soup, vegetarian curries and stews, potato pancakes and potato torta for brunch, and the always-popular potato salad. Treat yourself to a potato cookbook for ideas beyond baked, fried, mashed, etc.
  •  
     
    HOW TO STORE POTATOES

    Potatoes don’t go bad quickly, and can be stored for up to 6 months.

  • PLASTIC. Don’t store potatoes in airtight plastic bags. If they are sold in plastic, the bag should have cut-outs to enable breathing.
  • PAPER. If storing potatoes in paper bags, leave the bags open at the top to allow for easy breathing.
  • DARK. Store potatoes in a cool, dark and clean place or they will sprout more quickly.
  • MOISTURE. Avoid any extra moisture, but don’t store potatoes in a bone-dry place or they will start to lose their natural moisture and shrivel up.
  • NO FRIDGE. Don’t store raw potatoes in the refrigerator. When stored at temperatures below 40°F, the starch converts to sugar, and the moisture will cause sprouting.
  • NO LIGHT. Shield potatoes from light. When exposed to light, potatoes become green-tinged, which is a sign of chlorophyll and toxic alkaloids (see the next section).
  • NOT TOO COLD. When potatoes are stored too long in a too-cold environment (below 40°F), the starches convert to sugar. This not only makes for an overly-sweet potato but also alters the cooking chemistry, resulting in uneven cooking performance and discoloration.
  • SEPARATE. Don’t store potatoes near onions. Proximity to onions causes potatoes to sprout more quickly.
  •  
     
    DON’T EAT POTATOES THAT HAVE TURNED GREEN

    Potatoes that have developed green coloration may be harmful.

    Potatoes exposed to excess light may turn a greenish hue on its skin, flesh or sprout. This is due to the development of solanine, a glycoalkaloid. It is a natural toxin present in potatoes, but extra light causes it to grow to dangerous proportions.

    Solanine may upset the digestion and cause discomfort—or worse. Solanine that is consumed in high quantities can lead to paralysis [source].

    Cooking a green potato does not make it safe. While you can can usually cut away the green portion and safely eat the remainder, the potato can bitter. It’s best to toss it.
     
     
    COOKING POTATOES

  • SKINS ON. Potatoes are easier to prepare and healthier to eat when their skins are left on.
  • SOAK & SCRUB. Potatoes are typically washed before they are shipped to be sold, but should be washed again before food preparation. Soak potatoes in cool water to loosen the dirt; then scrub them gently with a vegetable brush or sponge. Trim away any eyes or blemishes.
  • DON’T FREEZE. Freezing cooked potatoes is usually not a good idea. Since potatoes are 80% water, they become watery and grainy when reheated. Manufacturers of prepared potatoes have methods to circumvent this, but a home freezer can’t.
     
     
    POTATO NUTRITION

    Potatoes contain many essential nutrients. The skin of the potato contains half of the fiber; more of the nutrients are found within the potato itself.

    Because potatoes are high in carbohydrate, there is a misconception that they are fattening*. However, the calories come from the ingredients with which the potatoes are prepared—butter and cooking oil, sour cream and gravy.

  • ANTIOXIDANTS. Potatoes contain phytochemicals like carotenoids that help protect cells in your body from damage.
  • FIBER. A medium potato has 2 grams of fiber, representing 8% of your daily recommended amount.
  • IRON. With only 6% of the daily recommended amount of iron, potatoes aren’t known for their iron content. Still, it’s a contributing nutrient that keeps you healthy, and every little bit counts.‌
  • POTASSIUM. A medium potato with the skin provides 620 milligrams of potassium. In fact, it’s considered one of the most potassium-rich foods available as one serving of potatoes provides 18% of the daily recommended amount of potassium.
  • VITAMIN B6: A medium potato offers 10% of the daily recommended amount of vitamin B6.
  • VITAMIN C: You may think of orange juice when it comes to vitamin C, but it’s time to rethink. Potatoes have 45% of your daily recommended amount of Vitamin C.
  •  
     
    > TYPES OF POTATOES


    > POTATO HISTORY
     
     
    SWEET POTATOES: DISTANTLY RELATED

    There are many different shapes, sizes and colors of sweet potato: orange, purple, red and tan varieties can be found. However, none of them is related to the white potato, or to the African yam.

  • The sweet potato diverges from the sweet potato at the family level, Solanales
  • The taxonomy of the white potato: class Magnoliopsida, order Solanales, family Solanaceae, genus Solanum, species: S. tuberosum.
  • The taxonomy of the sweet potato differs at the family level: class Magnoliopsida, order Solanales, family Convolvulaceae, genus Ipomoea, species, I. batatas.
  • The yam has comes from a completely different class and order: class Liliopsida,
    order Dioscoreales, family Dioscoreaceae, genus Dioscorea. There are some 600 species of yam.
  •  
    National Sweet Potato Day is February; Sweet Potato Awareness Month is November.


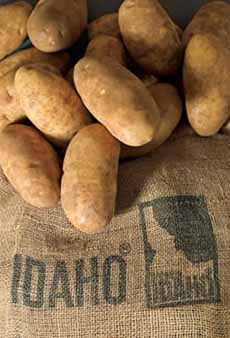
    Russet Potatoes From Idaho
    [1] Russet potatoes, the standard for baked potatoes and French fries.


    [2] Tricolor baby potatoes. Baby potatoes are new potatoes—potatoes harvested when immature. They are not the same as creamer potatoes, which are smallest variety of potato and more flavorful (photo © Recipes Worth Repeating).


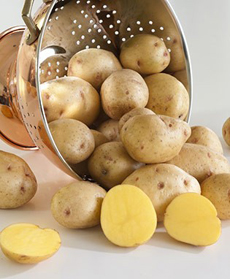
    [3] Yukon Gold potatoes (photo © Bonnie Plants).


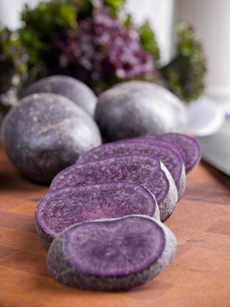
    [4] Purple Peruvian potatoes (photo © Mona Makela | iStock Photo).


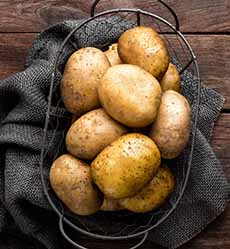
    [5] All-purpose white potatoes (photo © Idaho Potato Commission).

    Sweet Potatoes Whole & Sliced
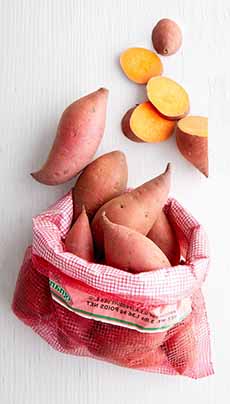
    [6] Sweet potatoes are different from white potatoes, and completely unrelated from yams. See the explanation at the end of the article.

     
    ________________

    *A medium baked potato has 161 calories. Skip the butter and sour cream and season with nonfat plain Greek yogurt, fresh-cracked pepper and snipped chives. It’s just as delicious and you’ve only added 20 more calories.


    Comments off

    An Easy Appetizer Plate Recipe For Beautiful Starters

    This appetizer isn’t fancy, but it’s on the menu of Noma, a three-Michelin-star restaurant run by chef René Redzepi in Copenhagen, Denmark. (The name is a syllabic abbreviation of the two Danish words nordisk (Nordic) and mad (food), and the restaurant is known for its reinvention and interpretation of New Nordic Cuisine. It aims to limit menu ingredients to those found or made in Scandinavia.

    In 2010, 2011, 2012 and 2014, Noma was ranked as the Best Restaurant in the World by Restaurant magazine. It closed for a couple of years as Redzepi traveled the world studying foods of different cultures. As of 2019, the last year of rankings before the pandemic, it ranked #2.

    The food isn’t necessarily haute cuisine. It’s more of a combination of flavors that bring excitement to the palate, and includes foraged ingredients that would never be found in food stores.

    We particularly liked the ease of this appetizer plate. As you can see, these are foods that anyone can prepare.
     
     
    THE NOMA APPETIZER PLATE

    This appetizer plate includes fruits, vegetables and seeds, and lots of edible flowers for color. The sweet and savory selection includes:

  • Dressed lettuce leaf
  • Edible flowers
  • Grilled artichoke heart half
  • Grilled half orange slice
  • Grilled half fig
  • Half French radish
  • Marinated beets and atop a raw mushroom slice and spinach leaf
  • White mulberry and…
  • Some items we can’t identify, including the sauce*
  •  
    Most of these items are easily found in your grocery store (especially if you substitute a blackberry for the mulberry).

    We’re not so keen on edible flowers, which provide much of the color here. We’re just not wild about the flavor and most people don’t eat them anyway; so why waste the food and the money?

    However, we substitute other colored vegetables: a grape tomato or half a cherry tomato, pickled red onion.
     
     
    START THINKING ABOUT COLORS & SHAPES

    Your plate will be most interesting if you select an assortment of colors and shapes; for example:

  • Green: asparagus, castelvetrano olives, fig, marinated green beans, sugar snap peas.
  • Orange: grilled orange bell pepper, kumquat, mango, pickled carrot, orange cherry or grape tomato, spiced mandarin or orange segments.
  • Purple: blackberries, boysenberrie, fig, grilled eggplant (grilled) Fruits: figs, purple cabbage.
  • Red: balsamic-marinated strawberry, grilled red bell pepper, radicchio, red leaf lettuce, red pepper flakes, tomato (grape, cherry)<./li>
  • Yellow: corn relish, grilled yellow bell pepper, grilled pineapple, yellow cherry or grape tomatoes.
  • White: grilled cauliflower floret, mashed turnip or parsnip, white cheese
  •  
    Set them on a nice plate that shows off the plates and colors, and you’re in business.
     
    Here’s a longer list of vegetables by color. 


    [1] This plate of mixed bites, artistically chosen, is a modern version of the classic mixed hors d’oeuvre or antipasto plate (photo © Restaurant Noma | Copenhagen).


    [2] Americans are more familiar with an antipasto plate (photo © Kelly Cline | iStock Photo).


    [3] Colorful fall fruits and vegetables (photo © Good Eggs).


    BEYOND FRUITS & VEGETABLES

    While Noma choose a vegan plate of fruits, vegetables and seeds, you can also include white proteins: baked fish, chicken breast slice, deviled egg or boiled/poached quail egg, grilled tofu, raw scallop, white anchovy, white cheese, etc.

    ________________

    *It may be balsamic or black vinegar with a small amount of oil.


    Comments off

    Food Fun: Stephanie Izard’s Cheez-It Crunch Cake & Recipe


    [1] The original Cheez-It cake, made to celebrate the brand’s 100th birthday (all photos © Kellogg’s Cheez-It).


    [2] Take a big bite!


    [3] The cake was created for the 100th anniversary of Cheez-It. The brand’s history is below.


    [4] Have some Cheez-Its with your Cheez-It cake.


    [5] Don’t want to bake the cake? Enjoy Cheez-Its with your favorite soft drink (here, with cola).


    [6] Here, with ginger ale.


    [7] Here, with a glass of wine.


    [8] An easy snack: teeny peanut butter crackers (make a sandwich with PB).


    If you’re a Cheez-It fan, you might like to know about Stephanie Izard’s Cheez-It cake, incorporating her favorite snack. The Top Chef and James Beard Award winner even celebrated her wedding with a four-tiered Cheez-It cake, that went on to inspire retail variations by other bakeries.

    And good news: The recipe is below.

    The Chicago chef is restaurateur (Girl & the Goat, Little Goat Diner, Duck Duck Goat, Cabra Cevicheria) and bakery owner (Sugargoat Bakery).

    To mark its 100th birthday, the brand partnered with Chef Stephanie to create the cake (the history of Cheez-It is below).

  • Chef Stephanie estimates that there’s an entire box of large Cheez-It crackers in every cake.
  • Cheez-It crackers are crumbled to make Cheez-It flour, Cheez-It shortbread crumble on the inside, dulce caramel white chocolate Cheez-
  • The cake itself is at half Cheez-it.
  • The red icing is flavored with Nesquik, which Izard says “give[s] it a sweet, nostalgic flavor that goes nicely with the saltiness of the Cheez-It crackers” [source].
  •  
    You can purchase it on Goldbelly

     
    RECIPE: CARAMEL CRUMBLE CAKE WITH CHEEZ-ITS

    Here’s Stephanie’s cake for home bakers (recipe © Stephanie Izard). “Sweet, salty and savory,” she says, “this cake has it all!”

    Note that this is a two-layer cake, not the four layers in the photos and on Goldbelly.

    To save time, two 16-ounce cans of purchased vanilla frosting may be substituted for the homemade buttercream frosting, and 1 cup or purchased caramel ice cream topping may be substituted for the homemade caramel sauce.

    Prep Time is 2½ hours, total time is 6¼ hours. Yield: 16 servings.
     
    For The Cheez-It Crumble

  • 1 box (12.4 ounces) Cheez-It® Original
  • ½ cup (1 stick; 4 ounces) cold unsalted butter, cut into ½-inch pieces
  • ½ cup all-purpose flour
  • 3 tablespoons granulated sugar
  •  
    Ingredients For The Cake

  • 1½ cups granulated sugar
  • ½ cup vegetable oil
  • ½ cup sour cream
  • 2 eggs
  • 2½ cups sifted pastry flour or cake flour
  • 3½ teaspoons baking soda
  • ¾ teaspoon salt
  • 1½ cups buttermilk
  • 1 cup (4 ounces) shredded Cheddar cheese
  • 1 tablespoon vanilla
  •  
    The recipes for the caramel sauce and frosting are below.

    Preparation For The Cheez-It Crumble

    1. PREHEAT the oven to 350°F. Line a 15 x 10 x 1-inch baking sheet with foil.

    2. MAKE the Cheez-It Crumble. Freeze the Cheez-It crackers for at least one hour. Remove from the freezer and place in a blender container or food processor bowl. Cover and process until very fine crumbs form. Repeat the processing, if needed, to make the crumbs as fine as possible. Remove and discard any large pieces.

    3. COMBINE in a mixer bowl ½ cup of the Cheez-It crumbs (reserve the remaining crumbs for the cake), the cup butter, flour and sugar. Beat with the paddle attachment, with the electric mixer on medium speed, until the pieces are the size of peas.

    4. SPREAD on the prepared baking sheet. Bake for 20 to 25 minutes or until golden brown, stirring every 10 minutes. Cool completely, stirring to break up any large pieces.

    Preparation For The Cake

    1. REDUCE the oven temperature to 325°F. Grease and flour two 8-inch round cake pans with 2-inch-high sides. Line the bottoms of the pans with circles of parchment paper. Set aside.

    2. COMBINE in a large mixer bowl 1½ cups sugar and the vegetable oil. Beat on medium speed with the wire whisk attachment of the electric mixer until combined. Add the sour cream and beat until mixed. Add the eggs, one at a time, beating on high speed after each addition until light and fluffy.

    3. ADD the reserved Cheez-It crumbs, pastry flour, baking soda and teaspoon salt. Mix on low speed just until combined.

    4. COMBINE in a medium saucepan the buttermilk and shredded cheese. Cook and whisk over medium heat until cheese is softened. Blend with an immersion blender until smooth. (Or, pour the buttermilk-cheese mixture into a blender or food processor container. Carefully process with the feeder cap removed until smooth.) Stir in 1 tablespoon vanilla.

    5. TURN the mixer to medium-low speed. Gradually add the buttermilk mixture to the beaten cake mixture, beating just until combined. Pour into the prepared cake pans.

    6. BAKE about 40 minutes or until toothpick inserted near the center comes out clean. Transfer to a wire cooling rack and cool the cake layers in the pans for 10 minutes. Remove the layers from the pans. Remove the parchment paper from bottoms of the cake layers. Cool completely.

    Assembly instructions follow the recipes for the caramel sauce and the buttercream frosting.
     
     
    RECIPE: SALTED CARAMEL SAUCE

    Ingredients

  • 1 cup heavy cream
  • ½ cup water
  • 1 cup granulated sugar
  • 1 teaspoon salt
  • 1 teaspoon vanilla
  •  
    Preparation For The Caramel Sauce

    1. HEAT the cream in small saucepan, just until warm and small bubbles begin to form around edges. Remove from the heat. Cover to keep warm and set aside.

    2. PLACE the water in a 2-quart saucepan with heavy bottom. Pour 1 cup of sugar and the teaspoon of salt into the center of the pan, forming a low mound. Do not stir. Pat the mound down until it’s evenly moistened. Any sugar touching sides of the pan should be below the water line.

    3. COVER and cook over medium heat, without stirring, until the sugar dissolves and syrup looks clear.

    4. UNCOVER the saucepan and continue to cook the sugar mixture over medium heat until it turns a light amber color. Swirl the pan gently (instead of stirring) if the mixture begins to color unevenly.

    Check the color frequently by using a bamboo skewer or toothpick to place a drop of syrup on a light-colored plate. As soon as the syrup is light amber, remove it from the heat.

    5. STAND back to avoid splattering and gradually stir in the warm cream and the vanilla. Return to the heat. Cook, stirring constantly over low heat, about 1 minute or until smooth.

    6. REMOVE from the heat. Let stand for 5 minutes. Pour into a heatproof bowl. Refrigerate about 1 hour or until cool.


    RECIPE: BUTTERCREAM FROSTING

    Note that salt is added to this buttercream to maintain the sweet-and-salty profile of the cake.

    Ingredients

  • 5 egg whites
  • 1 cup granulated sugar
  • 1 cup (2 sticks; 8 oz.) unsalted butter, cut into 1-inch pieces and softened
  • 1½ teaspoons vanilla
  • 1 teaspoon salt
     
    Buttercream Frosting Preparation

    1. COMBINE the egg whites and 1 cup sugar in top of double boiler or a heat-proof pan that fits over top of medium saucepan. Place over boiling water (the upper pan should not touch the water). Cook, whisking constantly or beating with a hand-held mixer, until an instant read thermometer reads 160°F and the sugar is completely dissolved. Remove from the heat.

    2. POUR the warm egg white mixture into the bowl of an electric mixer. Using the whisk attachment, beat on medium-high speed until cool and stiff peaks form (the tips stand straight).

    3. CONTINUE to beat on medium-high speed, adding the butter, a few pieces at a time. Beat until the butter is completely incorporated after each addition. (If the mixture deflates and looks curdled, keep beating until smooth. If the mixture looks soupy, refrigerate the bowl for 20 minutes and beat again. It may need more than one session in the refrigerator.)

    4. ADD the vanilla and the salt. Beat until smooth and spreadable.
     
     
    TO ASSEMBLE THE CAKE

    1. PLACE one cake layer on a cardboard disk or cake plate. Spoon about 1 cup of the buttercream on top. Drizzle with about ½ cup of the caramel sauce. Sprinkle with half of the Cheez-It crumbles. Top with the second cake layer.

    2. FROST the top and sides of cake with a thin layer of the buttercream. Refrigerate about 1 hour or until firm.

    3. SPREAD the remaining buttercream over the top and sides of the cake. Drizzle with the remaining caramel sauce. Sprinkle with remaining Cheez-It crumbles. Slice and serve.

    For longer storage, loosely cover and refrigerate. Let stand at room temperature for 2 hours before serving.
     
     
    CHEEZE IT HISTORY

    Cheez-It cheese crackers were introduced in 1921 by the Green & Green Company, a manufacturer of snack crackers based in Dayton, Ohio. The original tag line was “A Baked Rarebit”—rarebit being a melted cheese over toasted bread (here’s more about it).

    The rectangular crackers are made with wheat flour, vegetable oil, cheese, salt and spices.

    The brand was acquired by Sunshine Biscuits 1932. Sunshine Biscuits became a subsidiary of the Keebler Company in 1996. Keebler, in turn, was acquired by Kellogg in 2001. Here’s more history.

    Today there are nine varieties of Cheez-It, from Extra Toasty and Extra Cheesy to Pepper Jack and Whole Grain. There are also Cheez-It Grooves, Duoz, Snap’d, snack mixes and snack packs.


  • Comments off


    © Copyright 2005-2026 Lifestyle Direct, Inc. All rights reserved. All images are copyrighted to their respective owners.