|
Recently we received a delightful pitch from Zola, a wedding planning and registry website, for an article on pairing wines and mocktails with wedding cakes.
While it’s terrific information for anyone ordering a wedding cake, it’s also great for cake lovers in general.
Be it birthday, anniversary, baby shower, holiday dinner, or any occasion to have a great piece of cake, we share their recommendations with you.
The original article has much more information, including mocktail pairings and recipes for people who don’t drink wine. There’s a recipe for each type of cake. Read the full article on Zola.com.
1. Vanilla Cake and Riesling
Vanilla cake is a wedding favorite and goes beautifully with a Riesling. An off-dry Riesling, Kabinett*, is sweet enough to compete, but won’t overpower the cake’s flavor.
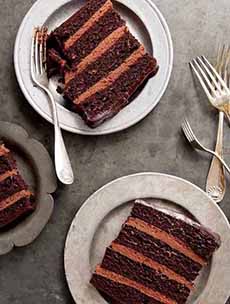
2. Chocolate Cake and Amarone
Amarone is very similar to Port, a classic dessert wine. This full-bodied red wine has a rich chocolate flavor, with spiced and coffee undertones. While it’s an international favorite, it’s on the expensive side. If you’re on a budget, a Ripasso is a good substitute.
3. Funfetti Cake and Sparkling Rosé
What’s better for a funfetti cake than a pink wine: rosé. Look for one on the sweeter side (here’s more about the types of rosé). Its bubbling strawberry flavor matches the sweetness of the vanilla cake and the mood of the funfetti. Try the sparkling rose from Martini (formerly Martini & Rossi) and Yellowtail: both around $12 pe bottle.
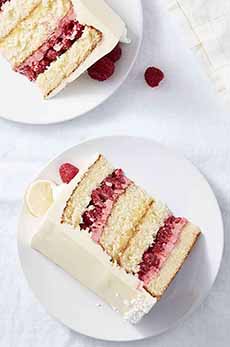
4. Lemon Raspberry Cake and Prosecco
Prosecco is a light sparkling wine with tangy citrus notes, so it’s a natural choice for a refreshing lemon and raspberry cake. The delicate flavors of the cake are enhanced by the Prosecco’s bubbles. Here’s more about Prosecco.
5. Pink Champagne Cake and Chardonnay
An unoaked Chardonnay from a warm climate (Australia, California, New Zealand, South Africa) is ripe with sweet fruit flavors. It’s a perfect match for the strawberry flavor in a pink champagne cake, with a bright flavor to match the champagne in the cake. The higher acidity pairs well with a meringue buttercream icing.
6. Piña Colada Cake and Riesling
Citrus and wine is a tough combination, but a sweet Riesling is just the match. German Rieslings* hold ripe notes that pair well with tropical fruit like pineapple and coconut. Specifically, you’ll want the Trockenbeerenauslese (troh-ken-beer-en-OUSE-lay-suh). Wine people say TBA for short. But these tend to be very pricey. Look at the two other sweet Rieslings below.
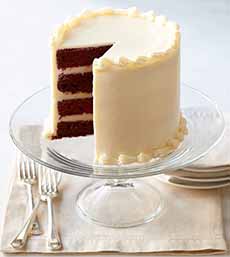
7. Red Velvet Cake and Cabernet Sauvignon
Rich and delicious red velvet is made for a Cabernet Sauvignon. Both have cocoa flavors, and the wine has a secondary vanilla note that complements the cream cheese frosting. Choose a Cabernet Sauvignon with good fruit and medium tannins (ask at your wine store).
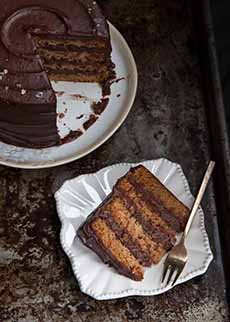
8. Chocolate Hazelnut Cake and Tawny Port
Ports are well-loved dessert wines from the Portugal, and are a natural pairing with anything chocolate (including a box of chocolates). Specifically look for Tawny Port. Its primary notes are caramel and hazelnut, with secondary berry and mocha flavors. (Here are the different types of Port.)
9. Coffee and Cream Cake and Madeira
Madeira is another great Portuguese sweet wine, showcasing almond, caramel and coffee notes. A coffee and cream cake is a strong match with Madeira’s similar richness, warmth and flavor profile.
10. Cookies and Cream Cake and Pinot Noir
The cream in this cake can be hard to pair, but Pinot Noir is a the best choice to match the sweet chocolate and cream. Choose a Pinot Noir that has strong fruit and mild-to-medium tannins (ask at your wine store).
11. Spice Cake and Pinot Gris
Pinot Gris (PEE-no GREE) has apple and pear fruit notes, so it works well with a spiced dessert. It carries its own sweet spice flavors, making it the perfect companion for a spice cake. Look for a fruity and sweet Pinot Gris from Alsace.
12. Caramel Apple Cake and Port
A Tawny Port with cinnamon and caramel flavors is a wonderful match. You can brighten the cake’s flavor with a White Port, which has notes of baked apple and roasted nuts.
13. S’Mores Cake and Fruit Wine
A fruit wine (non-grape), crisp and delicious, is a great contrast to the warm and gooey marshmallow and chocolate of a s’more. It helps balance the richness of the cake while matching its sweetness. While there are numerous fruit wines, look for a Pomegranate wine from Israel.
|