THE NIBBLE BLOG: Products, Recipes & Trends In Specialty Foods


Also visit our main website, TheNibble.com.


FOOD FUN: Popcorn Peanut Brittle Recipe


[1] Popcorn peanut brittle. The recipe is below (photo © The Popcorn Board).


[2] Pop your own, or buy it popped and ready to mix in (photo © Hannah Kaminsky | Bittersweet Blog).


[3] Garlic brittle from Rabbits Pickled Garlic (photo by Elvira Kalviste | © The Nibble).


[4] Chocolate-dipped peanut brittle (photo © See’s Candies).


[5] Smoked serrano chile and Georgia pecan brittle at Seviche Restaurant (photo © Seviche | Louisville).


It isn’t National Popcorn Day (January 19th). It isn’t National Peanut Brittle Day (January 26th), or National Candy Day (November 4th)..

But it is a day for a bit of food fun.

Want to make peanut brittle even more fun? Add popcorn!

You can substitute another nut in the brittle; for example, almonds, macadamias, pecans, or pistachios instead of peanuts.

Or, use mixed nuts!

The history of peanut brittle is below.

> The history of popcorn.

> The history of peanuts.

> The history of candy.
 
 
RECIPE: POPCORN PEANUT BRITTLE

Thanks to the National Popcorn Board for the recipe.

Ingredients For 8 Servings

  • 2 cups granulated sugar
  • 1/2 cup corn syrup
  • 1/4 cup butter
  • 2 teaspoons vanilla extract
  • 1 teaspoon baking soda
  • 1 cup roasted salted peanuts
  • 4 cups popped popcorn, divided
  •  
    Preparation

    1. LINE a large baking sheet with parchment paper; spray it with cooking spray and set aside.

    2. COMBINE the sugar, corn syrup, and 1/2 cup water in a large heavy-bottomed saucepan. Cook over medium heat, stirring until sugar dissolves.

    3. INCREASE the heat to medium-high and bring to a boil, without stirring. Reduce the heat to medium. Cook, without stirring, for about 10 minutes or until golden brown and the candy thermometer reaches the hard-crack stage (300°F to 310°F)*.

    4. CAREFULLY REMOVE the pan from the heat, working quickly. Stir in the butter, vanilla, and baking soda until foamy. Stir in the peanuts and 2 cups of popped popcorn until well coated.

    5. IMMEDIATELY POUR the mixture onto the prepared pan. Using a heatproof spatula, spread the mixture as thinly as possible. Sprinkle with the remaining popcorn, pressing the popcorn into the candy with the spatula.

    6. LET COOL completely. Break into pieces and store in an airtight container.
     

    PEANUT BRITTLE HISTORY

    Different civilizations have been making sugar syrup-based candy for millennia. Cavemen raided beehives for their sweet treats.

    But the first foods that can be called candy were made around 1500 B.C.E. The ancient Egyptians used honey as a base and added dates, figs, nuts and spices [source].

    Sugar candy itself was invented in northern India, the earliest known producer of crystalline sugar, about 250 C.E. [source].

    Fast-forward 2000 years or so: Peanut brittle was invented in the American South.

    The story is that around 1890, a Southern woman created peanut brittle by mistake.

    She was making taffy when she added baking soda instead of cream of tartar. She realized her error; but not wanting to waste the ingredients, she continued to cook it.

    (Elsewhere, a similar accident created fudge instead of taffy.)

    The result: crunchy brittle instead of chewy taffy.

    The term brittle first appeared in print in 1892, along with recipes that included different nuts and seeds.

    Brittle is a mixture of sugar and water heated to the hard crack stage (300°F).

    In parts of the Middle East, brittle is made with pistachios, a local nut; while many Asian countries use their local sesame seeds and peanuts.

    Today, creative cooks have enhanced brittle with everything from smoked nuts to pumpkin seeds, bacon to cayenne to garlic. Some even add maple syrup or dip the brittle in chocolate.
     
     
    ________________

    *If you don’t have a thermometer, test for the hard-crack stage by dropping a teaspoonful of hot syrup into a cup of cold water. At this stage, the syrup will form hard brittle threads and crack when you bend them.


    Comments off

    TIP OF THE DAY: Uses For Tahini Beyond Hummus

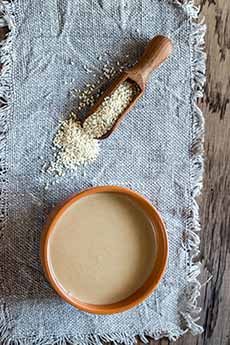
    If you like nutty flavors, you’ll like tahini (photo #1): a creamy, nutty paste made from ground sesame seeds. It’s familiar to every fan of hummus (photo #3).

    Most Americans buy tahini to make hummus or baba ghanoush. If you eat halvah, you’ve eaten tahini-based candy.

    Tahini is also the base of tarator sauce (the recipe is below**), a multipurpose Middle Eastern staple used for meats, vegetables and seafood, plus falafel (photo #4), shwarma and other pita sandwiches.

    The history of tahini is below.

    We were inspired by a jar of Once Again Tahini (photo #2) to experiment with uses beyond our favorite Middle Eastern dishes.

    By the way, along with tahini, Once Again makes artisan nut and seed butters, including almond, cashew, peanut, and sunflower butters. The products have just one ingredient: nuts or seeds. The company is employee owned, and dedicated to Fair Trade, Fair Labor and sustainability.
     
     
    WHAT IS TAHINI?

    Tahini paste is a Middle Eastern staple.

    In most Middle Eastern cultures, the paste is called tahina, from the Arabic tahn, meaning “ground.” Most Western countries use the Greek spelling, tahini.

    Think of tahini as sesame butter. You can substitute it for a no-nuts peanut butter. Some fans eat it from the jar, like PB.

    To make tahini, sometimes the sesame seeds are first roasted, sometimes they are raw. The flavor is an individual preference; although tahini made from raw sesame seeds is lower in fat than tahini made from roasted seeds [source].

    The seeds can be hulled or unhulled. You may prefer the hulled seeds because they have a less bitter taste. However, as with whole grains, the unhulled sesame seeds provide more fiber and other nutrition. When tahini is made from unhulled roasted seeds, it’s darker, more bitter, and called sesame butter [source].
     
    The ground paste can be mixed with a bit of oil for a consistency that’s similar to homemade peanut butter.

    Like homemade peanut butter, which lacks the the emulsifiers that keep big brand PBs from separating, some of the natural oil of the ground seeds rises to the top. Just stir it back in before measuring out what you need.

    Because of tahini’s high oil content, it should be refrigerated after opening to keep it fresher, longer. You can even freeze it.
     
    If you have a cost-effective source of sesame seeds, you can whir them in your food processor to make your own tahini—in just 20 minutes. Here’s how.
     
     
    TAHINI NUTRITION

    Seeds—chia, flax, hemp, pumpkin, sesame, sunflower—are good for you (more about seed nutrition). Tahini, in particular:

  • Vitamins. Is high in vitamin E and vitamins B1, B2, B3, B5 and B15 (the benefits of B vitamins).
  • Minerals. Is rich in minerals such as calcium, iron, lecithin, magnesium, phosphorus and potassium. If you need more calcium for bone strength, tahini has nine times more calcium than PB.
  • Protein. Tahini has 20% complete protein, making it a higher protein source than most nuts; and it’s easily digestible [source].
  • Fiber & Fatty Acids. Sesame is a good source of both dietary fiber and monounsaturated fats. Tahini is a source of the healthy fatty acids omega-3 and omega-6.
  •  
    Here’s more on tahini nutrition.
     
     
    BEYOND THE MIDDLE EAST: WAYS TO USE TAHINI

    There’s so much more to do with that bottle or can of tahini paste that is a step apart from Middle Eastern cuisines.

    Use it to make fusion food: the integration of ingredients from one cuisine into another.

    Tahini can be mixed in to other foods, thinned into a sauce, and used plain or augmented in:

  • Dairy, mixed into cottage cheese, crème fraîche, sour cream or yogurt to create new flavors.
  • Dips, e.g. for crudités (try this red pepper dip and this green dip for St. Patrick’s Day; or this dip below††).
  • Dressings: as a binder in chicken salad, potato salad, etc., alone or mixed with mayo.
  • Grains, mixed in or as a garnish.
  • Marinades.
  • Noodles (we use it instead of peanut butter on sesame noodles; for everyday pasta or pasta salad, add lemon and garlic).
  • Nut butter substitute.
  • Salad dressings, for dairy-free creaminess in green salads.
  • Sandwich and burger spreads, especially on chicken, turkey and plant-based burgers
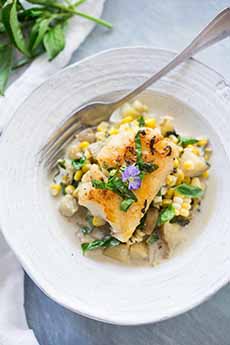
  • Sauces for chicken, fish, grains, lamb, vegetables
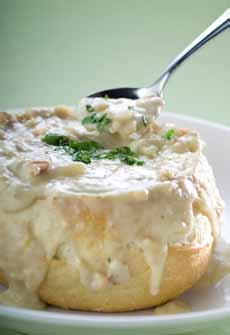
  • Soups (add a couple of tablespoons to thicken and enhance flavor)
  • Sweets: brownies, candies (e.g. caramels), cookies, ice cream
  • Toast spread (use it with avocado toast)
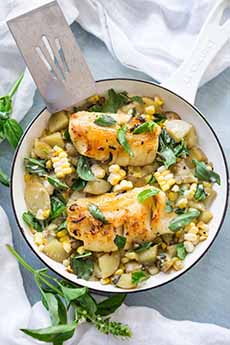
  • Vegetables: grilled, steamed (try it in a baked potato)
  • Vinaigrettes—add a splash of tahini or try the recipe below‡‡
  • World cuisines: beyond tahini with American fare, integrate it with other cuisines†
  •  
    Check out these 18 modern recipes with tahini.

     
    TAHINI HISTORY

    Sesame seeds grow in the pods of a flowering plant.

    The plant, Sesamum indicum, is the best-known member of the genus that includes other annual or perennial herbs with edible seeds.

    Sesame is native to sub-Saharan Africa and India. The plant is hardy, and can grow in drought conditions [source].

    Today sesame is widely grown in India and Asia. The tiny seeds can be in shades of shades of black, brown and red, depending on the cultivar; but the most common color is a pale ivory [source].

    Tahini was originally a byproduct of sesame oil production, but became a valued food in its own right. Sesame seed contains between 45% to 55% oil, and is notable for its resistance to rancidity [source].

    Sesame seed has been cultivated in Egypt since at least 2 C.E., first as a source of oil.

  • Egypt. The oldest mention of sesame is in a cuneiform document written 4,000 years ago that describes the custom of serving the gods sesame wine.
  • The addition of sesame seeds to food is shown in an ancient Egyptian tomb painting, that depicts a baker adding the seeds to bread dough [source].
  • Greece. The ancient Greeks used sesame seed as medicine as well as food. Hippocrates, the great Greek physician, is said to have recommended sesame for its nutritional value.
  • The Greek historian Herodotus wrote about the cultivation of sesame 3,500 years ago, in the region of the Tigris and Euphrates in Mesopotamia. It was mainly used as a source of oil.
  • India. The ayurvedic medicine of India, which dates back to 3300–1300 B.C.E, recommends sesame seeds to nourish and keep the body healthy. The belief is that the seeds’ high oil content lubricates and protects the tissues.
  • Persia. The concept of sesame paste (tahini), rather than oil, came from Persia, where it was called ardeh*. Tahini next moved to Israel.
  • Baghdad (modern Iraq). Tahini is mentioned as an ingredient of hummus kasa, a recipe transcribed in an anonymous 13th-century Arabic cookbook, Kitab Wasf al-Atima al-Mutada [source].
  •  
     
    A PRICEY SEED

    For centuries, only the wealthy could obtain the sesame seeds to make tahini.

    In some cultures, the seeds were used as currency—much as the hard-to-obtain peppercorns were once used in Europe [source].

    Perhaps that’s why “Open Sesame” was chosen as the magical phrase that opened the treasure cave, in the story of Ali Baba and the Forty Thieves (although the tale was written at the beginning of the 18th century, so it may be a stretch).
     
     
    TAHINI COMES TO THE U.S.

    Tahini began to appear in the U.S. in the 1940’s, in health food stores.

    In 1965, the U.S. passed new immigration reforms, allowing new waves of Arabs, Asians and other nationalities to immigrate [source].

    They brought their cuisine with them, of course. Middle Eastern restaurants and grocers ultimately attracted other Americans into the fold.

    These days you can purchase tahini in most supermarkets. There’s even a tahini dry mix seasoning, made with toasted sesame seeds, black pepper, citric acid, garlic, sea salt and parsley.

    By the way, in the southern U.S., sesame seeds are known as benne, a name brought from Africa by enslaved people‡.

    The word “sesame” that we use is of Semitic origin, reaching the English language in the 15th century via the Greek sesamon and Latin sesamum.
     
     
    ________________

    *In addition to savory tahini/ardeh, in Iran there is halvah ardeh: a sweet, dense paste made with ground sesame or tahini, and occasionally studded with pistachios [source].

    †In Indian cuisine, for example, tahini is served with breads, chicken, chickpeas, eggplant, fish, lamb, noodles, etc. It is generally added to make thick and rich gravy based curries [source]. In addition to India, tahini is found in the cuisines of Africa, Israel, Iran, Japan, Turkey, Turkey, even China, Japan, Korea and Vietnam.

    ‡The word benne (also spelled bene, pronounced benny) means sesame in the language of the Bambara peoples of Mali, and among the Wolof of Senegal and Gambia [source].

    **To make tarator sauce and add a fresh tang to almost any dish, just combine 1/2 cup tahini, 1/2 cup lemon juice, 4 cloves minced garlic and 1/4 cup chopped parsley. Pulse in a food processor until combined.

    ††For an easy dip, add lemon juice, salt and a dash of pepper or hot sauce to the tahini. A recipe for lemon tahini dressing: Combine 1/4 cup tahini, 3 tablespoons lemon juice, 1 clove pressed garlic, 1 tablespoon chopped cilantro, 4 tablespoons water (or enough to reach desired consistency), and salt and pepper to taste.

    ‡‡An easy tahini dressing recipe: Combine in a blender or food processor 1/2 cup tahini and 1/2 cup olive oil with 2 teaspoons apple cider vinegar, 2 teaspoons of lemon juice, and 2 teaspoons of grated ginger. Pulse and serve.


    [1] Tahini paste (photo © Alex9500 | Panther Media).


    [2] Once Again has plain unsweetened, unsalted tahini, plus this version with lemon (photo © (photo © Once Again Nut Butters).


    [3] A Greek salad and quinoa bowl with hummus, the latter being the best-known use of tahini in the U.S. Here’s the recipe (photo © Baked Greens).


    [4] Falafel with tahini sauce, its most familiar use in the U.S. after hummus (photo © Alesia Kozik | Pexels).


    [5] Fish in tahini sauce (photo © Jennifer Pallian | Unsplash).


    [6] Add tahini or tarator sauce to grilled vegetables (photo © Once Again Nut Butters).


    [7] Tahini as a soup garnish. Here’s the recipe from Cooking Light (photo © Cooking Light).


    [8] Potato salad with a tahini-herb dressing. Here’s the recipe (photo © Blue Diamond).


    [9] Add tahini to mayo, or use by itself, in egg salad, tuna salad, etc. Here’s the recipe for this chicken salad sandwich (photo © Sara Tane | My Recipes).


    [10] Getting fancy at Kindred restaurant: scallops with whipped tahini and artichoke crisps (photo © Kindred Restaurant | Davidson, North Carolina).


    [11z] An elegant watermelon radish and avocado salad with tahini dressing (photo © Matthew Kenney Cuisine).


    Comments off

    RECIPE: A Special Corn Chowder Recipe For National Clam Chowder Day


    [1] A hearty meal: corn chowder topped with a fish fillet (photos #1 and #2 and recipe © Sylvia Fountaine | Idaho Potato Commission).


    [2] A view in the pan.

    Clam Chowder Bread Bowl
    [3] Clam chowder served in a bread bowl is a popular restaurant preparation. Here’s how to make a bread bowl (photo © Arch Rock Fish | Santa Barbara [now closed]).


    [4] The original chowders were topped with a biscuit. Feel free to add one; but it became much easier to serve the chowders with store-bought oyster crackers or saltines (photo © Wendy Rake | Pexels).


    [5] Saltines are oyster crackers’ flat brother. They were invented in 1876 at F. L. Sommer & Company in St. Joseph, Missouri when the company used baking soda to leaven its wafer-thin cracker. Initially called the Premium Soda Cracker, it was later named Saltines because of the baking salt component. They quickly became popular (photo © Sterb B | Wikipedia).


    It’s winter, it’s cold, and February 25th is National Clam Chowder Day.

    We’ve got several clam chowder recipes below, but we wanted to take advantage of a chowder holiday to share this recipe with you:

    Corn chowder topped with your choice of cod, haddock, halibut, salmon, sea bass, scallops or shrimp.

    You can choose one fish or two—and yes, you can even add clams.

    Before we get to the recipe, we’d like to share some comments from the great American chef Jasper White, in his book 50 Chowders.

    He shares that the oldest-known printed chowder recipe is for fish chowder, from the Boston Evening Post on September 23, 1751.

    It calls for onions, pork, salt, pepper, parsley, sweet marjoram, savory and thyme—ingredients that are still used today.

    The chowder was served with a biscuit topping. The biscuit was later replaced by oyster crackers or saltines served with the soup instead of on top of it.

    But if you’re up for baking biscuits, revive the tradition!

    Chowder is much older than the first printed recipe, of course. Here’s the history of chowder.
     
     
    RECIPE: CORN & BASIL POTATO CHOWDER WITH WHITEFISH OR SEAFOOD OF CHOICE

    Although you might prefer to make this recipe with summer corn, we used frozen corn with no perceivable diminution of flavor.

    The recipe is ready in 30 minutes. Add the optional half-and-half for extra creaminess.

    If you’re using corn on the cob, see the note below under Preparation.

    This recipe was created for the Idaho Potato Commission by food blogger Sylvia Fountaine of Feasting At Home.

    Take a look at her blog: You’ll want to make everything!

    Ingredients

  • 3 tablespoons olive oil, divided
  • ½ cup white or yellow onion, diced (or 1 large shallot)
  • 8 ounces new crop Idaho® potatoes (yellow, red, Yukon or any variety with thin skin), diced no bigger than ½ inch thick (the smaller you cut them, the faster they cook)
  • 1 ear of fresh corn, kernels sliced off; or 3/4 cup canned or frozen kernels*)
  • 1 cup stock: chicken, corn, fish, vegetable; or water (see Note for corn stock)
  • ½ teaspoon kosher salt
  • Pepper to taste
  • 8 ounces fish: bass, cod, haddock, halibut, salmon, scallops, shrimp
  • Optional: 2-3 tablespoon half and half or soy milk
  • ⅛ cup fresh basil leaves, cut into ribbons (chiffonade) or torn
  •  
    Preparation

    1. HEAT the oil in a large skillet over medium heat. Add the onion and sauté until fragrant, about 3 minutes.

    2. ADD the potatoes and corn. Sauté 2-3 minutes; then add the stock or water and the salt and pepper, and bring to a simmer. Cover, turn the heat down to low, and simmer 10 minutes or until the potatoes are fork tender. While the potatoes are simmering…

    3. HEAT the remaining 1 tablespoon of oil in another skillet. Season the fish with salt and pepper, and sear each side over medium high heat. Lower the heat and cook to your desired doneness. Set aside. When the potatoes are fork tender…

    4. UNCOVER the potatoes and cook off a little of the liquid. If desired, add a few tablespoons of half and half or soy milk for a little extra creaminess (cook for a minute or two to thicken).

    5. STIR in half of the basil. Taste and adjust the seasonings. Right before serving…

    6. STIR in the remaining basil, saving a little for the top garnish. Dish up the chowder and top with the seared fish and basil.

    NOTE: If using corn cobs, for even more corn flavor, scrape the cobs with the end of a knife and gather the “milk.” Place this along with the cobs (you can cut them smaller) into a pan or pot, covered with water, and simmer on low heat for 30 minutes to make corn stock. Reduce to one cup.
     
     
    CORN TRIVIA

    Corn is the third-most consumed cereal grain in the world, after rice and wheat, respectively.

    Many of us eat corn as a vegetable, not a grain. According to the Whole Grains Council, corn is both grain and vegetable, depending on its state.

  • Fresh corn—corn-on-the-cob, corn chowder, creamed corn and other corn kernel preparations are considered a vegetable.
  • Dried corn—popcorn, cornmeal, grits—is considered a grain [source].
  •  

    MORE CHOWDER RECIPES

  • Classic New England Clam Chowder Recipe
  • Corn Chowder With Fish Or Seafood
  • Gnocchi Clam Chowder
  • Instant Pot New England Clam
  • The Different Types Of Clam Chowder
  •  
     
    MORE TO DISCOVER

  • THE HISTORY OF CLAMS
  • THE HISTORY OF CHOWDER
  • THE DIFFERENT TYPES OF SOUP
  • THE HISTORY OF SOUP
  •  
     
    ________________

    *One average corn on the cob yields 3/4 up kernels. A 10-ounce package of frozen corn yields about 2½ cups. If you do use fresh corn cobs, don’t throw out the spent cobs. You can use them to add depth and flavor to other soups and chowders. Stick them in the freezer until you need them.


    Comments off

    TIP OF THE DAY: Wedge Fries Vs. Jojo Potatoes

    Wedge fries are our kind of “food fun,” combining qualities of fries and baked potatoes.

    The outside is a golden crunch, the inside is soft and crumbly like a baked potato.

    The wedges are cut into what one of our colleagues called “dill pickle shape.”

    They can be baked or fried, seasoned with anything you like or left plain but for salt and pepper.

  • If you deep fry them, call them wedge fries.
  • If you bread and pressure-fry them, can call them jojos (photos #5 and #6, to be explained shortly).
  • If you bake them, they are essentially baked potato wedges; but wedge fries sound so much more interesting—like oven fries.
  • Baked or fried, they can be seasoned however you like (chile? herbs? parmesan?).
  • You can serve them with any condiment, from the classic ketchup and malt vinegar to blue cheese or ranch dressing, gravy, honey mustard, mayonnaise, salsa (photo #1), sour cream, sweet chili sauce….You-name-it.
  •  
    Head below for a super-easy baked wedge recipe.
     
     
    THE HISTORY OF WEDGE FRIES, STARTING WITH JOJOS

    It seems that in the general category of wedge fries, there was a pioneer called the jojo (photos #5 and #6).

    The jojo is a breaded potato wedge fried in a pressure fryer. They are often where fried chicken is served, because the same pressure fryer cooks both (separately, of course).

    The resulting wedge has a “shatter-crispy outer layer” with a “precise texture…that mystically sets the jojo apart,” according to one connoisseur.

    After these jojos became the rage—in the Pacific Northwest and Midwest, a plainer potato wedge trickled down to with who do regular fat frying or bake their fries.
     
     
    WHO INVENTED JOJOS?

    Several restaurant professionals claim to have invented the jojo.

    Whoever the claimant might be, the ability to make jojos was created thanks to the new pressure fryers that food-service manufacturers were promoting in the mid-20th century.

    One such was the Flavor-Crisp Pressure Fryer [source].

    Three feet tall, it was a vast improvement over the open-air fryers, which required gallons of hot vegetable oil.

    The pressure fryer used less oil, and the oil was temperature-controlled.

    Thus, super-hot oil allowed chicken to be fried exceedingly quickly. The chicken retained more moisture that resulted in juicier meat.

    It was a hit.

    As the theory goes, cooks wondered what else they could throw into their new fryers, and potatoes were an obvious choice: Places that sold fried chicken invariably sold french fries.

    Fiesta Pizza & Chicken of Akron, Ohio claims that its founders introduced “jojo potatoes” in the mid-1960s [source].

    A son of one of the founders said that his dad got the idea of pressure-frying lightly-breaded wedge-cut potatoes after learning the technique from a cook in Youngstown.

    His cooks cut the potatoes in fours, but they were too thick to cook through the middle. Cutting them into eights became the way to go [source].

    Another Claim

    Another source claims that, beyond Ohio, the wedge fry also has roots in Portland, Oregon.

    A food equipment company, Nicewonger sold Flavor-Crisp pressure fryers in Portland beginning in the 1950s. The founder’s son says that his father, Paul Nicewonger, was at a restaurant trade show demonstrating the pressure fryer in 1958. His booth happened to next to an Idaho potato booth.

    Nicewonger took some of the Idaho russets, cut them up and pressure-fried them. Attendees who grabbing the samples and wanted to know what they were called. Nicewonger called them Jojos, later telling his son that it was the first thing that popped into his head.

    Yet another claim comes from a former president of Ballantyne Strong of Nebraska, telling the exact same story—except he gave credit to a former Vice President, Ed Nelson, at a 1961 restaurant show in Chicago.

    The truth is out there!

    Just remember: If it’s not breaded and pressure-fried, it’s not a jojo [source].

    But non-breaded, non-spiced potato wedges, deep-fried or baked, are just as delicious.
     

    RECIPE: PARMESAN POTATO WEDGES

    How easy is it to make potato wedges? Just take a look.

    Instead of the garlic/oregano/paprika mix below, you can blend equivalent amounts of any other seasoning (try 1 tablespoon fresh rosemary leaves, finely chopped, and 2 minced garlic cloves).

    Instead of the garlic salt in the recipe, remember to add regular salt and pepper.

    You can add less cheese (e.g. 1 tablespoon), or no cheese. You know what you like, so have fun with it!

    Ingredients For 4 Servings

  • 1/4 cup grated parmesan cheese
  • 1 teaspoon garlic salt
  • 1/2 teaspoon garlic powder
  • 1/2 teaspoon dried oregano
  • 1/2 teaspoon paprika
  • 4 medium baking potatoes (about 8 ounces each)
  • Cooking spray (see Note)
  • Condiments of choice
  •  
    Preparation


    [1] Baked wedge fries with salsa (photo © Potato Goodness).


    [2] Baked parmesan, black pepper and garlic potato wedges. Here’s the recipe (photo © Urban Accents).


    [3] Baked parmesan and herb wedges. The recipe is below (photo © Taste Of Home)


    [4] Black pepper, toasted onion and garlic potato wedges (photo © Lucero Olive Oil [closed 2019]).


    [5] Crisp enough for you? Here’s the recipe, made in a T-Fal fryer (photo © Copykat).


    [6] Jojo air fryer potato wedges. Here’s the recipe (photo © Project Meal Plan).

     
    1. PREHEAT the oven to 400°F. Mix first 5 ingredients.

    2. CUT each potato lengthwise into 8 wedges. Place in a parchment-lined pan, 15x10x1 inches. Spray the potatoes with cooking spray and sprinkle with the cheese mixture. (Note: Instead of cooking spray, we tossed the potatoes in vegetable oil before, then in the seasoning blend, before placing them in the pan.

    3. BAKE until tender and golden brown, about 30 minutes. Halfway through, flip the wedges.


    Comments off

    TIP OF THE DAY: How To Speed Up The Ripening Of Avocados & Bananas


    [1] Almost ripe, but not quite. Stick them in the microwave! (photo © Waldemar Brandt | Unsplash).


    [2] Hard avocados? The microwave awaits! (photo © Erol Ahmed | Unsplash).


    [3] Turn your now-soft avocados into bacon-avocado-tomato crostini, delicious with a glass of wine or with an appetize Here’s the recipe (photo © Calvo Growers).


    February 23rd is National Banana Bread Day.

    To ripen bananas or any fruit more quickly, most of us know the trick:

    Enclose them in a paper bag with an apple.

    Apples give off ethylene gas, which hastens ripening. The fruit could be ready by the next day.

    But what if you need to use the bananas now, to bake banana bread or banana cream pie, or whip up a banana pudding with Nilla Wafers?

    Ditto when you need to quickly ripen avocados for guacamole or avocado toast.

    The answer is: microwave them.
     
     
    IMMEDIATE RESULTS RIPENING HACKS

    To Ripen Bananas

  • Pierce an unripe banana with a fork (as with with a potato), and microwave for a minute or two.
  • You’ll have to judge based on the ripeness of the bananas at hand.
  • Microwave for less time if the bananas are further down the road to ripeness.
  • The pulp will turn soft and sweet, perfect for mashing.
  •  
    To Ripen Avocados

  • Cut the avocado in half and remove the pit. Wrap each half in plastic wrap.
  • Microwave on high for two minutes.
  • Remove and hold the wrapped avocados under cold water to stop the cooking.
  •  
     
    MORE TIPS

  • How To Ripen Bananas
  • How To Ripen Fruit
  • How To Keep Produce Fresher, Longer
  •  
     
    KNOW YOUR FOODS

  • THE HISTORY OF BANANAS
  • THE HISTORY OF AVOCADOS
  •  


    Comments off

    The Nibble Webzine Of Food Adventures
    RSS
    Follow by Email


    © Copyright 2005-2024 Lifestyle Direct, Inc. All rights reserved. All images are copyrighted to their respective owners.