THE NIBBLE BLOG: Products, Recipes & Trends In Specialty Foods


Also visit our main website, TheNibble.com.

TIP OF THE DAY: Burger Salad & Salad Burger

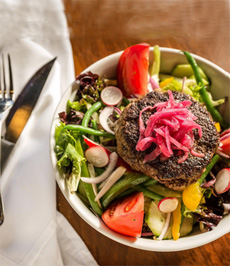
For years we have been enjoying the Burger Salad at Five Napkin Burger in New York City. It’s evolved over time, but initially consisted of a big bowl of beautifully arranged baby greens and colorful veggie complements, in a perfect vinaigrette. Atop was a plump burger: beef, salmon, turkey, veggie or a solid piece of grilled tuna.

We love good bread and can [alas] eat loaves of it. But burger buns—even when heavily seeded or made of brioche—rarely fall into that group. And they get soggy.

So when Five Napkin Burger presented a menu of burger salads in addition to conventional burgers, we tried a salad and were hooked. We were never a neat burger eater, so enjoyed the bonuses: no meat juices or ketchup dripping onto us when we raised the burger to our mouth.

While it could be a calorie- and carb-cutting alternative for some, let us hasten to say that we enjoy our burger salad along with the establishment’s excellent onion rings, sweet potato fries, and a beer.

Today’s tip is not just a burger salad, but for those who still want their bun, a salad burger (below).

   
/home/content/p3pnexwpnas01_data02/07/2891007/html/wp content/uploads/burger salad 5napkin 230

Our favorite way to enjoy a burger this burger salad from Five Napkin Burger. Photo courtesy Five Napkin Burger | NYC.

 
HOW TO CREATE A GREAT BURGER SALAD RECIPE

To start, think of your favorite salad and assemble the ingredients. Is it spinach salad? Cobb salad? Chopped salad? Salade Niçoise? Spicy greens (arugula, radish, watercress)? Tortilla salad?

Create your burger salad from those ingredients; and if the original salad contained chicken, turkey or other meat, consider adding small amounts of them—a mixed grill burger salad, as it were.

You can make a bacon cheeseburger salad or a diet burger burger salad. You can add seeds for more nutrition. And there are ways to cut calories. But here’s a list of options for starters:

 
BASIC SALAD INGREDIENTS

  • Lettuce: mixed greens (we love to add arugula and cress, but have peaked on kale)
  • Salad veggies: bell pepper, carrots, celery, cucumbers, fresh herbs (basil, cilantro, dill, mint, parsley), radishes
  • Tomatoes: cherry, grape, sliced, sundried—or substitute pimento (roasted red pepper)
  • Onions: green (scallions), red, sweet
  •  
    SALAD ADD-ONS

  • Cheese: crumbled, cubed, julienned, shaved ribbons or shredded
  • Extra veggies: broccoli florets, cauliflower, chiles, fennel, green beans, mushrooms—raw, pickled, roasted or steamed
  • Fruits: berries, dried fruit, mandarin or orange segments, sliced stone fruit, apples or pears
  • Luxury veggies: artichoke hearts, avocado, endive, hearts of palm, radicchio, water chestnuts
  • Seasonal veggies: for example, asparagus and green peas in spring; corn, yellow squash and zucchini in summer
  • Proteins: bacon, beans or legumes (chickpeas, lentils), ham, hard-boiled eggs, tofu/seitan, seafood (we recently created a modern surf and turf burger salad with grilled shrimp), slices or cubes of poultry, salami, sausage, etc.
  • Starch: boiled potatoes, cooked grains, small pasta shapes
  • Garnishes: anchovies, croutons, nuts, olives, peppadews, pepperoncini, pickles, seeds (chia, flax, pepita/pumpkin, sunflower, toasted sesame), sprouts
  •  
    SALAD DRESSING

    A burger salad begs for a delicious vinaigrette. Here’s our template for making a vinaigrette recipe you’ll love.

  • Some people are calorie and fat counters. If that’s you, go for a dressing of plain balsamic vinegar (conventional or white balsamic). It makes a delicious dressing with just 14 calories per tablespoon.
  • Another direction is to use lemon, lime or yuzu juice. Yuzu is imported from Japan and pricey, but worth it.
  • Low-calorie salsa also works, plain or mixed with a bit of salad oil. For a creamy dressing, mix salsa with plain Greek yogurt.
  •  
    However, before you avoid salad oil, ask any nutritionist, the FDA or the American Heart Association: Two tablespoons daily of a heart-healthy oil are important for general health and specific conditions*. The recommended oils are monounsaturated, and include avocado oil, canola oil, olive oil and peanut oil.

    It’s time to stop looking old-school at “calories” and “fat”—an old school way of looking at diet—and focus your choices on health and nutrition.


    /home/content/p3pnexwpnas01_data02/07/2891007/html/wp content/uploads/salad burger umamiburgerhdsoneatsFB 230

    Plan B: Top your burger with a salad.
    Photo courtesy Umami Burger | Hudson
    Eats.


    THE SALAD BURGER

    Instead of topping salad with a burger, you can top a burger with salad.

    Far more than a bunless burger or “diet burger”—the type served by our local diner and others, which plates a burger patty with lettuce, tomato, onion and a scoop of cottage cheese—a salad burger tops your burger with a flavorful salad.

    As you can see in the photo, it can be simple mixed greens, very lightly dressed. Since the burger is America’s favorite food, if you’ve been meaning to add more salad to your diet, here’s your chance.
     
    *A BIG FOOTNOTE ON HEALTHY FATS

    Monounsaturated fats deliver many health benefits, including:

  • Decreased risk for breast cancer.
  • Reduced cholesterol levels. The American Heart Association recommends the consumption of monounsaturated fats to improve one’s blood lipid profile.
  • Lower risk for heart disease and stroke. The FDA recommends that .8 ounce daily—about 2 tablespoons—may “possibly prevent coronary disease.”
  • Weight loss, when switching to monounsaturated fat from polyunsaturated fats (corn oil, safflower oil and soybean oil, among others) and saturated fats (largely from animal products: meat, dairy, eggs).
  • Less severe pain and less stiffness for sufferers of rheumatoid arthritis. Diet plays a role in reducing the pain and stiffness of those who already have rheumatoid arthritis.
  •   

    Comments off

    RECIPE: A Waffle Sandwich (Wafflewich) For National Waffle Day

    For special occasions, a waffle sandwich is true food fun. There’s an immediate special occasion: August 24th is National Waffle Day.

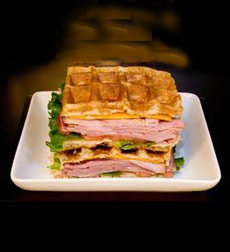
    Andrea Correale, CEO of Elegant Affairs Caterers, sent us two yummy sandwich recipes to celebrate the day. Both replace the bread with waffles. The result: a wafflewich!

    Waffle sandwiches require the extra step of making fresh waffles. Frozen waffles don’t taste anywhere as good.

    To assauge any waffle guilt, check out our recommended whole grain pancake and waffle mixes.

    Don’t miss the recipe for the BLT Wafflewich, below.
     
     
    RECIPE #1: HAM & CHEESE WAFFLEWICH

    When a wafflewich includes cheese, the sandwich is even better if you place it in a panini press to melt a bit.

    Ingredients Per Sandwich

  • 2 waffles, freshly made from a waffle mix or your own recipe*
  • 3 slices ham per sandwich (Andrea prefers hickory honey ham)
  •    
    /home/content/p3pnexwpnas01_data02/07/2891007/html/wp content/uploads/waffle ham and cheese elegantcaterers 230ps
    Enjoy your ham and cheese on a waffle. Photo courtesy Elegant Affairs Caterers.
  • 3 slices cheese per sandwich (Andrea prefers sharp Cheddar; we like Emmental)
  • Mustard
  • Optional: lettuce and tomato
  • Sides: baby carrots or other crudités, coleslaw, pickles†, pickled vegetables, candied jalapeños
  •  
    *For big eaters, you can make a triple decker sandwich (three waffles). If your waffle recipe contains sugar—which is normal for breakfast waffles—cut it back to 1/2 teaspoon or none at all.

    †We added sweet and spicy pickle chips to the sandwich before grilling in the panini press. Check out our article on the best pickles.
     
    Preparation

    1. COOK the waffles in a waffle maker.

    2. PLACE the ham and cheese, lettuce, and tomato between two waffles, with the pickle chips if desired (or, serve the pickles on the side). We added Dijon mustard between the ham and cheese layers.

    3. PLACE the waffle sandwich in a panini press and cook until the cheese is gooey. Remove and serve immediately with the sides.


    /home/content/p3pnexwpnas01_data02/07/2891007/html/wp content/uploads/blt waffle sandwich elegantcaterers

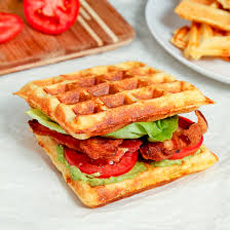
    A twist on the BLT: a BLT Waffle Sandwich. Photo courtesy Elegant Affairs Caterers.


    RECIPE #2: BLT WAFFLEWICH

    You can make this a vegetarian sandwich with Morning Star Bacon Strips or Lightlife Smart Bacon, and/or Baconaise bacon-flavored mayonnaise (one of our favorite mayos). These products get their bacony taste from natural smoke flavor and other seasonings.

    You can also add sliced avocado, chicken, or turkey.

    Ingredients Per Sandwich

  • 3 slices cooked bacon (Andrea prefers hickory smoked bacon)
  • Sliced tomatoes
  • Lettuce (we prefer iceberg or romaine for the crunch)
  • Optional: sliced avocado, chicken or turkey
  • Mayonnaise (we prefer flavored mayonnaise)
  • Optional: long toothpicks (we like these festive cellophane frill toothpicks)
  • Sides: coleslaw or potato salad, chips (corn/tortilla, lentil, vegetable, etc.)
  • Preparation

    1. PILE the bacon, lettuce, tomatoes, and the optional avocado, chicken, or turkey on the bottom waffle. If using iceberg lettuce, we find it helpful to slice it in slabs from the head, so the lettuce will lie flat on the sandwich.

    2. SEASON with salt and pepper as desired.

    3. SPREAD the top waffle with mayonnaise. Place the top on the sandwich and anchor with toothpicks as necessary.

    4. SERVE with sides.


    CHECK OUT WHAT’S HAPPENING ON OUR HOME PAGE, THENIBBLE.COM.


    Comments off

    TIP OF THE DAY: Go Rustic, Make A Crostata Or A Galette

    Before there were pie pans, there were crostatas and galettes. But let’s start with a brief history of pie, to provide some perspective before we get to a delicious crostata/galette recipe.
     
    THE HISTORY OF PIE

    Culinary historians trace the origin of pie to ancient Egypt, where savory fillings were baked in woven reeds as the vessel. A form of flat, free-form pastry, now called a crostata (Italian) or galette (French), evolved, consisting of a crust of ground grain (barley, oats, rye, wheat) and filled with honey.

    The concept was brought to Greece, and then to Rome. Ancient Greeks are believed to have created pie pastry, and the trade of pastry cook was distinguished from that of baker.

    In the millennia before modern bakeware was created, the Romans made an inedible pastry of flour, oil and water to hold meat and poultry as they baked (its main purpose was to keeping in the juices). The Roman Legions brought the technique with them as they forged through Europe.

    It was the use of lard and butter, in northern Europe, that led to a dough that could be rolled out and molded into what became a tasty modern pie crust.

       
    /home/content/p3pnexwpnas01_data02/07/2891007/html/wp content/uploads/pear apple galette waitrose recipe 230

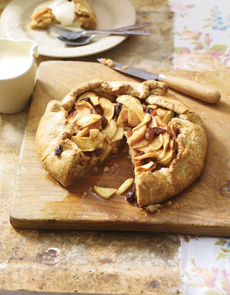
    A galette is sometimes called a rustic tart. Photo of a pear and apple galette courtesy Waitrose.

     
    According to the American Pie Council, “pye” first appears in the written record in England in the 12th century. The crust of the pie was referred to as a “coffyn,” rectangular like its namesake. The walls were thick to hold the shape, and there was more crust than filling. Often, the legs of a fowl were placed to hang outside of the coffyn and used as handles!

    The predecessor of modern cake and pie pans was a metal hoop that was placed on a baking sheet. Ultimately, bakeware was made from tin or pottery. It is believed that the rounded shape rather than square or rectangular, as well as the shallowness of the pan, were devised to create a smaller space in which to stretch limited ingredients.
     
    WHAT IS A CROSTATA OR GALETTE?

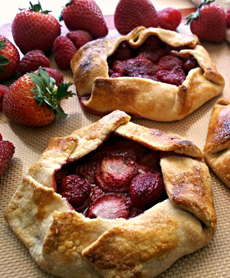
    A crostata or galette was an early way to form a pie crust in the absence of pie pans—and before anyone even realized a pie pan was desirable! The dough was rolled flat, the filling placed in the middle, and the edges turned up and folded (see the photos) to contain the filling. It was used for savory and sweet pies, and could be made free-form or in a rectangle, round or square.

    And, even after the emergence of tin and ceramic pie pans, for poor folk as well as the itinerant, no purchase of a pie pan was needed. This is a pie made without bakeware (well…a baking sheet helps the modern baker, instead of the older practice of using the floor of the oven or fireplace).

    Even today, it is simple to make; and we find it a fun undertaking, uniting us with all of those ancestors who baked without pans. No technique to create an even, fluted crust is necessary. There’s no worry about tearing the dough as you lift it into the pie pan. No one cares if the final result isn’t perfectly round or rectangular: The rusticity is the charm.

    And, the ease of creating a crostata/galette may get you to make pie more often—not just a fruit pie, but savory pies of vegetables, meat, even fish and seafood. Tip: It’s fun to make “leftovers pie,” tossing in everything from pasta, rice or grains to cooked meats and vegetables, cheese, whatever (go on a scavenger hunt through the fridge and pantry).


    /home/content/p3pnexwpnas01_data02/07/2891007/html/wp content/uploads/galette crostada californiastrawberries 230
    Galettes can also be made in individual sizes. Photo courtesy California Strawberry Commission.
     

    RECIPE: FRUIT GALETTE (CROSTATA)

    This recipe below works for any fruit, but for a classic apple galette, this recipe adds cinnamon.

    You can make the dough up to three days in advance.

    Ingredients For The Dough

  • 1-1/3 cups all-purpose flour
  • 1 tablespoon/15 grams sugar
  • ½ teaspoon salt
  • 1 large egg
  • Heavy cream, as needed
  • 1 stick cold unsalted butter, cut into pieces
  • 2 teaspoons lemon juice
  • Optional: ½ teaspoon grated lemon zest
  • Optional: jam in a matching or complementary flavor*
  •  
    *Spreading jam on the bottom of an unbaked crust is a tip that adds a more fruit flavor and some extra sweetness to the pie.

    For The Filling

  • 3 cups fruit of choice, sliced or cubed (berries can be left whole)
  • ½ cup to 3/4 cup sugar, based on the sweetness of the fruit, with 1 tablespoon reserved
  • Pinch of salt
  • Optional: juice and grated zest of 1/2 lemon
  • 3 to 4 tablespoons cornstarch
  •  
    Preparation

    1. MAKE the crust: In a food processor fitted with a steel blade, or in a large bowl, pulse or mix together the flour, sugar and salt. Lightly beat the egg in a measuring cup; then add just enough cream to get to 1/3 cup. Lightly whisk the egg and cream together.

    2. ADD the butter to the flour mixture and pulse, or use a pastry cutter or your fingers to break up the butter into chickpea-size pieces. If using a food processor, do not over-process the dough or it gets tough.

    3. DRIZZLE up to 1/4 cup of the egg mixture over the dough and pulse or stir until it just starts to come together (but is still mostly large crumbs). Mix in the lemon zest.

    4. PLACE the dough on a lightly floured surface and pat it into one uniform piece. Flatten it into a disk, wrap in plastic and chill for 2 hours and up to 3 days. When ready to bake…

    5. PREHEAT the oven to 400°F. Roll the dough into a 12-inch round—or as close to round as is easy for you. Transfer the dough to a rimmed baking sheet lined with parchment paper and chill while preparing the filling.

    6. PREPARE the filling: Toss together the fruit, all but 1 tablespoon of the sugar, the salt, the lemon juice and zest, and the cornstarch. Use more cornstarch for juicy fruits like apples, berries and peaches, and less for drier fruits like figs.

    7. SPREAD the optional jam over the center of the dough circle, then place the fruit in the middle, leaving a border of 1½ to 2 inches (some people like the look of an even higher crust). Gently fold the pastry over the fruit, pleating to hold it in. Brush the pastry with the leftover egg and cream mixture. Sprinkle the reserved tablespoon of sugar on the crust.

    8. BAKE for 35 to 45 minutes, until the filling bubbles up vigorously and the crust is golden. Cool for at least 20 minutes on a wire rack. Serve warm or at room temperature.

    This recipe was adapted from one in the New York Times.


    Comments off


    © Copyright 2005-2026 Lifestyle Direct, Inc. All rights reserved. All images are copyrighted to their respective owners.