THE NIBBLE BLOG: Products, Recipes & Trends In Specialty Foods


Also visit our main website, TheNibble.com.


How To Cook A Perfect Prime Rib

Many families enjoy prime rib for the holidays. At our mother’s house, a bone-in prime rib (a.k.a. standing rib roast) was always on the holiday table.

Jan Birnbaum, Executive Chef at Epic Steak, a steakhouse on the San Francisco waterfront (great view of the Bay Bridge!), shares this advice so that you, too can cook the perfect prime rib.

April 27th is National Prime Rib Day.

> Do you know your cuts of beef? See them all in our Beef Glossary.
 
 
START WITH THE BUTCHER

Frenched

Ask for an 8-bone (approximately 14-18 pounds), bone-in beef rib export*, bones frenched 2 inches. This will serve about 15-20 people. (If you’re having fewer guests, discuss your needs with the butcher.)

Fat Cap

Ask the butcher to cut the fat cap so that it has a half-fat layer that has been cut and lifted, and only the bottom is attached to the rib. This attached fat cap will provide a perfect pocket in which to pack the aromatics.
 
 
INGREDIENTS

Aromatics

Prepare the aromatics: In a mixing bowl, toss the following ingredients until combined:

  • 2 white onions (skinned and cut julienne style)
  • 6 bay leaves (crushed and broken into half-inch pieces)
  • 4 ounces course sea salt
  • 3 ounces coarsely ground black pepper
  •  
     
    PREPARATION

  • SEASON. Lift the fat cap that has been cut from the export with the bottom attached and lay the onion mixture against the flesh. With butchers twine, tie the cap back on, going around the circumference of the rib, in between the bones, or in 4 to 5 places.
  • ROOM TEMPERATURE. Never cook cold meat. Allow the meat to temper on the counter for at least one hour.
  • PREHEAT. Preheat the oven to 500°F. (Put convection ovens on high fan.)
  • ROASTING PAN. Lay the rib on a rack with the bones facing up.
  • SEASONING. Season the outside of the meat bone side with salt and pepper. At THE NIBBLE, we also like a sprinkling of rosemary.
  •  
     
    COOKING THE PRIME RIB

    1. PLACE the meat into the oven with the bones facing front and the meaty part of the rib facing the back of the oven. Cook for 35 minutes.

    2. LOWER HEAT. Turn the oven down to 350°F and cook for 40 more minutes.

    3. TEMPERATURE. Make the temperature of the meat. For accuracy, use a quick read thermometer or digital thermometer and stick the thermometer into the thickest part of the rib.

    4. REMOVE PAN. When the thermometer reads 80°F, remove the rib from the oven and allow it to sit out on the counter and rest for at least 35 minutes.

    5. SLICE. Move the meat to a cutting board and cut the rack of bones as close to the meat as possible to remove them from the rib.

    6. SEPARATE. Separate the rack into 8 individual rib bones, leaving the meat on the end of the bone. Discard the aromatics and cut the fat cap off.

    7. Place the rib onto a roasting pan with a rack with the side of the ribs that had the bones.

    8. VEGGIES. Add washed vegetables to the pan: blanched creamer potatoes, carrots, baby turnips, or another favorite.

    9. OVEN. Return the rib to the 350°F oven and cook until a thermometer reads 115°-125° degrees for medium-rare, 130°-135° degrees for medium, and 145° for medium-well.
     
     
    SERVING THE PRIME RIB

    1. REST. Allow the cooked meat to rest for about 20 minutes.

    2. SLICE. lice the rib into slices of desired thickness. Chef Jan recommends cuts of 1-1.5 inches thick (this will yield a 14-ounce slice and will provide 12-14 cuts.)

    3. SERVE. Plate with some of the vegetables. You can deglaze the pan juices for gravy (“au jus”).
     
     
    ________________

    *The export is butcher lingo for a bone-in prime rib with the cap removed (exported) that is used for a standing rib roast.


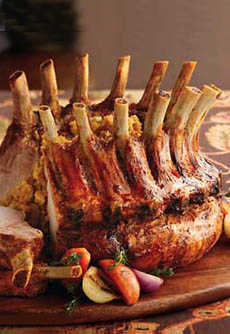
    Prime Rib Roast
    [1] Prime rib, a.k.a. standing rib roast (photo © Allen Brothers).

    Prime Rib Roast Raw
    [2] Ready to go into the oven (photo © Meat N’ Bone).

    Prime Rib Au Jus
    [3] Pouring on the jus (photo © The Mercury Atlanta [permanently closed]).

    Roast Beer Dinner Sliced
    [4] With a baked potato (photo © David Burke Prime).

    Roast Beef & Yorkshire Pudding
    In the U.K., it’s served with Yorkshire Pudding (photo © Gordon Ramsay Group).


    CHECK OUT WHAT’S HAPPENING ON OUR HOME PAGE, THENIBBLE.COM.


    Comments off

    TIP OF THE DAY: Uses For Cheesecloth & Kitchen Twine

    Two things you’ll find in every serious cook’s kitchen: cheesecloth and kitchen twine (a.k.a. butcher’s twine). Chef Johnny Gnall shows you how they make things easier. If you have questions or suggestions for tips, email Chef Johnny.

    While cheesecloth and twine may sound like an ordinary and unremarkable pair of items, they are more versatile then one might think. As with many kitchen tools, it’s all about how you use them.

    Here are my favorite ways to use this indispensable pair. Neither is expensive, so there’s no reason you shouldn’t keep them on hand.

    You can even package a twine dispenser and some cheesecloth as a gift for a budding cook.


    We store our kitchen twine neatly in this dispenser. Photo courtesy RSVP.
     
    WAYS TO USE BOTH CHEESECLOTH & TWINE TOGETHER

    Breathable Storage

    You can use cheesecloth and butcher’s twine to wrap and secure meat or produce that will benefit from air circulation in the fridge. The cheesecloth keeps the food protected but allows it to breathe, even if wrapped tightly. The food may still susceptible to bacteria, so take care to store it properly and cook it to the proper temperature.

    Hang Steaming

    You can steam vegetables in any large stockpot, without a steamer insert. Bundle the veggies in a thin layer of cheesecloth and tie with twine to secure; then fill the stockpot a third of the way with water and set it to boil. Hang the bundle of veggies over the boiling water using a long skewer or slotted spoon laid across the top of the pot. Cover (it’s okay if you don’t create a perfect seal) and steam to desired tenderness.

    Long-Term Draining

    If you’re trying to drain something for a number of hours (e.g. overnight, like yogurt), leaving it in the sink isn’t always convenient. Instead, place the item in a bundle of cheesecloth, tie it securely with kitchen twine, and hang it over a bowl somewhere out of the way. Just make sure to use a bowl big enough that the drainage won’t spill over.


    Cheesecloth, a very fine weave originally developed to drain the water in cheese making. Photo courtesy Norpro.
     

    Poultry Stuffing

    Scooping the stuffing from a roast bird is no the neatest task. You can fix that by bundling the stuffing in cheesecloth. Once it’s tied up and secure, push the cheesecloth pouch into the bird and cook as normal. Removing the stuffing takes mere seconds. You can also us this trick if you’re simply stuffing the bird with aromatics.

    Sachet

    It’s easy to infuse flavor into whatever you’re cooking: A sachet is one of my favorite things to make when poaching or braising. Simply pile your favorite aromatics (herbs, garlic, bay leaf, cinnamon stick, whatever) in the middle of a small piece of cheesecloth, gather the cloth together like a hobo stick, and tie with a piece of kitchen twine. Remove and toss when the cooking is finished.

     
    Sugar Dusting Pouch

    Bundle up a half cup or so of confectioners’ sugar in a small amount of cheesecloth, tie with butcher’s twine, and drop into a glass or mug. Then, when you want a nice, even dusting of powdered sugar, just shake the pouch lightly over your pastry or dessert.

    WAYS TO USE CHEESECLOTH

    Basting

    You can soak several layers of cheesecloth in wine, broth or any other flavorful liquid (even butter if you’re feeling naughty); then lay them over any bird or beast you plan to roast. The cheesecloth will help the roast to self-baste and stay moist. Keep an eye on it though, as you may want to rehydrate it depending on how long things are in the oven.

    Making Greek Yogurt

    Simply spread a cheesecloth over a colander and fill with plain yogurt. Refrigerate overnight, then press. It’s that easy to make Greek-style yogurt.

    Straining

    You can use one or more layers of cheesecloth to strain stocks and broths, keeping unwanted debris out. Using several layers will allow you to catch even the tiniest bits, and sometimes a cheesecloth can fit more comfortably over a receptacle than your own metal strainer.
    Find cheesecloth in any kitchen gadgets department or online.

    WAYS TO USE KITCHEN TWINE

    Trussing

    This one is the obvious no-brainer, and the first reason to buy kitchen twine. Remember when trussing, that form is far more important than function. It doesn’t how matter how pretty your trussing is; the objective is to hold your roast together so the meat cooks evenly.
    TWINE TIP: Put your twine in a twine dispenser for neat dispensing.
      

    Comments off

    TIP OF THE DAY: Homemade Pizza Dough

    Pizza is one of our favorite foods. When we make it at home, we typically purchase a crust and add our favorite ingredients.

    Then we received a pizza dough recipe from from Bruno diFabio, whose pizza was just awarded the grand prize, Best Pizza, in the Worldwide Pizza Championship.*

    DiFabio is now a six-time winner as the best—and also the fastest—pizza maker in the world.

    You don’t have to be fast to try your hand at his excellent dough. Check out the recipe below—but don’t plan on enjoying it today. The dough has to sit for 15-18 hours; then each dough ball must be kept in its own container, refrigerated and covered, for 3-4 days before using.

    Try it and see if this recipe—the best dough in the world—is worth the time.

    Find more of our favorite pizza recipes.


    Pizza dough, waiting to be rolled and baked. Photo by Mariha Kitchen | IST.

    WORLD CHAMPION PIZZA DOUGH RECIPE

    Ingredients: Phase 1

  • 1-1/2 teaspoons dry yeast
  • 2 ounces warm water (exactly 97°F)
  • 2 cups of water (room temperature or cool)
  • 2.2 pounds high-gluten flour (not all-purpose)
  •  
    Preparation: Phase 1

    1. ADD the dry yeast to the warm water. Stir slightly. Let stand for 2-3 minutes.

    2. ADD the 2 cups of water and the yeast water to a large mixing bowl.

    3. ADD the flour and mix only until the ingredients are blended. The mix will feel slightly dry and lumpy; this is OK.

    4. COVER the bowl with a dish towel or cheesecloth.

    5. LET STAND for 15-18 hours at room temperature. The dough will triple in size and give off an amazing aroma. This pre-fermented dough is called a biga.


    Ready to bake! Photo courtesy Ré Napoli,
    Providence, Rhode Island.
      Ingredients: Phase 2

  • 2.2 pounds high-gluten flour 2 cups water (49°F)
  • 1/2 teaspoon sugar
  • 3/4 teaspoon. sea salt
  • 1.5 grams olive oil (by weight, not converted to ounces)
  •  
    Preparation: Phase 2

    1. UNCOVER the biga and add half the flour and all the water. Mix until all ingredients are incorporated.

    2. ADD sugar and mix until incorporated.

    3. ADD salt and mix until incorporated.

    4. ADD olive oil and mix until incorporated.


    5. ADD the rest of the flour and mix until incorporated.

    6. REST the biga for 10 minutes, covered. This should yield about 5 pounds of dough.

    7. DIVIDE the dough into sections of about a pound each and roll them into balls. Each ball will roll out into a 13″ pizza. If you have more dough than you can use, you can freeze the balls, wrapped tightly.

    TO MAKE THE PIZZA

    1. PREBAKE the dough: Grease a 12-inch pan or large baking sheet. Sprinkle with cornmeal (optional).

    2. ROLL the dough on a lightly floured surface (the counter top is fine) roll the dough into a 13-inch circle. Transfer to the baking sheet.

    3. BAKE in a 425°F oven about 12 minutes or until browned.

    4. REMOVE from oven; add sauce and toppings.

    5. BAKE 10 to 15 minutes more or until bubbly.
    Find more of our favorite pizza recipes.
    *The World Pizza Championship is held annually in the town of Salsomaggiore Terme, in the province of Parma, Italy. oThe organizer is the Italian magazine Pizza e Pasta Italiana.


    Comments off

    TIP OF THE DAY: Uses For Cardamom


    Green cardamom. Photo courtesy Suvir
    Saran | Indian Home Cooking.

      Cardamom, a member of the ginger family (Zingiberaceae), is a highly aromatic and flavorful spice from from a plant native to India and its northern neighbors, Bhutan and Nepal. The name derives from the Latin cardamomum and the Greek kardamon, which referred to a particular Indian spice plant.

    The shell of the pod has very little flavor. The small seeds inside are intense in both aroma and taste. You can buy cardamom whole (pods), shelled or ground, in black, green and white varieties.

    If a recipe simply calls for “cardamom,” use the green variety, which has exotic floral notes. Black cardamom (actually brown in color) is stronger, smokey and resinous. White cardamom, preferred in Scandinavia, is green cardamom that has been sun-bleached for aesthetics; there is no difference in flavor.

    Cardamom, often seen as an exotic spice in the U.S., is popular in numerous cuisines worldwide.

  • In India, both green and black cardamom are important ingredients in meat and vegetable dishes.
  • In Africa, black cardamom is a staple spice.
  • In the Middle East, green cardamom seeds are mixed with coffee beans for a tastier brew.
  • In Scandinavia, white cardamom is added to sausage and baked goods: breads and buns, cakes, cookies, muffins and stollen.
  •  
    HOW TO STORE CARDAMOM

    Store cardamom pods in a tightly sealed glass jar, away from heat and light. They can keep indefinitely.

    WAYS TO USE CARDAMOM

    If you have cardamom sitting in the cupboard, it’s time to break it out. The spice fits into any recipe that calls for allspice, cinnamon, cumin, ginger, mace, nutmeg, preserved lemon or rose. Start by adding a pinch, then more to suit your taste. Beyond curries and other international dishes, use cardamom in:

  • Baking—everything from apple cake, brownies, cookies (cinnamon, chocolate chip, ginger, oatmeal, sugar) and cinnamon rolls to pound cake, shortbread and spice cake
  • Beverages: chai, coffee (add a pinch to the ground beans or add pods to a French press) mulled cider and wine, smoothies/lassi (especially mango)
  • Granola
  • Ice cream: start with chocolate and vanilla, then make lemon-cardamom
  • Lentil dishes
  • Marinade
  • Ground meat: burgers, meatballs, meat loaf
  • Pancakes
  • Fruit: compote, fruit soup, poached fruit
  • Pudding: bread pudding, custard, panna cotta, rice pudding
  • Preserved lemons
  • Rice: pilaf or plain rice (simply toss pods into the cooking water)
  • Yogurt: coffee, plain, vanilla
  •  
    FOOD TRIVIA

    Cardamom is the world’s third most expensive spice by weight, following saffron and vanilla. But in most cases, just a pinch is needed.

    As with many spices, cardamom also has health benefits, which range from improving digestion to increasing one’s metabolism.

    FEEL LIKE BAKING?

    Make this cardamom cookie recipe from Martha Stewart.
     
    Find more of our favorite spices in our Salts & Spices Section.


    Comments off

    RECIPE: Mistletoe Margarita, A Christmas & New Year’s Margarita Cocktail

    The mistletoe plant has ovoid green leaves with small white berries. Why is it associated with Christmas? Here’s one explanation:

    The Druids of Britain (think Stonehenge), circa 100 C.E., thought that mistletoe had magic properties: a cure for disease, a fertility aid, protection from witches and so forth. In a special ceremony held in late December or early January, priests would cut pieces of mistletoe from oak trees* and people would hang them in their homes.

    Over the centuries, the custom of hanging mistletoe at home endured, and around 800 C.E. it may have become joined with a Viking legend.

    In that legend, the god Balder is killed with a poison made from mistletoe (mistletoe is, in fact, poisonous). He is brought back to life by his mother, the goddess Frigga, who is able to reverse the effects of the poison.

    Overjoyed, Frigga then kisses everyone who walks under the hanging mistletoe. Fast forward another 13 centuries: We’re still kissing people under the mistletoe.\

    You can simulate mistletoe in a cocktail with a few mint leaves; but never let real mistletoe anywhere near edibles if you want to avoid acute gastrointestinal problems.


    Enjoy a Mistletoe Margarita—just don’t use real mistletoe! Photo courtesy Hornitos Tequila.

     
    _________________
    *Mistletoe is a parasitic plant. It grows attached to the branches of a tree or shrub, from which it absorbs nutrients.
    _________________
     
     
    RECIPE: CHRISTMAS MARGARITA/MISTLETOE MARGARITA

    Ingredients Per Drink

  • 1-1/2 parts Tequila
  • 2 parts pomegranate juice
  • 1/2 part sour mix (see discussion and recipe below)
  • 1/2 part triple sec
  • 1 squeeze fresh lime
  • Mint or sage leaves for garnish (sage leaves more closely resemble mistletoe)
  • Optional: 1/2 part grenadine for more intense color
  • Optional: sugar and lime wedges for rim
  • Optional garnish: pomegranate arils or two cranberries
  •  


    Why buy artificially colored, artificially
    flavored, HFCS- and preservative-laden sour
    mix, when you can make your own from
    simple, honest ingredients?†
     

    Preparation

    1. COMBINE all ingredients except garnishes and sugar in a pitcher. Chill.

    2. RIM the glass with sugar before pouring in the cocktail: Simply run a lime wedge around the edge of the glass and then dip the rim of the glass in a plate of sugar.

    2. POUR and garnish each glass with 2 mint leaves and/or other garnishes. Serve on the rocks or straight up.
     
    Find more of our favorite Christmas cocktails.
    WHAT YOU NEED TO KNOW ABOUT SOUR MIX

    That specialty product called sour mix—also called Margarita mix, sweet-and-sour mix and whiskey sour mix—is simply a lemon/lime flavored simple syrup (also called cane sugar syrup), a sweetener that dissolves easily in cold beverages.

    Simple syrup can be flavored. When it is citrus flavored, it is called sour mix or sweet and sour mix—sweet from the sugar, sour from the citrus.

    Commercial products abound; but as with many prepared foods, you can make a better, less expensive version by just using sugar, water and citrus juice.

    In fact, if you mix up your fair share of cocktails, you should always have some simple syrup at the ready. When you need sour mix, just stir in the citrus juice.


    HOW TO MAKE SIMPLE SYRUP & SOUR MIX

  • To make simple syrup, mix one part sugar and one part water, stirring over a low heat until the sugar dissolves, about five minutes. If you like things less sweet, use 2:1 water: sugar instead of 1:1.
  • You can use warm or lukewarm water and shake it in a jar for a “no cook” recipe.
  • Store simple syrup at room temperature in a repurposed jar, wine bottle or other tightly-capped container that is pour-friendly.
  • Add citrus juice to make sour mix: 1 cup of juice per cup of water. Half lemon, half lime is conventional; but if you have a passion for one over the other, you can use it exclusively. If you like to experiment with flavors, make grapefruit or yuzu simple syrup; or experiment with different varieties of lemons and limes.
  • Fresh sour mix will keep in the fridge for two weeks or longer (we’ve kept it for months). Simple sugar doesn’t need refrigeration, but once you add the citrus juice, it needs to be preserved.
  • LOW CARB/SUGAR-FREE OPTION: Juice 6 large lemons and 6 large limes; mix juice with 3 cups Splenda and 6 cups water.
  •  

    †You’ve seen the three ingredients of natural sour mix in the recipe above. Here’s what’s in a commercial brand like Mrs. T’s: water, high fructose corn syrup, citric acid, sodium citrate, sodium hexametaphosphate, gum acacia, potassium sorbate (preservative), polysorbate 60, natural flavor, ester gum, sodium metabisulfite (preservative), calcium disodium EDTA (preservative), calcium lactate, calcium gluconate, yellow color 5, yellow color 6.


    Comments off

    The Nibble Webzine Of Food Adventures
    RSS
    Follow by Email


    © Copyright 2005-2024 Lifestyle Direct, Inc. All rights reserved. All images are copyrighted to their respective owners.