THE NIBBLE BLOG: Products, Recipes & Trends In Specialty Foods


Also visit our main website, TheNibble.com.

TIP OF THE DAY: Homemade Granola Bars

Granola Bars
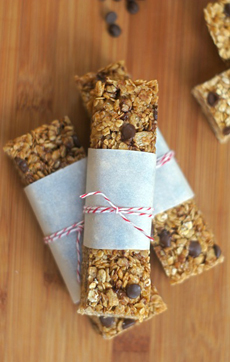
[1] No-bake chocolate chip granola bars from Fearless Homemaker. Here’s the recipe (photo © Fearless Homemaker).

Chocolate Cherry Granola Bars
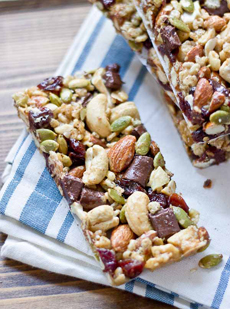
[2] Cherry, chocolate and cashew granola bars from Love And Zest. Here’s the recipe (photo © Love And Zest).

A round carton of Quaker Old Fashioned Oats
[3] Use Old Fashioned Oats, not quick oats, for granola bar recipes (photo © Quaker Oats).


It’s National Granola Bar Day. Even if you’re happy with the bars you buy, it’s the day to make your own custom recipe (ours is dark chocolate chunks, dried cherries and pistachio nuts, sometimes with a bit of coconut).

A delicious recipe and history of granola bars follow.

Elsewhere on The Nibble:

> The year’s 90 snack holidays.

> The year’s 14 cereal holidays.
 
 
HISTORY OF THE GRANOLA BAR

Here’s the history of granola breakfast cereal, which was invented in the 19th century by Dr. James Caleb Jackson for his sanitarium patients. It was the first dry breakfast cereal, and the first to be eaten cold.

He actually invented “granula.” In 1881, Dr. John Harvey Kellogg, proprietor of another sanitarium, copied his recipe; when Jackson brought a lawsuit, Kellogg changed the name of his product to granola.

Granola bars did not appear until much later, as a better-for-you snack. Most sources credit Stanley Mason (1921-2006) as the innovator. Mason was a tireless inventor. His more than 100 inventions also included the squeezable ketchup bottle, dental floss dispensers and disposable diapers.

He invented the granola bar in the 1970s by pressing loose granola to create a bar. This claim is disputed by Henry Kimball, who has a copy of a letter he allegedly sent in 1975 to an organization called the Idea Marketplace describing his granola bar invention [source].

Granola bars are dense, chewy cereal bars made from granola ingredients—oats, honey and inclusions like dried fruits and nuts. These days, chocolate baking chips, peanut butter and other ingredients not imagined by either Jackson or Mason, are often added.

Beyond the U.S., the granola bar goes by different names. It’s known as a flapjack in the U.K and Ireland, a muesli bar or cereal bar in Australia and New Zealand.

There are no “wrong” additions to a granola bar, although M&Ms and marshmallows seem to defeat the purpose of a nutritious snack. Here’s a basic recipe:
 
 
RECIPE: GRANOLA BARS

Ingredients

  • 2 cups old-fashioned rolled oats (not quick oats)
  • 1/2 cup raw sunflower seeds (or a mix of other seeds)
  • 1/2 cup chopped nuts of choice (a mixture is fine)
  • 1/2 cup wheat germ, oat bran or ground flaxseed*
  • 1/4 cup honey or maple syrup
  • 2 tablespoons dark brown sugar
  • 3 tablespoons unsalted butter (or canola oil), melted, plus extra to grease the pan
  • 1 teaspoon vanilla extract
  • 1/4 teaspoon salt (omit if using salted nuts)
  • Optional: 1/2 teaspoon cinnamon
  • 2 cups dried fruit in any combination (a list follows)
  •  
    _________________

    *If you don’t like these ingredients, use more oats. For gluten-free bars, use gluten-free rolled oats.


    Dried Fruit Options

  • Apricots, chopped
  • Blueberries
  • Cherries
  • Coconut, shredded or flaked
  • Currants
  • Cranberries
  • Dates, chopped
  • Figs, chopped
  • Raisins and/or sultanas
  • Tropical dried fruits: mango, papaya, pineapple
  •  
    More Ingredients

  • Candied ginger, diced
  • Chocolate chips
  • Nuts, in any combination
  • Peanut butter or other nut butter
  • Rice Krispies
  • Seeds, any kind or mixture
  • Spices: gingerbread spices, orange zest, pumpkin pie spices
  •  
    Preparation

    1. PREHEAT the oven to 350°F. Butter a 9 x 9-inch baking pan and line with parchment paper or foil, leaving “handles” on two sides for lifting. Set aside.

    2. COMBINE the oats, seeds and nuts and spread onto a rimmed sheet pan. Bake for 10 to 12 minutes, stirring occasionally, until lightly browned. Remove from the oven, transfer to a large mixing bowl and stir in the wheat germ. Reduce the oven temperature to 300°F.

    3. STIR in the honey, brown sugar, butter, vanilla, cinnamon and salt in a saucepan; stir until the sugar is dissolved. Pour over the oat mixture, toss until the mixture is well coated, then add the dried fruit.

      Coconut Cranberry Granola Bar
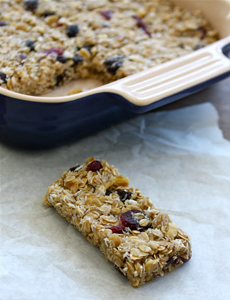
    [4] Coconut cranberry raisin granola bars from Bella Baker. Here’s the recipe (photo © Bella Baker).

    Apple Pie Granola Bars
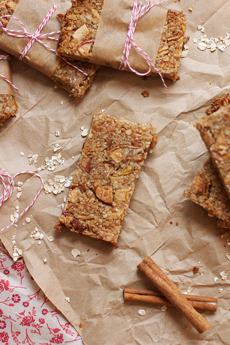
    [5] Apple pie granola bars from The Baker Chick. Here’s the recipe (photo © The Baker Chick).

     
    4. POUR the mixture into the prepared baking pan and press down on it, tamping it as tightly as possible with a rubber spatula or other implement. Bake for 20-25 minutes, until the granola is golden brown. (The longer it bakes, the harder the bars.)

    5. COOL for 2 hours before slicing into bars. Use a serrated knife. Store in an airtight container at room temperature for a week, using parchment or wax paper to keep the bars from sticking. You can also freezer them for up to 6 months.


    CHECK OUT WHAT’S HAPPENING ON OUR HOME PAGE, THENIBBLE.COM.


    Comments off

    TIP OF THE DAY: Ingredients For Exciting Winter Salads

    Green Salad With Apples & Pecans

    Shaved Brussels Sprouts Salad

    Green Salad With Edamame

    thai-celery-salad-with-peanuts-bonappetit-230
    Top: Mixed greens with apples and pecans.
    Second: Shaved Brussels sprouts,
    watermelon radishes on greens, topped with
    feta from Good Eggs. Third: Edamame, diced
    red bell pepper and black beans top greens
    at Betty Crocker. Bottom: Thai celery salad
    with sliced hot chiles and peanuts. Photo
    courtesy Bon Appetit.

      Over the weekend we had the occasion to meet friends for two different restaurant meals. At both, the side salad we ordered was boring: monotonously green with no contrast, but for dull croutons on one and a crown of thin-sliced red onions on the other.

    These were not free salads; they were overpriced sides. When we mentioned our disappointment to the servers, both mentioned the “limited selection” in winter.

    Limited choices, NO. Lack of imagination or sheer laziness, YES.

    There’s just as much opportunity to pack green salads with color and texture as any other time of the year.

    It’s just as easy to balance the flavors and textures with something bright-colored, something crunchy, something tangy, something peppery and something sweet.

    It doesn’t take a lot of effort to sprinkle with colorful, crunchy pomegranate seeds or some mandarin segments.

    And it doesn’t have to cost more: Use pricier ingredients sparingly and they’ll still add interest.

    Here’s how to add interest to winter salads while Mother Nature is taking a nap.

  • Plan for something crunchy, something colorful and something sweet in each salad.
  • Incorporate two colors besides green—red cherry tomatoes and orange bell peppers, for example.
  • Any salad can be turned into a lunch or dinner main when topped with a protein.
  • Don’t overlook your leftovers, from beans to grains and pasta. Toss them in!
  •  
    START HERE TO BUILD YOUR WINTER SALAD

    Pick something from each group, and no one will find your salads boring.

    Salad Greens: Beyond Everyday Lettuce

  • Arugula
  • Baby spinach
  • Bell pepper
  • Cabbage (especially Savoy cabbage)
  • Endive
  • Frisée
  • Kale
  • Lettuce, beyond iceberg and romaine
  • Watercress
  •  
    Other Vegetables

  • Beets
  • Brussels sprouts, shaved
  • Carrots
  • Cauliflower
  • Celery
  • Celery root
  • Cherry or grape tomatoes
  • Fennel
  • Hearts of palm
  • Onion
  • Pickled vegetbles
  • Pimento
  • Mushrooms, raw or marinated
  • Radicchio or red endive
  • Radishes
  • Red cabbage
  • Squash, roasted and diced
  • Sundried tomatoes
  • Turnip, shaved
  • Water chestnuts
  •  
    As you go up and down the produce aisles, look for other ingredients you’d like to try, whether as a principal ingredient or an accent.


    A Touch Of Fruit

    You don’t have to add fruit to every green salad, although most people will enjoy the touch of sweetness.

    Diced, sliced or segmented, you’ve got great choices:

  • Apple
  • Citrus: kumquat, mandarin, orange, pink or red grapefruit
  • Dried fruits: apricots, blueberries, cherries, cranberries, figs, raisins, dates
  • Grapes
  • Pear, Asian pear
  • Persimmons
  •  
    Garnishes

  • Cheese: crumbled, shaved, shredded
  • Chiles
  • Corn kernels
  • Fresh herbs: basil, cilantro, dill, parsley
  • Nuts, toasted or candied
  • Pomegranate arils
  • Seeds
  •  
    Plus A Touch Of…

  • Anchovies
  • Bacon
  • Beans
  • Baby potatoes or sunchokes
  • Capers
  • Croutons
  • Grains
  • Preserved lemons
  • Olives
  •  
    For The Dressing

    We’re fans of vinaigrettes rather than heavier dressings (although we do have a weakness for a great blue cheese dressing).

    Vinaigrettes are lighter, lower in calories (in that you use less), and most importantly, offer so much variety in terms of which oils and which vinegars you use.

      Arugula & Quinoa Salad

    Arugula & Burrata Salad

    Spinach Salad, Apples, Beets
    Top: Quinoa, arugula, red onion and sundried tomato at California Pizza Kitchen. Second: Mesclun and burrata atop beets, garnished with cherry tomatoes and a jumbo garlic crouton, at Duplex On Third. Third: Spinach salad with apples, beets and sliced almonds from Butterball.

    Anyone can mix three parts of oil with one part of acid. Take a look at:

  • Flavored oils
  • Nut oils
  • Flavored vinegars and balsamic vinegar
  • Herb-infused vinaigrette
  • Layered viniagrettes: add Dijon mustard, fresh lemon or lime juice, honey, horseradish or wasabi, orange juice, maple syrup
  •  
    These options should keep you busy…until the spring veggies arrive, and beyond.


    Comments off

    TIP OF THE DAY: How To Chop Herbs

    Chopping Parsley

    Fresh Cilantro
    Top: Be sure that herbs are absolutely dry
    before you chop them. Photo courtesy
    Williams-Sonoma. Bottom: Remove the
    woody stems but keep the green portions.
    Photo of cilantro courtesy Good Eggs | San
    Francisco.

      Fresh herbs are the avenue to adding a big punch of flavor with few calories to most dishes.

    The emphasis is on fresh. While dried herb are a fine stand-by, they don’t deliver the same flavor—and the flavor fades as they age. First…

    THE DIFFERENCE BETWEEN HERBS & SPICES

    These two terms are often used interchangeably, but that’s inaccurate. There are important differences.

  • Herbs are the leaves of a plant (although stems may also be used). They grow in any climate warm enough to grow vegetables.
  • Spices are from the seeds, roots, fruit or bark, and typically used in dried form. Most originate in tropical or semi-tropical regions.
  •  
    It’s possible for one plant to contain both herb and spice. For example:

  • Cilantro, an herb, is the leaf of the coriander plant; the seeds of the plant, coriander, are a spice.
  • Dill weed, an herb, and dill seed, a spice, come from the same plant.
  •  
    SWEET & SAVORY HERBS

    Most herbs can be used in savory dishes. Think dill, garlic, thyme, oregano, parsley. In addition, there are the so-called sweet herbs, that can be used in both savory and sweet dishes:

  • Chamomile
  • Lavender
  • Lemon Verbena
  • Licorice
  • Mint
  • Rose Geranium
  • Tarragon
  •  
    There are other sweet herb not often found in the U.S., such as sweet cicely (British myrrh). Stevia, an herb, delivers sweetness in addition to licorice notes.
     
    HOW TO CHOP FRESH HERBS

    Here’s what you should know before you grab a sharp chef’s knife and the cutting board:

    1. Be sure the washed herbs are fully dry.

    If they’re just a bit damp, they’ll get mushy when you chop them.

  • While you can use paper towels to pat them dry, the best course is to wash them in advance of when you need them—even a half hour in advance—and let them dry naturally.
  • Don’t have time to let them dry? Gout the hair dryer! No kidding: We’ve done this more than once with big, damp bunches of parsley.
  •  
    Next up: Different herbs require different chopping techniques.


    2. Herbs with edible stems.

    When you throw away the slender stems of herbs like cilantro, dill and parsley, you’re throwing away money. They are just as edible as the leaves.

  • Trim the bottom part of the stems, including any thick portion. If you don’t want to use them in the particular recipe, freeze them for later use in soups, stocks, stir-frys, pestos, minced into plate garnishes, etc. The stems freeze well; delicate leaves, less so.
  • Then, simply chop the stems along with the leaves. Don’t spend any time pulling the leaves off the stems!
  • Green stems from any herb can be cut fine or tossed into anything you’re cooking.
  • Use them in the same way you use bay leaf: When the food is cooked, remove and discard them. Use a spice ball if you like. They are a great addition to sauces, soups and even stir-frys.
  •  
    3. Herbs with big leaves and woody stems.


    Herb Keeper
    You don’t need an herb keeper. To make fresh herbs last longer, use a water glass instead. Add the herbs and cover the glass with a plastic bag.

     
    Big-leaf herbs like basil, mint and sage require a different technique.

  • Start by pulling the leaves from the woody stems.
  • Tear them into pieces, or make a chiffonade: Stack the leaves, roll them into a tight bundle and slice crosswise with a sharp knife.
  • Here’s more on how to chiffonade, plus a video from Le Cordon Bleu.
  •  
    3. Herbs with small leaves and woody stems.

    This group includes oregano, rosemary, tarragon and thyme. The leaves need to be stripped from the stems, but the stems are too woody to use.

  • The “hand technique” includes holding a single sprig at the top, pinching the stem with two fingers, and quickly running your fingers down the stem to remove all the leaves.
  • We prefer to use an herb stripping tool. It’s inexpensive and doesn’t take up much room in the gadget drawer.
  • Check your kitchen scissors; they may have an herb stripper built in to the center section.
  • These are small leaves and easy to chop or mince to desired size.
  •  
    4. Chopping or mincing chives.

    Chives, long and stem-free, are in their own category.

  • If you’re good with a knife you can simply slice them horizontally.
  • For us, it’s faster and neater to use our kitchen scissors.
  •  

    HOW TO STORE FRESH HERBS

    You don’t need an “herb keeper” to store herbs. Simply fill a tall glass with a few inches of fresh water, insert the herbs and cover with a plastic produce bag.

    It’s that easy!


    Comments off


    © Copyright 2005-2026 Lifestyle Direct, Inc. All rights reserved. All images are copyrighted to their respective owners.