|
February 21st is National Sticky Bun Day. Sticky buns and cinnamon rolls were the biggest treat of our childhood breakfasts: Better than waffles or pancakes.
The Horn & Hardart Automat, Americas’s first fast food chain, had such popular items that customers clamored to take them home. They set up a retail arm to package and sell some of them in retail stores.
Our family devoured many boxes of the honey buns. Today, they’d be called pecan sticky buns.
Below:
> Cinnamon buns, honey buns, and sticky buns: the difference.
> Recipe: The easiest way to make cinnamon buns is an overnight cinnamon bun casserole.
> The difference between rolls and buns.
> Recipe: overnight blueberry muffin casserole.
> The history of sticky buns.
Elsewhere on The Nibble:
> The year’s 116 breakfast holidays.
CINNAMON BUNS VS. STICKY BUNS: THE DIFFERENCE
The terms are often used interchangeably, but there are two categories of sweet yeast buns: cinnamon buns and honey (now called sticky) buns. Other terms include cinnamon rolls, cinnamon swirls, honey buns, and sticky buns, among others (cinnamon pecan rolls, e.g.).
All are made with a cinnamon swirl inside; they may have raisins as well.
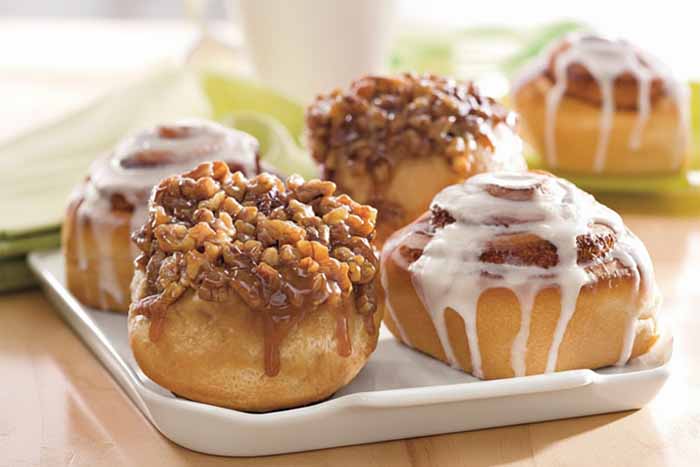
But a honey bun or sticky bun needs to have a sticky topping: caramel, honey, maple syrup, or sugar syrup. These typically have a garnish of nuts. Those topped with white icing fall into the cinnamon bun category.
See a comparison of the two in photo #7, below.
Only the sticky bun has its own holiday.
Now: What if you could bake a pan of sticky buns or cinnamon buns with ease, and bring them to the table warm and fragrant?
If this sounds like your kind of good time, McCormick has created the easiest recipe, an “overnight” casserole. But below we have recipes for:
Overnight Cinnamon Rolls Casserole
Overnight Lemon Blueberry Muffin Casserole
THE EASIEST WAY TO MAKE “CINNAMON BUNS”
Mix five ingredients together the night before—bread, milk, cinnamon, and vanilla—just 10 minutes of prep time.
The next morning, just bake the casserole for 25 minutes until golden brown. It then gets a drizzle of cream cheese frosting: 30 minutes total.
We served it yesterday, and a very good time was had by all—with some leftover for today.
While the recipe is a casserole, you slice it into square, bun-size pieces. The difference:
Conventional buns are individually shaped and then baked together side-by-side in a pan, and then pulled apart.
The casserole has bread cubes like a bread pudding. It bakes as a whole and is then cut into pieces.
RECIPE #1: OVERNIGHT CINNAMON ROLLS CASSEROLE
Ingredients For 12 Servings
12 eggs
1-1/2 cups plus 3 tablespoons milk, divided
2 tablespoons ground cinnamon, divided
5 teaspoons pure vanilla extract, divided
1/4 teaspoon baking powder
1 loaf brioche or challah bread, cubed
1/4 cup butter, melted
Cooking spray
1/4 cup firmly packed brown sugar
1/2 cup whipped cream cheese
3 tablespoons confectioners sugar
Preparation
|
|

[1] and [2] Overnight Cinnamon Roll Casserole. See the process step by step, from Gimme Some Oven (photos #1 and #2 © Gimme Some Oven).
[2] You can also serve the casserole as a dessert, with vanilla or cinnamon ice cream. You can even add a sprinkle of Grand Marnier.
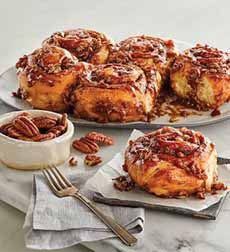
[3] Sticky buns have a honey or other sticky topping, with chopped nuts. You can get them from Wolferman’s (photo © Wolferman’s).
[4] Conventional: A pan of cinnamon buns with their conventional glaze. Here’s the recipe from The Baker Chick (photo © The Baker Chick).
|
1. WHISK the eggs, 1-1/2 cups of the milk, 1 tablespoon of the cinnamon, 3 teaspoons of the vanilla, and the baking powder in a large bowl until well blended. Add the bread cubes and toss to coat well.
2. GENTLY POUR into a 13″ x 9″ baking dish, sprayed with no-stick cooking spray. Cover and refrigerate for at least 4 hours or overnight.
3. PREHEAT the oven to 350°F. Remove casserole from the refrigerator. Mix the melted butter, brown sugar, and remaining 1 tablespoon of cinnamon in a small bowl until well blended. Drizzle the over casserole. Let stand 10 to 15 minutes.
4. BAKE for 20 to 25 minutes or until golden brown. Meanwhile…
5. MAKE the cream cheese topping. Mix the cream cheese, confectioners sugar, and remaining 2 teaspoons of vanilla in a small bowl until smooth. Slowly stir in the remaining 3 tablespoons of milk.
6. REMOVE the casserole from the oven and let stand for 5 minutes. Drizzle over the casserole before serving.
ROLL OR BUN: THE DIFFERENCE
There are many Standards Of Identity defined by the USDA and the FDA, but buns and rolls are not among them.
Thus, there is no official answer. According to the American Institute of Baking:
A roll is usually a hard-crusted small bread, such as French rolls and Kaiser-rolls. However, some hard-crusted individual breads are soft, like hot dog rolls.
A roll can also contain a filling, such as cinnamon rolls (which, in many areas, are sold as cinnamon buns) and Danish rolls.
A bun is generally more bread-like in shape (round or elongated) and soft. It typically does not contain a filling. An exception to this is hot-cross buns.
So the answer is, there is no answer. Historic, regional, and family traditions often determine what is a bun and what is a roll.
You may buy hot dog and hamburger rolls, for example; we buy buns.
|
|
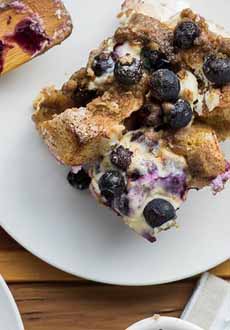
[5] Lemon Blueberry Muffin Casserole (photo © McCormick).
[6] A conventional blueberry muffin (here’s the recipe from Unwritten Recipes).
|
|
RECIPE #2: OVERNIGHT LEMON BLUEBERRY MUFFIN CASSEROLE
If you prefer blueberry muffins to cinnamon buns, McCormick adapted the muffin concept as well.
Prep time is 15 minutes the night before, and cook time is 30 minutes.
Ingredients For 12 Servings
For The Streusel Topping
1/2 cup firmly packed light brown sugar
1/2 cup flour
2 teaspoons ground cinnamon
1/4 cup (1/2 stick) cold butter, cut into chunks
For The Casserole
6 eggs
1 cup plus 2 tablespoons milk, divided
1/4 cup plus 2 tablespoons granulated sugar, divided
1 teaspoon ground cinnamon
1 loaf French or Italian bread, cut into 1-inch cubes (about 8 cups)
Cooking spray
1 package (8 ounces) cream cheese, softened
1 tablespoon pure lemon extract*
2 cups blueberries, divided
Preparation
1. MAKE the streusel: Mix the brown sugar, flour, and cinnamon in a medium bowl. Cover and set aside until ready to assemble in the morning.
2. MAKE the casserole: Whisk together the eggs, 1 cup of the milk, 1/4 cup of the granulated sugar and the cinnamon in a large bowl until well blended. Add bread cubes and toss gently to coat.
|
3. POUR evenly into 13″ x 9″ baking dish sprayed with no-stick cooking spray.
4. MIX the cream cheese, the remaining 2 tablespoons each of milk and sugar, and the lemon extract in a medium bowl, until well blended. Gently stir in 1 cup of the blueberries. Spread evenly on top of bread cubes. Top with the remaining 1 cup of blueberries. Cover and refrigerate overnight.
5. PREHEAT the oven to 350°F. Remove the casserole from the refrigerator and let stand for 10 to 15 minutes. Meanwhile…
6. CUT the butter into the streusel mixture with a pastry blender or 2 knives, until the mixture resembles coarse crumbs. Sprinkle over the casserole. Bake for 30 minutes or until golden brown. Let stand 5 minutes before serving.
THE HISTORY OF STICKY BUNS
Sticky buns have a Germanic origin, where they originated as yeast pastries called schnecken†. The breakfast pastry was brought to Philadelphia in the 18th century by German immigrants, who became known as Pennsylvania Dutch (a mishearing by English speakers of “Deutsch,” German).
Schnecken were made from a rich yeast dough enriched with egg, sour cream, and butter. A pastry the size of a modern sticky bun or cinnamon roll (a normal one, not Cinnabon), they were filled with sugar, cinnamon, raisins, and ground pecans or walnuts or pecans.
Many Germans arrived in the U.S., bringing their schnecken with them. Schnecken became popular among bakers in Germantown, a Philadelphia suburb, as early as the 1680s. They (and their subsequent name, sticky buns) are considered a Philadelphia specialty.
There’s no record of exactly when English-speaking Philadelphians started calling them “sticky buns.” In some cities they were called honey buns, referencing the honey that created the stickiness.
The sticky top is the result of an upside-down baking technique. Before the dough is placed in the baking pan, the pan is lined with the sticky ingredients—brown sugar, honey or both—as well as nuts and raisins. After the buns are baked, the pan is inverted so that the caramelized “bottom” becomes the top of the pastry. This is the original German schnecken technique.
[7] Sticky bun, front left, with pecans; and cinnamon bun, front right, with white icing (photo © Wolfermans).
________________
*You can substitute twice as much lemon zest (2 tablespoons) for the lemon extract. You can also make your own lemon extract by soaking lemon zest in vodka for two weeks, and then straining out the zest.
†German schnecken are different from German-Jewish schnecken. The latter are rugelach (a cookie) rolled in a snail shape. Both yeast-pastry schnecken and Jewish cookie schnecken existed simultaneously in Germany. Immigrants to the U.S. from Eastern Europe (Poland, Russia and the Ukraine) called their version of schnecken—the same cookie dough, rolled in a different shape—rugelach.
Jewish schnecken/rugelach are made with a cream cheese cookie dough, not a yeasted dough (although cream cheese, invented in the U.S., was not known in Europe). These rolled cookies can be filled with any types of jam or with chocolate; simply with cinnamon and raisins.
CHECK OUT WHAT’S HAPPENING ON OUR HOME PAGE, THENIBBLE.COM.
|
|