THE NIBBLE BLOG: Products, Recipes & Trends In Specialty Foods


Also visit our main website, TheNibble.com.

TIP OF THE DAY: Eggs In A Nest & Dark Vs. Light Baking Pans

Baked Eggs In Nests
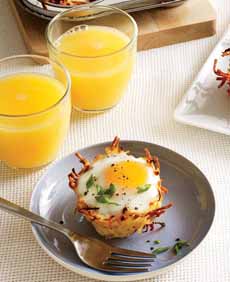
[1] Eggs in nests for breakfast (photo © Cooking Light).

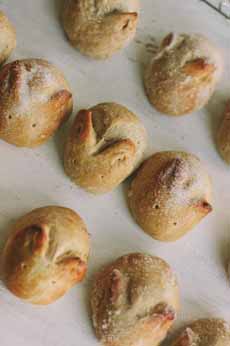
Easter Bunny Rabbit Rolls
[2] Bunny rabbit rolls. Too cute to eat? Nah! Here’s the recipe (photo © Artisan Bread In Five).


What’s on tap for Easter breakfast? How about eggs in crispy hash brown nests (photo #1).

If you want to make the adorable bunny rabbit rolls to serve with them, bake them first. You can make the dough the night before, and bring to room temperature before baking.

See the tip on when to use dark- versus light-colored baking pans, below.
 
 
EASTER EGG NESTS FOR BREAKFAST

We adapted this recipe from one in Cooking Light. Prep time is 10 minutes, cook time is 30 minutes.

You can also place a bacon or ham surprise on the bottom of the basket.

Ingredients Per Serving

  • 1/4 cup refrigerated shredded hash brown potatoes (such as Simply Potatoes*)
  • 2 tablespoons shredded carrot (substitute beet or zucchini)
  • Optional: 1 tablespoon diced onion
  • Optional: 2 tablespoons crumbled crisp bacon or diced ham
  • 1 large egg
  • Crunchy salt (kosher or coarse or flaky sea salt)
  • Garnish: 1/2 teaspoon chopped fresh chives and/or 1 teaspoon chopped fresh flat-leaf parsley
  •  
    Plus

  • Light-colored muffin pan
  •  
    Preparation

    1. PREHEAT the oven to 400°F. Combine the shredded potato, carrot and optional onion, and lightly season with salt and pepper. Mix thoroughly.

    2. MAKE the nests: Coat the muffin cups with cooking spray. Spoon 1/4 cup of the mixture into each muffin cup. Press it into the bottom and up the sides of the cup, to above the rim. Bake at 400°F for 30 minutes. Once baked…


    3. ADD the optional meat to the bottom of the nest. Crack 1 large egg into each nest. Bake at 400° for 8-10 minutes for runny eggs, or 12 to 15 minutes for set eggs.

    4. SPRINKLE the top with a dash of salt and garnish the egg and the plate with the chopped herbs.
     
     
    WHEN TO USE LIGHT VS. DARK COLOR BAKING PANS

    Depending on your age, all of your mother’s and grandmother’s baking pans were aluminum, a metal that absorbs and conducts heat evenly and is not reactive or corrosive.

    Then, test kitchens discovered that food browns better (e.g., the bottom of a baking sheet and the bottom and sides of a cake pan). This is because dark pans absorb more heat and thus, more heat radiates off the surface.

    For foods you want to brown (pizza, pie crusts, potato wedges, roasted vegetables), darker metal baking pans, sheets, and pie plates give you an edge.

    For recipes where you don’t want the extra browning on the bottom (breads, cakes, some cookies, muffins), use a light-colored pan, which absorbs less heat.

    That being said, we don’t know why Cooking Light specified a light muffin pan. There is no comments section on the page so we couldn’t ask; but we wouldn’t mind a browner potato nest (as opposed to a browner blueberry muffin).

    You don’t have to get rid of your pans. According to Cooking Light, if you bake in either dark metal pans or glass dishes, reduce the oven temperature by 25° and check for doneness early.
    Here’s an interesting article on the history of cookware and bakeware.

    ________________

    *1 package (19.7 ounces, 560 grams) yields 6 egg nests.


    Comments off

    TIP OF THE DAY: Creative Grilled Cheese & Tomato Soup Combos

    April 12th is National Grilled Cheese Sandwich Day. The Tip Of The Day is: Think outside the box.

    How can you make your grilled cheese sandwiches more complex, more creative, more…celebratory?

    Campbell’s did just that, creating four new approaches—if not exactly simple ones—to that American lunch favorite, grilled cheese and tomato soup.

    Kudos to Chef Eli Kirshtein’s recipe curation: We love the flavor combinations and fun factor.

    And we never would have thought of any of them!
     
     
    RECIPE #1: GRILLED CHEESE BENEDICT

    This riff on Eggs Benedict places the egg on top of a grilled cheese sandwich, and turns the hollandaise sauce into a tomato hollandaise with their iconic tomato soup.

    It makes this Grilled Cheese Benedict recipe we published in 2015 look so tame.

    Ingredients Per Sandwich

  • 2 slices honey wheat bread
  • 3 slices sharp cheddar (we’re fans of Cabot’s)
  • 2 eggs
  •  
    For The Hollandaise

  • 3 egg yolks, separated
  • 8 tablespoons (¼ pound) butter, melted
  • ¼ cup white wine, reduced by half
  • ¼ can Campbell’s Tomato Soup
  • Salt and pepper to taste
  • Garnish: fresh basil, shredded
  •  
    Preparation

    1. MAKE the hollandaise. Whisk the egg yolks and white wine over a double boiler until you have a ribbon consistency. Remove from heat and slowly whisk in the melted butter.

    2. WHISK in the tomato soup slowly. Taste and season.

    3. MAKE a traditional grilled cheese sandwich with the bread and cheese. Cut in half. (Here’s a basic recipe and tips).

    4. FRY two eggs sunnyside-up and place eggs on top of grilled cheese. Top with hollandaise and garnish with basil.
     
     
    RECIPE #2: GRILLED CHEESE BREAD BOWL WITH TOMATO SOUP

    Ingredients Per Serving

  • 1 individual sourdough bread bowl (here’s a recipe)
  • 2 ounces sharp cheddar cheese, shredded
  • 2 ounces soft mozzarella, shredded
  • 1 can Campbell’s Tomato Soup concentrate
  • 1 teaspoon fresh thyme, minced
  • 1 teaspoon fresh chives, chopped
  •  
    Preparation

       
    Grilled Cheese Benedict
    [1] Grilled Cheese Benedict with tomato soup instead of hollandaise (photos #1, #2 and #3 © Campbell’s).

    Grilled Cheese Benedict
    [2] Another view of Grilled Cheese Benedict.

    Grilled Cheese Soup Bowl
    [3] A sourdough bread bowl (recipe below)


    [4] America’s favorite tomato soup (photo © Larry Lamsa | CC BY 2.0 License).

     
    1. PREHEAT the oven to 350°F. Carefully pile all the cheese on top of the sourdough.

    2. PLACE the bread in the oven until all the cheese is melted and browned. Let the loaf cool to room temperature.

    3. SLICE off the top of the bread and reserve. Carefully scoop out the inside of the loaf, with care not to puncture the bottom.

    4. PLACE the soup concentrate in a pot and bring to a boil. Stir in the fresh thyme; then pour the soup into the bread bowl.

    5. GARNISH the top of the soup with chives. Place the reserved top back onto the bread and serve immediately.


    Grilled Cheese Pockets
    [5] Grilled cheese pockets with tomato sauce (photos #5 and #6 © Campbell’s).

    Michelada Grilled Cheese
    [6] The drinking man’s/woman’s lunch (photos courtesy Campbell’s).

       
    RECIPE #3: GRILLED CHEESE POCKETS WITH TOMATO SAUCE

    Ingredients Per Serving

  • 4 sheets store-bought puff pastry
  • 2 ounces cheese curds
  • 2 ounces sharp cheddar cheese
  • 3/4 cup (6 ounces) Campbell’s Tomato Soup concentrate
  • 2 eggs (for egg wash)
  •  
    Plus

  • Pastry brush
  •  
    Preparation

    1. PREHEAT the oven to 375°F.

    2. DEFROST the puff pastry and lay on flat surface. On two pieces, place the cheeses in the center, leaving a half inch border.

    3. MAKE the egg wash: whisk the eggs with a splash of cold water or milk until they are pale yellow and completely integrated. Lightly brush the egg wash around the edges of the pastry.

    4. PLACE the remaining sheets over the top, pressing the edges to create a seal. Trim neatly with a knife, and use a fork to impress a pattern (crimp) on the edges. Brush some additional egg wash on top of the pastry.

    5. BAKE for about 15 minutes, or until golden brown. Meanwhile…

    6. REDUCE the tomato soup concentrate slowly in a sauce pan, until thick and dark red. Serve the pastry hot, with the tomato sauce on the side.


    RECIPE #4: MICHELADA WITH QUESO FUNDIDO GRILLED CHEESE

    Pronounced mee-cha-LAH-dah, a michelada is a Mexican “beertail” (beer cocktail) made from beer, tomato juice, hot sauce and lime, served over ice in a salt-rimmed glass.

    This “adult” lunch gives you a michelada with a Mexican-style grilled cheese.

    If you’ve never had a michelada, here’s some more information.

    This recipe requires a panini press or a George Foreman-type grill.

    The recipe can make one tall drink or two in rocks glasses.
     
    Ingredients For The Michelada

    For The Rim

  • 1 lime, halve juiced, half sliced into wedges
  • Salt
  • Chili powder—or—Tajin seasoning
  •  
    For The Drink
    1 can Campbells Tomato Soup concentrate

  • Optional: 2 tablespoons clam juice
  • 1 tablespoon Worcestershire sauce
  • 1 teaspoon hot sauce, or to taste
  • 1 lime, juiced
  • 1 Mexican lager (e.g. Modelo), chilled
  • Ice
  •  
    Ingredients For The Grilled Cheese

  • 1 cup Mexican melting cheese (e.g. asadero, queso de papa, queso oaxaca,queso quesadilla)
  • 1 fresh jalapeño, sliced
  • 1 soft yeast roll
  •  
    Preparation

    1. CREATE the rim garnish by combining equal parts of salt and chili powder in a small dish. Or if you have Tajin seasoning, use it straight. Place the juice of half the lime in a shallow dish. Twist the rim of the glass in the juice, and then twist it in the dish of seasoning. You can use a Collins glass or a beer mug (or two rocks glasses). Set aside.

    2. COMBINE the drink ingredients except the beer; set aside in the fridge.

    3. MAKE the grilled cheese. Slice the roll open and toast the inside. Place the cold cheese inside the roll, press it into the bread somewhat so the layers adhere. Add slices of jalapeño to taste.

    4. BUTTER the outside of the roll lightly and, using a panini press or in a pan on the stove top, toast it until the cheese is melted. While the cheese is melting…

    4. COMBINE the beer and the michelada mix over ice and garnish the glass with a lime wedge.

    5. TO SERVE: You can serve the sandwich, halved, on the side, or quartered on a long toothpick or skewer over the michelada.
      

    Comments off

    RECIPE: Robin’s Egg Cheesecake

    For spring, we love a “robin’s egg” cake: a speckled exterior, garnished with some chocolate Easter eggs.

    Last year we made this Speckled Egg Malted Milk Egg Cake.

    This year, McCormick sent us a speckled cheesecake recipe, developed by Amanda Rettke of I Am Baker.

    For step-by-step photos and a video, visit Amanda’s recipe page.

    Two white cake layers sandwich a bright yellow lemon cheesecake layer.

    For even more springtime color splash, tint one of the white layers pink. Just add 3-5 drops of red food color to the white batter until you reach the desired shade.

    RECIPE: SPECKLED ROBIN’S EGG CHEESECAKE

    Ingredients

  • 1 white cake recipe (you can use a box mix)
  • 1 lemon cheesecake (recipe below)
  • Garnish: candy grass and speckled eggs
  •  
    For The Lemon Cheesecake

  • 2 packages (8 ounces each) cream cheese, softened
  • 1/2 cup granulated sugar
  • 1 tablespoon fresh lemon juice
  • 1 tablespoon McCormick Lemon Extract
  • 2 eggs
  •  
    For The Buttercream

  • 3 cups powdered sugar
  • 1/3 cup butter or margarine, softened
  • 1-1/2 teaspoons vanilla
  • 1 to 2 tablespoons milk
  • 1 teaspoon Sky Blue food color, McCormick’s Colors From Nature (photo #3)
  •  
    Cocoa Water For The Speckles

  • 1/4 cup water
  • 1 tablespoon cocoa
  • 1/4 teaspoon Sky Blue food color
  •  
    Plus

  • Whisk
  • Cake stand
  • Small offset spatula
  • Bench scraper
  • Paint brush
  •  
    Preparation

    1. BAKE the white cake layers per box instructions. Set aside. (We baked the cake layers the day before and wrapped them in plastic after cooling.) When they are cool, level the tops if necessary.

    2. PREPARE the cheesecake: Heat the oven to 350°F. Prepare a springform pan: Line with parchment and spray with non-stick spray.

    Allow it to cool for at least 3 hours before assembling the cake.


    Robin's Egg Cheesecake

    Robin's Egg Cake

    McCormick Colors From Nature

    Blue Eggs
    [1] and [2] A cake for Easter or other spring celebration (photos courtesy I Am Baker). [3] The blue color is created with McCormick Colors From Nature. [4] The real deal, robin’s eggs in their nest (photo courtesy Erica Lea | Flickr).

     
    3. COMBINE the cream cheese, sugar, lemon juice, and lemon extract in the bowl of a stand mixer, until well blended. Add the eggs; mix just until blended. Pour into the springform pan.

    4. BAKE for 40 minutes or the until center is almost set. Cool. Refrigerate 3 hours or until firm.

    5. PREPARE the buttercream. In medium bowl, mix the sugar and butter with a spoon or an electric mixer on low speed. Stir in the vanilla and 1 tablespoon of the milk. Gradually beat in just enough remaining milk to make the frosting smooth and spreadable. If too thick, beat in more milk, a few drops at a time. Add 1 teaspoon of the sky blue food coloring. You can add more or less to reach your desired color. Set aside.

    6. ASSEMBLE the cake. Place the first layer of white cake on a cake stand. Carefully place the lemon cheesecake directly on top. Set the final layer of white cake on top of cheesecake. You may need to trim and level the cheesecake before putting the cake together. (No frosting between layers is necessary.)

    7. COVER the cake in buttercream and smooth with a small offset spatula. Go back with a bench scraper to get extra-smooth sides and top.

    8. WHISK together the speckling liquid ingredients. Place the cake on a table lined with newspaper and wear a protective apron. Dip the brush into the cocoa water and then hold it in your left hand near the cake. With your pointer finger of your right hand, run your finger along the bristles of the paint brush. The first time you do this, try to be a little farther away from the cake, just so you are able to gauge how much pressure you can use, how much liquid you need on your brush, and how close you need to be.

    Spatter the speckles all over the top and sides of the cake. If you get a big spot or an area you don’t like, you can carefully dab a paper towel onto the area and remove most of the brown, while still blending in with the cake. When done, clean off the edge of the cake stand.

    9. GARNISH the top with candy grass to center and add small chocolate eggs. Chill until ready to serve.


    Comments off


    © Copyright 2005-2026 Lifestyle Direct, Inc. All rights reserved. All images are copyrighted to their respective owners.