THE NIBBLE BLOG: Products, Recipes & Trends In Specialty Foods


Also visit our main website, TheNibble.com.

FILM: The Hundred Foot Journey

THE HUNDRED-FOOT JOURNEY
Papa Kadam (Om Puri) brings his family and
their cuisine from Mumbai to a small
French town. Photo courtesy Dreamworks.


We didn’t know about the international best-seller, The Hundred-Foot Journey, a novel by Richard C. Morais. But after seeing the film version twice, we were so captivated that we ordered a copy.

The main story, of an immigrant Indian restaurant family taking on the finest Michelin restaurant in 50 miles of their town in the south of France, was chosen by Oprah Winfrey as a “favorite summer read” in 2010. Oprah brought the book to Steven Spielberg, and we are the beneficiaries of the film, The Hundred Foot Journey. If you love a warm story, beautiful cinematography, spot-on performances and direction and of course, great cuisine, you’ll cherish this charming film.

Let others write about the cultural divide and the ability to walk in somebody else’s shoes. We’re here for the food, which is glorious. From the just-harvested produce and fresh proteins in the town market, to the activity in the kitchens of two very different restaurants, this film is a feast for food lovers.

The actual distance from the [fictitious] elegant Michelin one-star Le Saule Pleureur* to the boisterous newcomer, Maison Mumbai, is brief: one hundred feet, says the title. It refers to both the actual distance and the cultural divide and battlefield.
 
*The Weeping Willow.

 
But the distance seems shorter. Just walk out the front door of the elegant maison de maître that is Le Saule Pleureur, cross the country road and enter the more modest premises of the upstart neighbor. It’s Pigeon aux Truffes versus Goat Curry.

There are several journeys: the Kadam family’s, from Mumbai to France; young Hassam’s, from his modest family restaurant to the pursuit of three stars at a top Paris restaurant; the pursuit of the craft of great cuisine; and two love stories. The haughty restaurateur, Madame Mallory, feisty Papa Kadam, and even the beautiful sous-chef in Madame’s kitchen, Marguerite, discover new paths.


The story takes place in the real town of Saint-Antonin-Noble-Val, in the Tarn-et-Garonne department in the Midi-Pyrénées region in the south of France.

The words “charming,” “picturesque” and “quaint” are not clichés here: You will want to go online and book your next vacation. Many of the actual vendors who work in the local market appeared as extras in the film, along with their produce, cheeses, flowers and wines.

However, as happens in motion pictures, some locations are not what they may seem.

The center of town is Saint-Antonin-Noble-Val, but the breathtaking outskirts where the two restaurants face off amid green fields, is actually a composite, a miracle of digital art that placed a farmhouse some 10 km away across the street from the 19th century pink mansion that stands in for Le Saule Pleureur.

  THE HUNDRED-FOOT JOURNEY
Across the street: one-star French cuisine at the elegant Le Saule Pleurer: Papa, Hassan and Madame Mallory (Om Puri, Manish Dayal and Helen Mirren). Photo courtesy Dreamworks.
 

This film has received only average reviews from many reviewers. We don’t agree with their comments, and can only imagine that these individuals aren’t interested in chefs, great cuisine or stories built around them.

To lovers of great cuisine, who thrill to the flavors and aromas of fine kitchens, it’s a sensory delight—a very joyous journey indeed. Not to mention, a fine story that seems very real.

Directed by Lasse Hallström, the film stars Helen Mirren, Om Puri, Manish Dayal and Charlotte LeBon. But the gifts of all cast members and the production team, tfrom cinematographer Linus Sandgren and production designer David Gropman to the food stylists and the location scouts, deserve three stars.


Comments off

S’mores Pie, Ice Cream Cake & More For National S’mores Day

no-bake-smores-pie-browneyedbaker-230
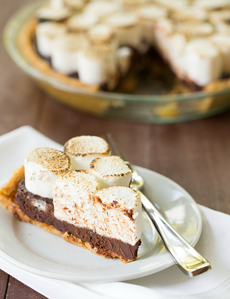
[1] A no-bake s’mores pie (photo © Brown Eyed Baker).


[2] For a change, substitute pound cake for the graham cracker s’mores crust (photo © American Egg Board).


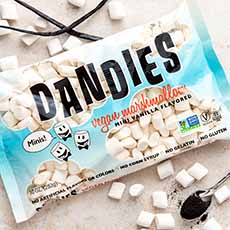
[3] These mini-marshmallows are vegan and absolutely delicious (photo © Dandies).


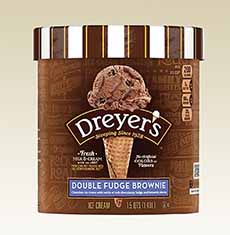
[4] The recipe calls for chocolate ice cream, but you don’t have to use plain chocolate. How about chocolate chip, or double fudge brownie (photos #4 and #5 © Dreyer’s).


[5] Even more out there: rocky road ice cream in a s’mores ice cream cake or pie.

smores-cupcake-ps-230
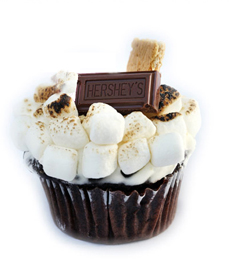
It’s easy to assemble s’mores cupcakes (photo © Crumbs Bake Shop [now closed]).


You don’t need a campfire to celebrate National S’mores Day, August 10th. Here are recipes that are just as much fun.

First, a no-bake S’mores Pie, the creation of Brown Eyed Baker, Lauryn Cohen. Here’s her recipe, shown in the photo.

The marshmallows are browned with a chef’s torch (most popularly used to make crème brûlée).

Prefer cake to pie? Here’s a S’mores Ice Cream Cake recipe from the Wisconsin Milk Marketing Board. Recipes for S’mores Cupcakes and S’mores Ice Cream follow below.
 
 
RECIPE #1: S’MORES ICE CREAM CAKE

Ingredients For 10 Servings

  • 1-3/4 cups graham cracker crumbs,* divided
  • 1 loaf pound cake or chocolate pound cake
  • 1 rectangular container (1-1/2 quarts) chocolate ice cream
  • 10 ounces mini marshmallows
  • Optional garnish: chocolate sauce
  •  
    _________________

    *You can substitute a prepared graham cracker crust for the crumbs, sugar and butter. You will still need some graham cracker crumbs for garnish.
    _________________
     
    Preparation

    If you have a chef’s torch, use it instead of the broiler in Step 3.

    1. LINE a broiler-safe 8×8-inch glass or metal baking dish with foil, overlapping the edges of the dish with the foil (to help lift out the cake). Cut the pound cake into 1-inch slices (or as thick as desired) and tightly pack them into a layer.

    2. SOFTEN the ice cream at room temperature for 5 minutes; remove the carton from the ice cream and cut the ice cream in half. Place both halves on top of the cake layer, trimming as necessary. Use a spatula to press and spread the ice cream evenly. Add a layer of graham cracker crumbs. Cover and freeze solid, for 30 minutes or more.

    3. PREHEAT the broiler with the rack in the lower part of the oven. Remove the ice cream cake from the freezer; top with marshmallows (tightly placed together), spreading to edges of the pan, pressing down to seal. Place cake under the broiler, 8 to 10 inches from the heating element. Broil until marshmallows are puffed and golden, 2 to 3 minutes, watching constantly.

    4. REMOVE from the oven, sprinkle with remaining 1/4 cup graham cracker crumbs, and drizzle with optional chocolate sauce. Cut and serve immediately.
     
     
    RECIPE #2: S’MORES CUPCAKES

    Ingredients

  • Chocolate cupcakes
  • Marshmallow creme
  • Graham crackers
  • Chocolate bar
  • Optional: mini marshmallows
  •  
    Preparation

    1. BAKE or buy chocolate cupcakes. Frost with marshmallow creme. Add optional mini marshmallows and brown with a chef’s torch.

    2. DECORATE with pieces of chocolate bar and graham cracker.
     
    Ice Cream Cupcakes Variation

    Instead of marshmallow creme, substitute vanilla or marshmallow ice cream. Garnish with mini marshmallows, chocolate and graham crackers.
     
     
    RECIPE #3: S’MORES ICE CREAM

    Some brands offer s’mores ice cream, but you can make your own. You get to add your preferred form of marshmallow into this recipe: either a marshmallow creme swirl or mixed-in mini marshmallows.

    Ingredients

  • Vanilla ice cream
  • Chocolate chips or chunks
  • Graham crackers, crumbled
  • Mini marshmallows or marshmallow cream
  • Optional: pound cake, waffle cones
  •  
    Preparation

    1. SOFTEN the ice cream on the counter. If using mini marshmallows, cut them in half.

    2. SWIRL the marshmallow cream through the ice cream; alternatively, mix mini marshmallows into the ice cream.

    3. MIX in the chocolate chips and graham crackers. Return the ice cream to the freezer.

    4. SERVE in bowls, or with a slice of chocolate pound cake, or in a waffle cone.


    CHECK OUT WHAT’S HAPPENING ON OUR HOME PAGE, THENIBBLE.COM.


    Comments off

    TIP OF THE DAY: Tataki, Plus Salmon Tataki Salad

    tuna-tataki-seared-haru-230
    Tataki means briefly seared. Photo of tuna
    tataki courtesy Haru | NYC.
      Tataki, also called tosa-mi, is a Japanese style of preparing fish or meat. The protein is seared very briefly over a hot flame or in a pan, briefly marinated in rice vinegar, sliced thinly and served chilled or at room temperature.

    The traditional presentation includes garnishes of thinly sliced scallions and finely shredded ginger, with soy sauce for dipping.

    The word “tataki,” meaning “pounded,” actually refers to the ginger condiment: It was originally pounded with a mortar and pestle. While some still prepare it that way, modern cooks can choose to purée it in a food processor or grate it with a zester or other fine grater.

    The port of Nagasaki was the first point of entry for foreigners in feudal Japan. Legend says that tataki was developed by Sakamoto Ryoma, a 19th-century samurai, who picked up the European technique of grilling meat from the foreigners in that city.

    In feudal times, bonito (skipjack tuna) was the preferred fish for tataki. Although bonito is still frequently used in Japan, in modern times, ahi tuna and salmon have taken over in popularity. [Source: WiseGeek] Beef, typically filet mignon or sirloin strip, is also be prepared tataki-style.


    RECIPE: FISH OR BEEF TATAKI

    1. CUT the fish or beef into thick pieces. Marinate in rice vinegar or mirin (a low-alcohol rice wine).

    2. SEAR each side for five seconds over an open flame or pan-sear on a stovetop burner. The grill or pan should be very hot, and the meat or fish should be quickly seared on all sides to cook only the outer surface, leaving the flesh raw.

    3. COOL the protein in a bowl of ice water; remove, pat dry and thinly slice for serving.
     

    Dipping Sauce

    1. COMBINE equal amounts of soy sauce and rice vinegar, or to taste. Add finely sliced or minced green onion (scallion).

    2. SEASON as desired with grated ginger (you can substitute wasabi).
     
    RECIPE: SALMON TATAKI SALAD

    You don’t have to go to Nobu in Los Angeles to enjoy this delicious salmon tataki salad. Here’s the recipe, courtesy of Nobu Magazine.

    “The Salmon Tataki with Paper Thin Salad is a work of art,” says Nobu. “Incorporating skillfully sliced vegetables and seared salmon, this dish is light and flavorful. With a little help from a mandolin slicer and fresh ingredients, you can impress dinner guests with a beautiful and delicious meal.”


    As with sushi or beef tartare, the fish or meat needs to be extremely fresh. Asian specialty stores sell frozen tataki fish slices. Vacuum packed and frozen immediately for freshness, they can be a lot more affordable than fresh tuna and salmon.

    Ingredients For 1 Or 2 Servings

  • 7 ounces boneless, skinless fresh salmon fillets
  • Freshly ground black pepper
  • Jalapeño dressing (recipe below)
  • 2 baby beets
  • 2 baby carrots
  • 2 baby green zucchini
  • 2 baby turnips
  • 4 red radishes (watermelon radishes are ideal)
  • Bowls of ice water
  •   salmon-tataki-nobu-3
    This salmon tataki salad is easy to make. Photo courtesy Nobu Magazine.
     

    Preparation

    1. HEAT a nonstick skillet until medium-hot. Season the salmon fillets with black pepper, then sear them for 5 seconds on each side. Make sure the outside is completely seared and turns white. Immediately plunge the seared slices into ice water to stop the cooking process. Drain and pat dry with paper towels, then cover and refrigerate.

    2. PREPARE the salad: Keep the beets to one side. Slice the baby vegetable lengthwise very thinly (about 1/32 inch thick) on a mandolin grater, into a bowl of ice water. Leave them in the ice water for 1 hour; this will cause them to tighten up and become crunchy.

    3. REPEAT the same process with the beets, but place the slices in a separate bowl of water, to stop the color from running into other vegetables. Rinse until the water becomes clear; then add some ice to chill. You might want to wear disposable gloves for this, to prevent staining your hands.

    4. DRAIN the baby vegetables and the beets separately, then mix them together.

    5. POUR some of the dressing on the bottom of a serving dish, so it completely covers the bottom. Cut the chilled seared salmon into slices about 1/4 inch thick and arrange across the middle of the plate, then place the vegetable salad in the middle on top of the salmon.

     
    RECIPE: JALAPEÑO DRESSING

    Ingredients

  • 2 teaspoons chopped jalapeño, seeded (you can substitute cilantro)
  • 1 teaspoon sea salt
  • 1 teaspoon chopped garlic
  • 6-1/2 teaspoons rice vinegar
  • 1/2 cup grapeseed oil
  •  
    Preparation

    1. PROCESS the jalapeño, salt, garlic, and vinegar in a food processor until well mixed and the jalapeño is finely chopped. Slowly add the grapeseed oil and process until well blended.
      

    Comments off

    FOOD 101: Cooking History

    early-man-cooking-sirgy.com-230
    Be grateful for your stove and microwave! Photo courtesy Sirgy.com.
     

    Do you like sashimi and steak tartare?

    Man has been wandering Earth for some 200,000 years, but the general use of fire began only about 40,000 to 50,000 years ago. Until then, man ate his food raw.*

    Neanderthals discovered how to deliberately create fire. This led to warmth—the priority in the Ice Age—and to the secondary benefit of cooking meats. Most likely, a piece of mammoth, venison or another flesh that would have been eaten raw, fell in the campfire. It had to be left there until the flames died down, no doubt filling the air with the alluring aroma of roasting meat.

    Heat breaks down tough fiber and releases flavor in the process. As a natural next step, meat and tough roots were slower cooked in the embers or on a flat stone by the side of the fire.

     
    Boiling took more time to evolve, using large mollusk or turtle shells until man created vessels of earthenware or bark that could be placed over the fire. Steaming inside animal stomachs and leaves preceded the more sophisticated development of crockery. The first oven could have been as simple as a hole in the ground.
     
    Here’s what your most ancient of forefathers did:

  • They dug a large pit in the ground and lined it with flat, overlapping stones to prevent seepage. Large quantities of water were poured in, presumably transported in skin bags. Other stones were heated in the campfire and add to the water to bring it to a simmer.
  • The food was then added and, while it was cooking, more hot stones to keep the water at the desired temperature. This technique is still used in some isolated parts of the world.†
  •  
    It was only much later that boiling or stewing was done in small pots placed near the fire, or in cauldrons suspended over a fire. [Source: Food in the Ancient World, Joan P. Alcock [Greenwood Press:Westport CT] 2006 (p. 105-106)]

    The use of fire vastly extended man’s diet, enabling tough foods to be palatable. Cereals—barley, millet, rice, rye, and wheat, as well as potatoes, require cooking before they can be consumed by humans. The use of fire doubtless encouraged the domestication of these foods and the end of lives as hunter-gatherers, as man settled into farming communities.

    Thanks to FoodTimeline.org for inspiring this article.

     
    *Source: Cambridge World History of Food, Kenneth F. Kiple and Kriemhild Conee Ornelas [Cambridge University Press:Cambridge] 2000 (p. 1571)
    †Source: Food in History, Reay Tannahill [Three Rivers Press:New York] 1988 (p. 14-16)


    Comments off

    FOOD HOLIDAY: National Rice Pudding Day

    Here’s a fun take for National Rice Pudding Day: rice pudding tartlets. These are made in rustic style by Frog Hollow Farm.

    You don’t need tartlet pans that turn out fluted, rigid tart shells. Instead, just roll the dough and fold the edges over the filling—the style known as galette. Rice pudding replaces the traditional fruit filling.

    Just make your favorite rice pudding recipe and this galette dough:

    RECIPE: GALETTE DOUGH

    You can make this dough up to 2 days in advance. Wrapped in plastic, then in foil, it can be frozen for up to a month.

    Ingredients

  • 2 sticks cold unsalted butter, cut into small pieces
  • 2-1/2 cups all-purpose flour
  • 1/2 teaspoon coarse salt
  • 1 teaspoon sugar
  • 1/2 cup ice water
  •   rice-pudding-tartlet-froghollow-230
    Rice pudding tartlets. Photo courtesy Frog Hollow Farm.
     

    Preparation

    1. PLACE 3/4 of the butter on a parchment-lined baking sheet and freeze until hard, 30 minutes or longer. Refrigerate the remaining butter.

    2. COMBINE flour, salt, and sugar in a food processor. Add the refrigerated butter and pulse 10 times to combine. Add the frozen butter and pulse until mixture resembles coarse meal. There should be some small, pea-size clumps.

    3. ADD the ice water and pulse 10 more times until just incorporated. Squeeze a small amount of dough between your fingers to make sure it holds together. If not, pulse a few more times, as necessary.

    4. EMPTY the dough onto a piece of plastic wrap. Gather the dough, bringing the edges together and pressing it into a mass. Form the dough into a ball and wrap it in plastic.

    5. ROLL out the dough, still wrapped in plastic, into 1/2-inch-thick disks, four inches in diameter (for individual tartlets). Refrigerate for least 45 minutes.

    6. Place filling in the center of the circles. Pleat the dough around the filling and bake until the crust is lightly golden, for about 15 minutes in 375°F oven.
     
    RICE PUDDING RECIPES

  • Adult Rice Pudding Recipe
  • Layered Rice Pudding Bars Recipe
  • Leftover Rice Rice Pudding Recipe
  •   

    Comments off

    The Nibble Webzine Of Food Adventures
    RSS
    Follow by Email


    © Copyright 2005-2026 Lifestyle Direct, Inc. All rights reserved. All images are copyrighted to their respective owners.