|

[1] Classic tuna poke. You can buy it ready-to-serve from Pete’s Seafood Club.

[2] At better restaurants, you may have a large choice of vegetables and seasonings to mix with your poke (photo © Dons Bogam | NYC) .

[3] This salmon poke bowl is packed with shredded crab leg, tobiko roe, avocado, black, red and green seaweeds, and spinach leaves (photo © Kabuki Restaurant).

[4] Tofu poke. The recipe is to the right (photo © Hannah Kaminsky | Bittersweet Blog).

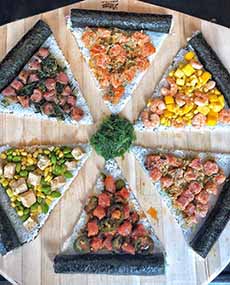
[5] A poke “take” on musubi, Japanese rice balls (photo © Hoku’s At The Kahala | Kahala Hotel & Resort).

[6] Poke on a pizza (photo © Pizza Corner Hawaii).
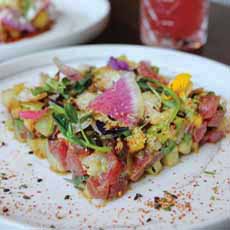
[7] Poke tartare, chopped into tiny pieces. Unlike tuna tartare, poke retains all of the marinade and other seasonings (photo © Allison Tong | Flavor & The Menu).
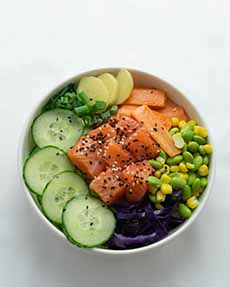
[8] A colorful salmon poke bowl with cucumber, carrots, chives, corn, edamame, red cabbage, and summer squash, sprinkled with sesame seeds (photo © Miu Sua | Unsplash).
[9] Poke pizza from the Makai Poke Co. in Hoboken, NJ, alas, now closed.

[10] Chicken poke bowl. Here’s the recipe (photo Abacus A.I.)
|
|
Our colleague Hannah Kaminsky is on a food safari in Hawaii, the land of abundant produce and poke. A vegan, she discovered a tofu poke bowl and was inspired to create her own (the recipe is below, and you can certainly substitute tuna).
Poke is first and foremost a raw fish and vegetable dish served as an appetizer or salad course in Hawaiian cuisine. A relative of ceviche, crudo, tartare, and tataki, it’s a combination of raw fish and vegetables that becomes a salad appetizer.
Actually pronounced poe-KEH, it is mispronounced poe-KEY by enough people that the latter pronunciation is becoming an accepted alternative.
Poke is Hawaiian for “to section” or “to slice or cut.” Another meaning is “chunk.”
The most popular recipe, ahi poke, is made with yellowfin tuna cubes marinated in sea salt, soy sauce, roasted crushed candlenut (inamona), sesame oil, limu seaweed, and chopped chili pepper. Alternatively, it is served sashimi-style with wasabi and soy sauce.
Other types of tuna can be substituted for the ahi, or you can use a different seafood entirely: Raw salmon and octopus are popular. Vegetarians can substitute tofu—as in the recipe below.
Other accompanying condiments include furikake seasoning*, garlic, hot sauce (such as sambal olek), ogonori (ogo) or other seaweed, sesame seeds and tobiko (flying fish roe).
September 28th celebrates the traditional Hawaiian dish of raw, marinated fish. There’s a second holiday, National Fresh Poke Day, celebrated on August 15th**.
> The history of poke is below.
> Chicken poke bowl recipe with grilled chicken.
> The history of sushi.
> The different types of sushi and sashimi: a photo glossary.
> The year’s 6 sushi holidays.
> The year’s 56 fish and seafood holidays.
RECIPE: TOFU POKE
How about a variation for vegetarians? This recipe was “ever so slightly adapted from Aloha Tofu,” by Hannah. “Like some of the best dishes,” says Hannah, “this one couldn’t be simpler to prepare.”
“The basis is a classic dish made by the tofu masters themselves. Their rendition adheres very closely to the traditional fish-based formula, substituting fried tofu cubes for the raw fish—a move that should appease those who can appreciate tofu well enough, but not so much that they care to eat it raw.
“The finished dish is sold in their brand new eatery, but since I didn’t have a chance to scope out that scene as well, I’m grateful that the full recipe is published on their website as well. No strings attached, no gimmicks or marketing ploys; just the desire to share their tofu and new ways to enjoy it. Now that’s the Aloha Spirit in action.”
Ingredients For 4-6 Side Or Appetizer Servings
1 package (12 ounces) deep fried tofu, cut into bite-sized cubes (substitute raw sushi-grade tuna)
1 tomato, diced
1/4 cup coarsely chopped ogo limu seaweed (substitute hijijki)
1-2 green onions, chopped
1/4 cup low sodium soy sauce
1 tablespoon toasted sesame oil
2 teaspoons toasted sesame seeds
1 teaspoon finely minced fresh ginger
Pinch crushed red repper flakes, to taste
Preparation
1. TOSS the tofu, all of the chopped vegetables, and seasonings together in a large bowl. Thoroughly combine all of the ingredients and coat them with the marinade.
2. COVER and chill for at least 30 minutes before serving, or up to a day. Serve cold.
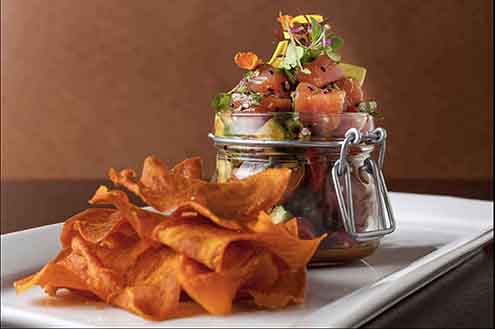
[9] Serve poke with sweet potato chips or mixed vegetable chips. In a pinch, pita chip or tortilla chips will work (photo © Blue Water Grill).
POKE HISTORY
Poke’s origins lie long before Western contact—which was the arrival of Captain James Cook to the Hawaiian Islands in 1778. How many centuries prior to then, we don’t know; but the dish may be ancient.
Initially, it was made with raw reef fish, seasoned with sea salt and seaweed, and combined with inamona—crushed kukui nuts (candelnuts). Salting also helped to preserve the fish for a subsequent meal.
Poke (rhymes with okay) literally means “to cut crosswise into pieces.” It has long been a simple dish made of chopped seafood†, often tuna, today marinated in soy sauce and sesame oil, which arrived with Japan immigrants in the latter half‡‡ of the 19th century. Onion and tomatoes, now also common ingredients, were some of the mainland vegetables introduced during the 19th century.
Today there are many variations of poke, including different fish and shellfish. Don’t be surprised to find octopus and mussel poke.
Beyond the original simple recipe of marinated fish with onion (photo #1), poke can now include avocado, cilantro, cucumber, crispy onions, mushrooms, pineapple, plain or pickled jalapeño, ponzu sauce, teriyaki sauce…and a much longer list.
Each group immigrating to Hawaii has added ingredients to poke, creating bacalao poke (made with Portuguese dried salt cod), furikake salmon, kimchi shrimp, miso tako (octopus), pipikaula (dried beef), and spicy ahi poke [source].
Everyday fusion spicing with wasabi and/or kimchee is common—as is poke mixed with mayonnaise.
Most historians agree that it wasn’t until the 1960s and 1970s, that the name “poke” was given to the dish. The name means “chunk” in Hawaiian. In the past poke was typically any meat or seafood that is cut into small chunks and marinated [source].
The naming poke coincided with ahi tuna becoming more readily available [source]—but we haven’t been able to connect the dots and explain why the coincidence.
The bright pink hue of ahi was far more aesthetically pleasing than dull, grey reef fish and it tasted better (although pricier).
In 1991, Chef Sam Choy, a promoter of the Hawaiian regional cuisine movement of the early 1990s, launched the first annual poke contest, which showcased inventive poke recipes from across the state.
When it arrived on the mainland (the Continental U.S.), poke took a path beyond the traditional marinated fish. Poke bowls emerged with added almonds, bamboo shoots, cauliflower, chicken, corn, kale, mango, orange slices, quinoa, zucchini noodles, and more.
It is now often served atop a bowl of rice, like chirashi sushi.
While those bowls would be unrecognizable in Hawaii, the state has created ahi poke musubi (rice balls—photo #6); poke inari sushi and sushi sliders (filled with poke); poke burritos, nachos, tacos and tostadas.
And yes, there is poke pizza (photo #7).
Today poke can be cooked or raw, cubed or scraped: It doesn’t even have to be fish or seafood, as illustrated by the Tofu Poke recipe above (photo #4).
The good news is that, in whatever form, poke has arrived.
________________
*Furikake is a dry Japanese seasoning meant to be sprinkled on top of rice. It typically consists of a mixture of dried and ground fish, sesame seeds, chopped seaweed, sugar, salt, and MSG. There are different blends, including Ebi Fumi Furikake, Katsuo Fumi Furikake, Nori Fumi Furikake, Noritamago Furikake, Salmon Furikake, Seto Fumi Furikake, Shiso Fumi Furikake and Wasabi Fumi Furikake. You can find them at Asian food stores or online.
**Why is there a Fresh Poke Day? Isn’t poke always fresh? Well…poke can be purchased frozen and thawed, as can sushi, and often it is pre-made in grab-and-go sushi in certain markets. Also, the fish can be pre-sliced, waiting to be mixed. So this holiday emphasizes the freshness front and center: You order it and it is sliced and mixed for you. “Fresh” signals an elevated experience, with fish that’s just been cut, and is vibrant and bursting with flavor (exactly how poke was meant to be!).
†In less civilized times, some Hawaiians would suck the flesh off the bones and spit out the skin and bones.
‡1778: Captain James Cook landed at Waimea Bay on the island of Kauai, becoming the first European to make contact with the Hawaiian Islands. Cook names the archipelago the “Sandwich Islands” after the Earl of Sandwich. A year later, Cook was killed by an angry mob at Kealakekua Bay on the island of Hawaii.
‡‡The first Japanese immigrants arrived in Hawaii in 1868 [source].
|